Introduction
These documentation pages contain everything you need to know to get up and running with our product, 21 Travel Rule. It covers some background concepts about the Travel Rule, and explains how you can use 21 Travel Rule to achieve your compliance objectives.
Below, we outline some important attributes of our product.
21 Travel Rule is on-premise software
21 Travel Rule is licensed software that runs on-premise within your own IT environment. At no time is any individual or aggregated information exposed or shared with 21 Analytics.
21 Travel Rule can be used through a Back Office GUI
We offer our Compliance Dashboard to handle Travel Rule messages with counterparty VASPs. Managing address ownership proofs for self-hosted wallets can also be done there.
The Compliance Dashboard is most suited for parties that have a limited number of transactions per day or parties who have integrated with our API and want a dashboard-like functionality.
21 Travel Rule can be used through a Front Office GUI
We offer our Quickproof web application to automate interactions with your customers to obtain address ownership proofs in a scalable fashion.
21 Travel Rule can be integrated through APIs
The GUI functionality is powered by a GraphQL API that is also available for integration into your IT systems. This allows for a high level of automation for VASPs with a larger scale of transactions and proofs.
21 Travel Rule can be deployed in an hour
Our reference deployment is based on Docker and can be inspected here. In our experience, customers that have the necessary infrastructure in place can get the system up within an hour. We also have documentation on how to deploy in a OpenShift/Kubernetes environment.
Questions
Please direct questions to info@21analytics.ch.
Security
In this section we give an overview of our security processes, designs and mitigations.
Security-first Development Policies
Development Collaboration Platform
Gitlab is our development collaboration platform where all our development policies are enforced, continuous integration checks are run and dependency management tools are integrated.
Access rights to developers are granted conservatively, i.e. developers cannot change policies but need to request those changes from upper management.
Rust
We use Rust as our backend development language. Rust is a memory-safe language that compiles to machine code and thus doesn't compromise on performance while eliminating the primary source for security-related bugs [1][2][3].
Rust has seen growing adoption in both critical open source software [4] [5] [6] [7] and at Fortune 500 companies [8] [9] [10] [11].
Rust's safety guarantees are softened when using so-called unsafe blocks. Our
policy is to forbid unsafe code blocks which is enforced through a dedicated
compiler setting.
Code Review
We have strict code review policies in place that demand that every change to the source code needs to be reviewed and approved by another developer. Only then it can be merged into master. Among other aspects the reviewer is asked to focus on security. As a side-effect of our code review practices, know-how is spread across the team that shares the responsibility for the source code. This eliminates malware injection or sabotage from malicious insiders.
The code review policy is enforced by Gitlab.
Continuous Integration
Our continuous integration pipeline runs tests, linter checks and builds. Only if all tasks run successfully a change can be merged into master.
This continuous integration check policy is enforced by Gitlab.
Employing a security-in-depth approach, we use the cargo-audit
[12] vulnerability scanner to automatically scan our entire
dependency tree for versions with reported security vulnerabilities. This is
also run by the continuous integration system and hence, will block offending
changes from being merged into master. If issues arise on the master branch then
all merge requests will we blocked until the issue has been fixed on master.
This continuous integration check policy is enforced by Gitlab.
Dependency Management
We use tools that monitor our dependencies (libraries, docker images, etc.) and open merge requests once newer versions of dependencies become available. After they pass our continuous integration they are reviewed and can be confidently merged into master without introducing regressions or breaking the build. Updates that fail continuous integration are handled manually to ensure a quick update.
Having an efficient and effortless dependency management process enables us to constantly ship up-to-date software to our customers.
Security by Design
On-premise/Self-hosted solution
Our products are on-premise/self-hosted solutions, i.e. the software runs in the customer's data centre or cloud provider of the customer's choice.
21 Analytics has no means to access your deployment. In particular, 21 Analytics cannot access PII data, logging data or configuration data. In case of support requests the customer needs to grant access to 21 Analytics (e.g. via screen sharing during a video call) or share logging information (e.g. via upload to our help desk) such that we can provide them with advice.
Secure Architecture
Separation of Concerns
We have designed a micro service architecture where we apply the separation of concerns [13] principle. APIs accessible from the public internet are exposed in different micro services than APIs that interface with the custodial system.
In our reference deployment [14] those logical separations are enforced with a configuration that also splits them on a network level.
Principle of least privilege
Our services are stateless and use a database for persistence. We use database roles and permissions in accordance to the principle of least privilege [15] to refuse one microservice from accessing another's data.
Mitigation
We are aware that even when a memory-safe language like Rust is used disaster can strike nonetheless. Our services are containerised to isolate them from the host system. Furthermore, we statically compile our binaries which allows us to run them in empty containers. This significantly limits the attack surface in case of a successful memory-corruption exploit. For example, an attacker could not even gain access to libc or any binary useful for escalating the exploit chain like e.g. a shell.
Vendored Software
Our products don't comprise of vendored software components.
Open-source Software with Track Record
We use some off-the-shelf open-source software components with a high track record and are well-established in enterprise computing. The complete list of those components is as follows:
Resources
[1]
https://www.chromium.org/Home/chromium-security/memory-safety/
[2]
https://www.zdnet.com/article/microsoft-70-percent-of-all-security-bugs-are-memory-safety-issues/
[3]
https://security.googleblog.com/2021/02/mitigating-memory-safety-issues-in-open.html
[4]
https://daniel.haxx.se/blog/2021/02/09/curl-supports-rustls/
[5]
https://security.googleblog.com/2021/04/rust-in-linux-kernel.html
[6]
https://security.googleblog.com/2021/04/rust-in-android-platform.html
[7]
https://www.abetterinternet.org/post/preparing-rustls-for-wider-adoption/
[8]
https://learn.microsoft.com/en-us/windows/dev-environment/rust/rust-for-windows
[9]
https://engineering.fb.com/2021/04/29/developer-tools/rust/
[10]
https://aws.amazon.com/blogs/opensource/why-aws-loves-rust-and-how-wed-like-to-help/
[11]
https://aws.amazon.com/blogs/opensource/sustainability-with-rust/
[12] https://rustsec.org/
[13]
https://en.wikipedia.org/wiki/Separation_of_concerns
[14]
https://docs.21analytics.ch/deployment/deployment.html
[15]
https://en.wikipedia.org/wiki/Principle_of_least_privilege
Software Architecture
The 21 Travel Rule software solution consists of containerised microservices. The container images are available as a “FROM scratch”-image (referred to as the “micro image”). With the micro image, the executables run in an empty container, which includes nothing but the absolute minimum for the program to work and, with that, isolates the execution environment of a process. Even if an attacker successfully hacks our software, they find themselves in an empty container with no further exploitable software.
Container Images
21travel (Backend Services)
This image contains the microservices for trpd, aopd, and autod.
21-travel-web-ui (Back Office GUI)
This image serves the optional internal Compliance Dashboard web application.
virtualcounter (Front Office GUI)
This image serves the optional Virtual Counter web application which automates interactions with your customers. For more information see 21analytics.ch/virtual-counter.
quickproof (Front Office GUI)
This image serves the optional Quickproof web application which automates interactions with your customers without the need for authentication by relying on unique URLs instead.
sunrise (Front Office GUI)
This image serves the optional Sunrise web application which automates interactions with counterparty VASPs. For more information see 21analytics.ch/sunrise/.
Microservices and Network Overview

Microservices
trpd (TRP)
trpd is the processing engine for exchanging travel rule data through Travel Rule Protocol (TRP). It handles communication with all counterparty VASPs using TRP. It's possible to run multiple instances of trpd for HA, failover and zero-downtime updates.
aopd (AOPP)
aopd is the processing engine for registering ownership proofs through Address Ownership Proof Protocol (AOPP; Digital Signatures), Visual Proofs and Satoshi Tests. It handles communication with non-custodial (self-hosted) wallets. It's possible to run multiple instances of aopd for HA, failover and zero-downtime updates.
autod (Internal API)
autod is the internal API that provides unified access to all databases and services of 21 Travel Rule. Its GraphQL API is used by the Web User Interface and custom integrated services from the VASP.
Databases
The SQL databases are handled by PostgreSQL, a free and open-source (OSI-approved license) relational database management system. PostgreSQL can be run as a container, standalone application, or is also available as a fully managed service from various cloud providers.
TRP
The TRP database contains all data related to transfers through the Travel Rule Protocol, as well as additional data for those transfers sourced from Blockchain Analytics, Screening and Exchange Rate services.
The Email database contains all data related to transfers sent out via email, as well as additional data for those transfers sourced from Blockchain Analytics, Screening and Exchange Rate services.
AOPP
The AOPP database contains all data related to transfers with self-hosted wallets, as well as additional data for those transfers sourced from Blockchain Analytics and Exchange Rate services.
Offline
The Offline database contains all data related to incoming-transfers registered manually by receiving VASP through the Compliance Dashboard or the API.
Compliance Dashboard
The Compliance Dashboard is served from a container of the 21-travel-web-ui image. It runs a HTTP file server. The Compliance Dashboard is only accessible to users (typically compliance officers) from within the VASP and should never be exposed to the outside world. It only accesses autod, the internal API.
It's possible to run multiple instances of the Compliance Dashboard.
SeaweedFS
SeaweedFS is an open-source fast distributed storage system for blobs, objects, files, and data lake, for billions of files. In the 21 Travel Rule software solution it's used to store and access of visual proofs.
Keycloak
Keycloak is an open source identity and access management software. It provides the account management and single-sign on functionality. Keycloak has built-in support to connect to existing LDAP or Active Directory servers.
Physical Architecture
21 Travel Rule can be run on a single machine, as demonstrated in our Reference Deployment Reference Deployment, which is based on Docker Compose.
Our container-based architecture also effortlessly enables more advanced setups, such as deploying a cluster of machines on OpenShift to provide HA and automatic failover.
Reference Deployment
21 Travel Rule is a software solution for FATF’s Travel Rule by 21 Analytics.
These instructions only work if you have a valid 21 Travel Rule license, which comes with a username and password to access our Docker Registry.
If you get stuck with the deployment instructions then please refer to our Troubleshooting section where common usage errors are clarified.
Hardware Requirements
We recommend the following minimum for operating the 21 Travel Rule software:
- 2 CPU 2198 MHz
- 2 GB RAM
- 40 GB Disk
The hardware requirements depend the number of transactions you send & receive.
The above disk requirement includes 20 GB dedicated to the file storage service.
You may in- or decrease this quota by modifying the arguments to the seaweedfs
service.
Software Requirements
To run 21 Travel Rule the following software needs to be installed:
- Docker
- Docker Compose (version 2.x or higher)
- git
Any operating system which can run Linux Docker containers will work.
Deployment with Docker Compose
First, pull this git repository with
git clone https://gitlab.com/21analytics/21-travel-deployment.git
Second, log in to our Docker Registry using the username / password that you have obtained from us by executing the following command:
docker login registry.21analytics.ch -u YourUsername
Then adjust the domain names in the Caddyfile to enable HTTPS. You probably want to commit your changes to the Caddyfile to simplify upgrades later:
git add Caddyfile
git commit -m "Caddyfile: Set domain"
NOTE: Caddy will
automatically set up HTTPS using
the
ACME
protocol. The only pre-requisite is to configure your domains in the Caddyfie
after you have registered them with your
domain name registrar.
The completion of the ACME challenge can take several minutes. Therefore, please
allow for some time for the HTTPS auto-setup to complete.
After that, you can spin up your instance with the docker-compose file as shown below. The first time you run those commands the database access passwords are initialised. Therefore, you are free to choose those passwords. We recommend generating cryptographically secure passwords with your chosen key management solution.
After the first initialisation, the environment variables still need to be set
to successfully start the platform. The POSTGRES_PASSWORD can be omitted after
the first initialisation. Instead of exporting the environment variables you
can use a .env file, see
here.
Also, the pg16_data folder needs to be created where the application data is
persisted.
export POSTGRES_PASSWORD=secret_password_1 # only required for init
export AUTOD_DB_PW=secret_password_2
export AOPD_DB_PW=secret_password_3
export TRPD_DB_PW=secret_password_4
export KEYCLOAK_DB_PW=secret_password_5
export KEYCLOAK_ADMIN=your_keycloak_admin_username
export KEYCLOAK_ADMIN_PASSWORD=secret_password_6
export TRAVEL_LOG=info
mkdir pg16_data
docker compose up -d
Allow approximately three minutes for all services to start up.
Once the services are up and running, a user can be created by accessing the graphical user interface. After the first login, the user is redirected to the settings page where further details should be configured.
User Management
The reference deployment uses a Keycloak service to manage user accounts. Please refer to the Keycloak page for more information.
Logging
All our services emit log messages. The log level can be adjusted by setting the
TRAVEL_LOG environment variable. Starting with the least verbose level the
available log levels are:
errorwarninfodebugtrace
where info is the default log level. TRAVEL_LOG=debug increases the logging
level to debug.
Furthermore, it is possible to selectively adjust the logging level for certain
modules only (the module names can be obtained from existing logging output),
e.g. to increase the logging level for HTTP traffic
TRAVEL_LOG=tower_http::trace=debug should be set.
Putting it all together the services can be run with adjusted logging level for HTTP traffic like demonstrated in the following command.
TRAVEL_LOG=tower_http::trace=debug docker compose up -d
Graphical User Interface
The graphical user interface can be accessed as configured in the Caddyfile.
It needs to be served from the root path /.
Upgrade
For an upgrade from version 6.0.0 to version 7.0.0 please refer to our upgrade guide.
APIs Exposed by Caddy Reverse Proxy
Here, we document the API endpoints that require to be publicly accessible. Our
reference Caddy configuration in the Caddyfile already sets up everything
accordingly. This is meant as a reference for firewall and WAF (Web Application
Firewall) configuration.
Travel Rule Protocol (TRP):
443 (HTTPS) at /transfers and
/transfers/
TCP Incoming and Outgoing. This has to be accessible for your
counterparty VASPs.
AOPP 443 (HTTPS) at /proofs/
TCP, incoming only. This has to be
accessible for your customers.
Working with OpenShift/Kubernetes
Disclaimer: we don't offer support for deployments on OpenShift or Kubernetes due to the large diversity of possible architectures. However, we have found that our reference deployment offers a helpful guideline for deployments on OpenShift/Kubernetes. Therefore, we provide some hints below for how the reference deployment can be efficiently transformed for use on OpenShift or Kubernetes.
Converting the docker-compose.yml
You can use the kompose tool to convert the
docker-compose.yml. Often, the generated files need some manual adjustments,
e.g. you might want to remove the caddy reverse proxy service because you are
already running a different solution.
Configuring Your Reverse Proxy
You very likely have a reverse proxy running in your cluster already. The
Caddyfile
can be inspected to extract configuration details you need to apply for your
reverse proxy.
Using an Existing Postgres Database
The
init.db
script can be inspected to extract the required configuration for Postgres
(users, passwords, schemas, permissions). As a consequence the database
connection URLs that are passed to the 21 Travel Rule services need to be
changed.
Keycloak
Background
The reference 21travel deployment uses a Keycloak
service to manage users. This allows transparent delegation to IAM solutions
already in place, for example via Keycloak's
LDAP integrations.
Guides
A guide for the initial configuration of the Keycloak server can be found here.
New users can be added using this guide.
Initial Keycloak Configuration
The reference deployment automatically loads a 21travel realm that will be
used for authentication. It is only missing a valid redirect URI which needs to
be configured as follows:
Obtain Keycloak Admin URL
Locate your Keycloak instance at compliance-dashboard.yourDomain.com/auth,
where compliance-dashboard.yourDomain.com should be replaced with the URL
where your Compliance Dashboard is accessed from (compare with Caddyfile).
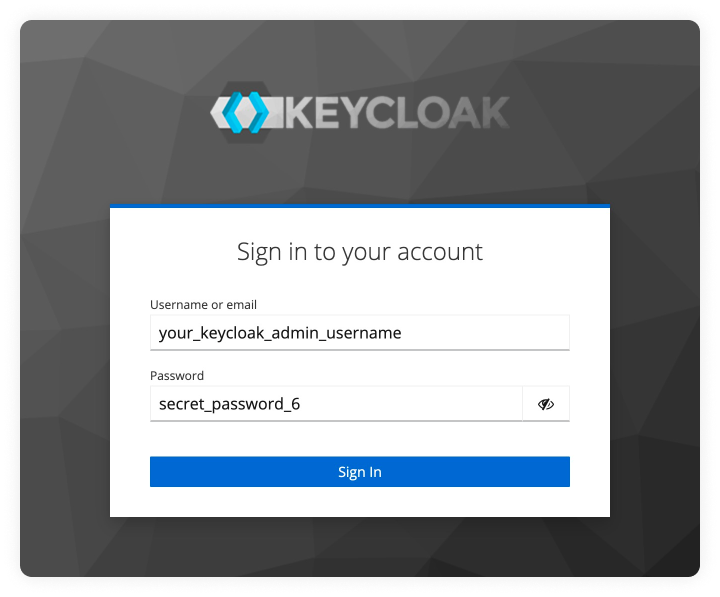
Login Into Keycloak As Admin
Login with the admin credentials you provisioned when spawning the reference deployment.
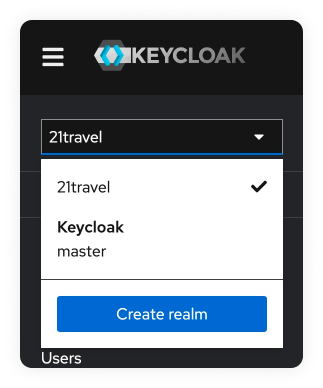
Select Realm
Select the 21travel realm in the dropdown menu in the top left.
Navigate To Accounts Page
Go to "Clients".

Select "account".

Configure All Redirect URLs
In the field "Valid redirect URIs", replace the value with the URL where you
access your Compliance Dashboard. Following the above example, the correct value
would be https://compliance-dashboard.yourdomain.com/*. Note the /* at the
end of the URL.
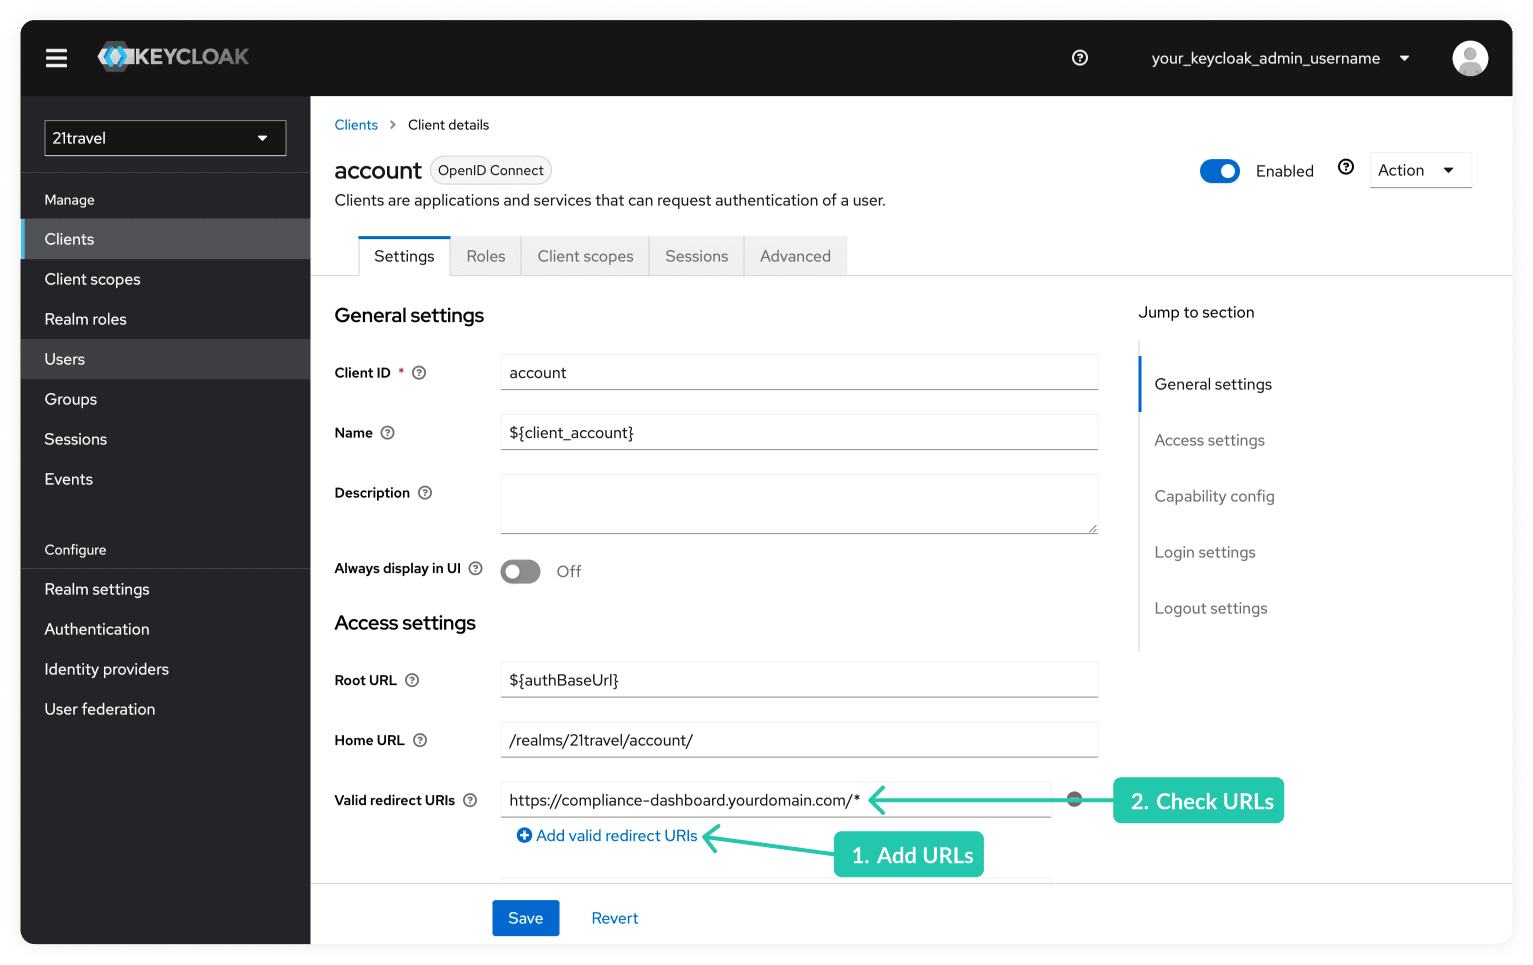
Save the changed settings by clicking on the "Save" button.
Manually Adding Users
To add users manually via Keycloak's web interface:
Select Realm
Select the 21travel realm as described here.
Navigate To Users Tab
Go to "Users".
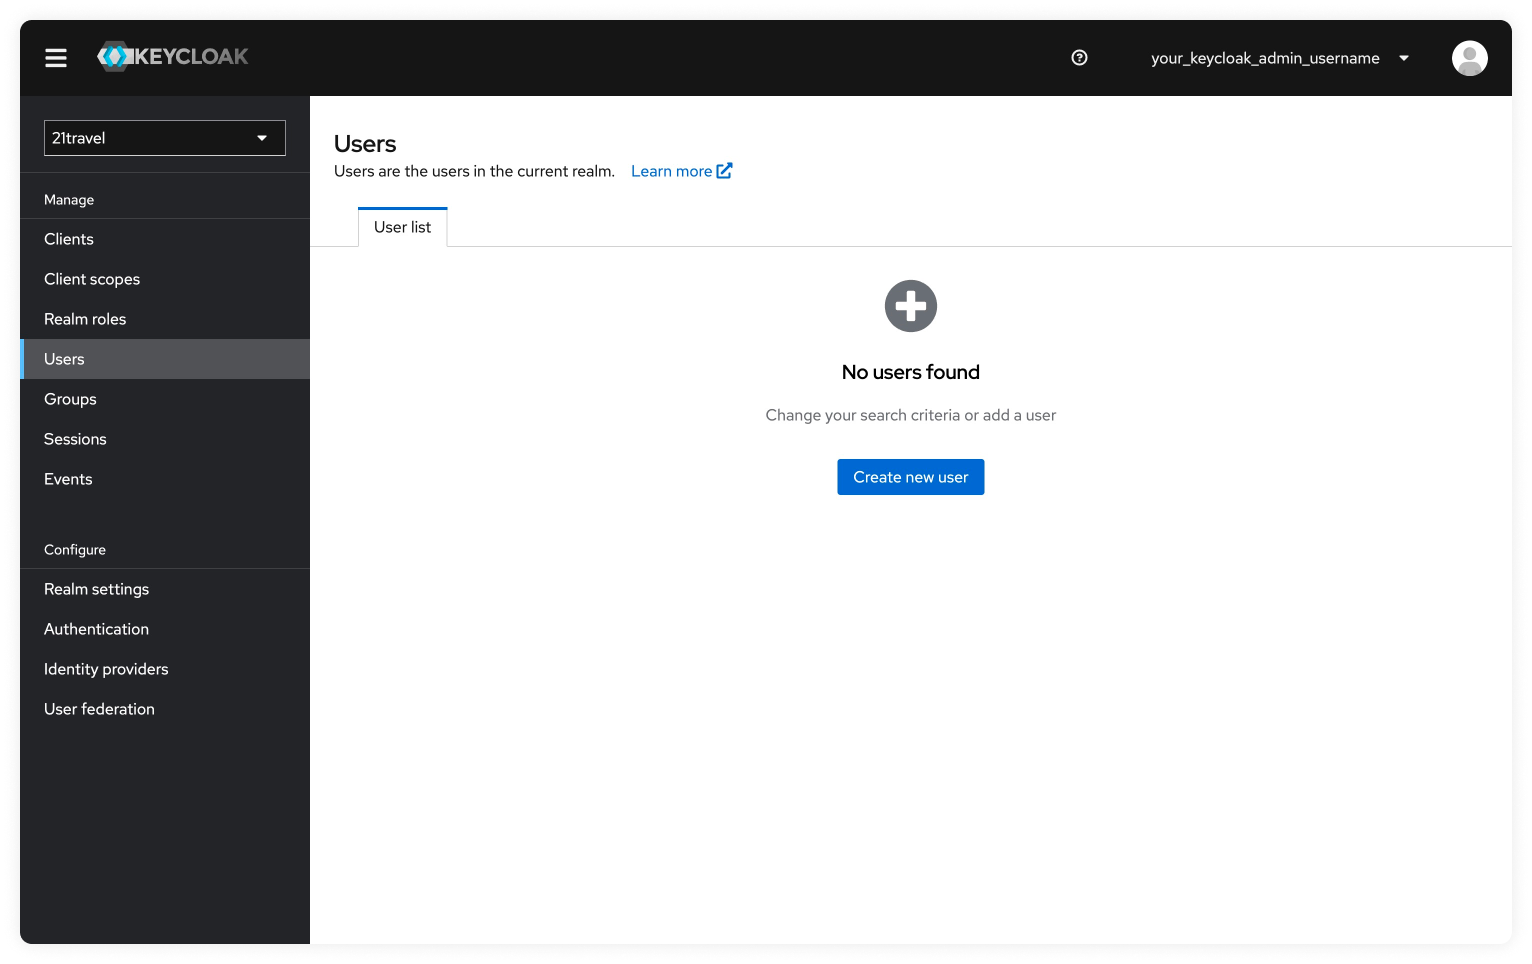
Create New User
Click "Create new user" and add the Username for the compliance officer user.
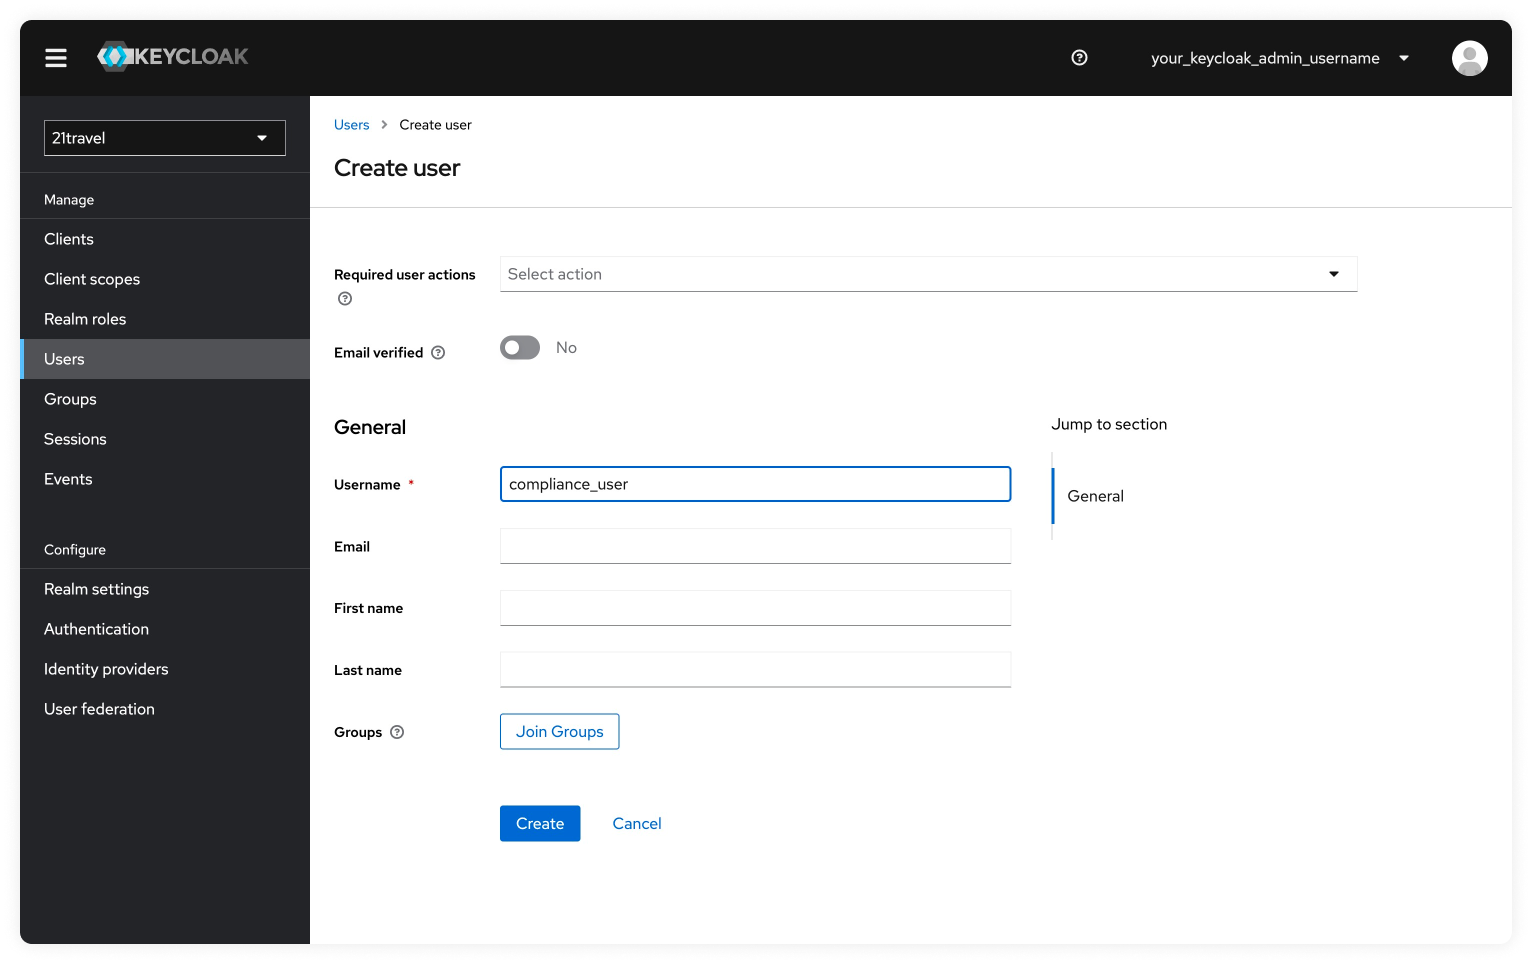
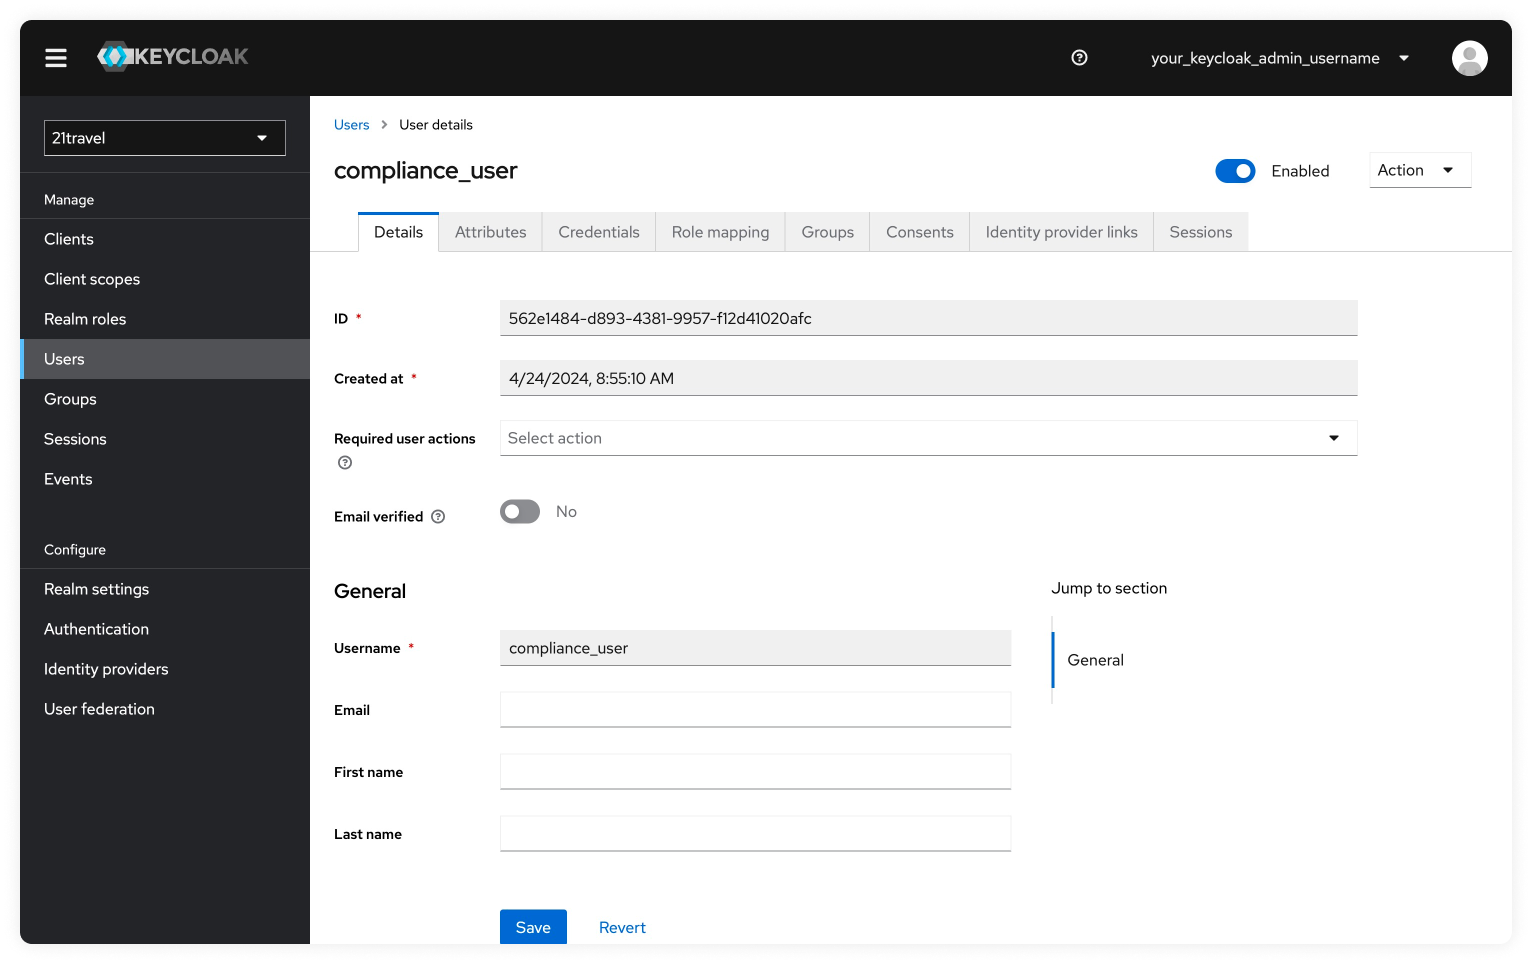
Click on "Create". You will then be redirected to the Details tab where you can see the information you provided.
Set Temporary Password For New User
Next, we will navigate to the Credentials tab to set a temporary password.
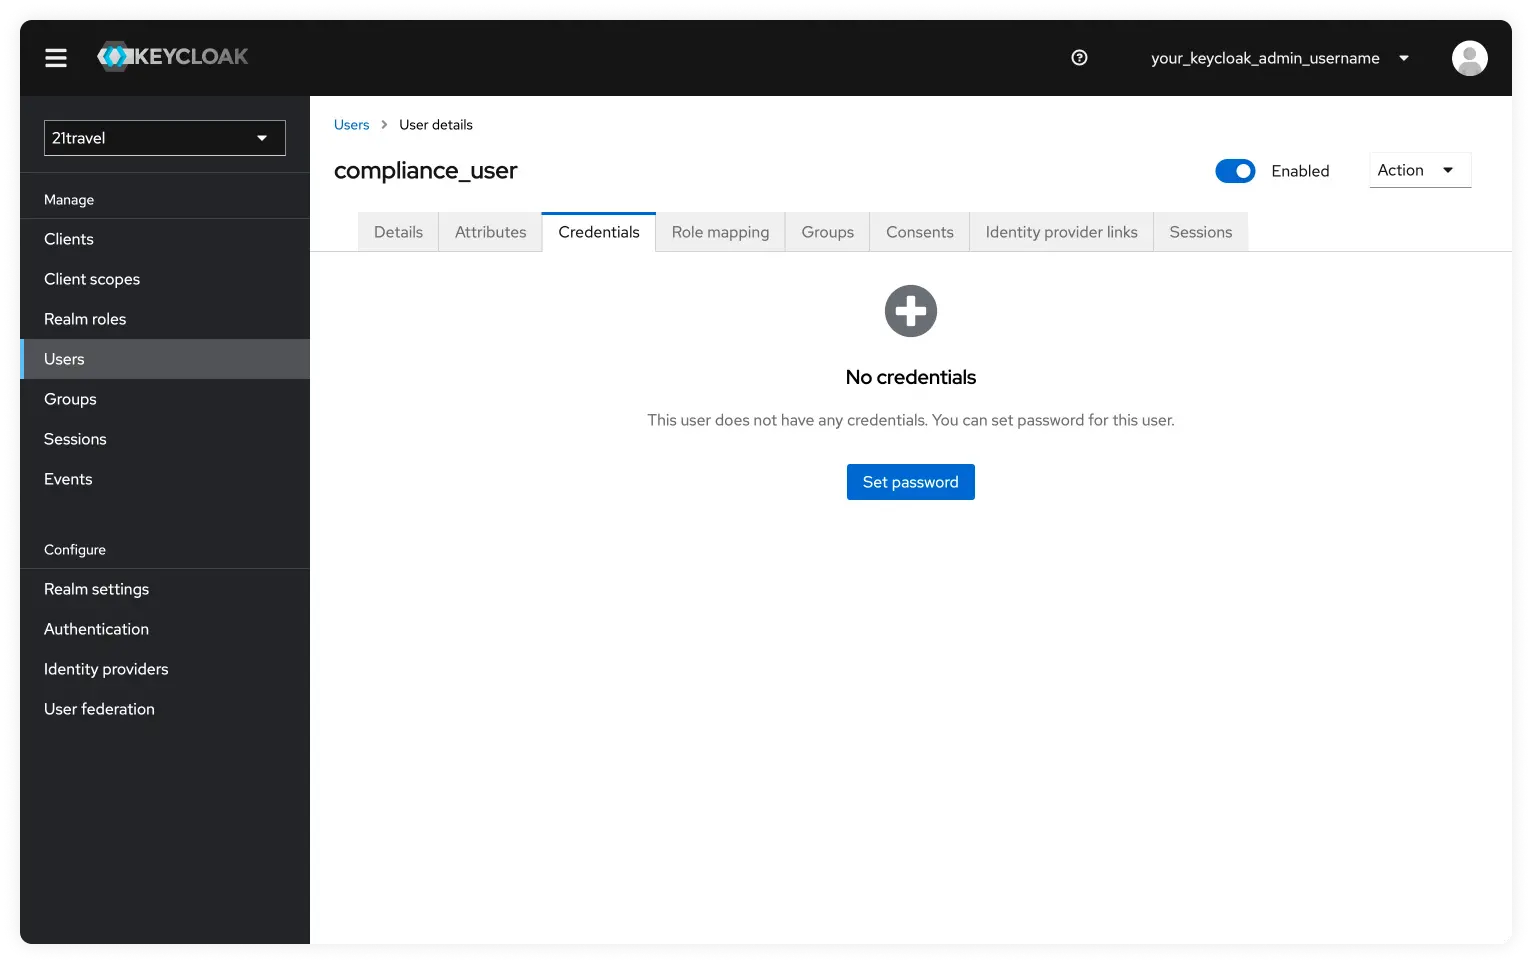
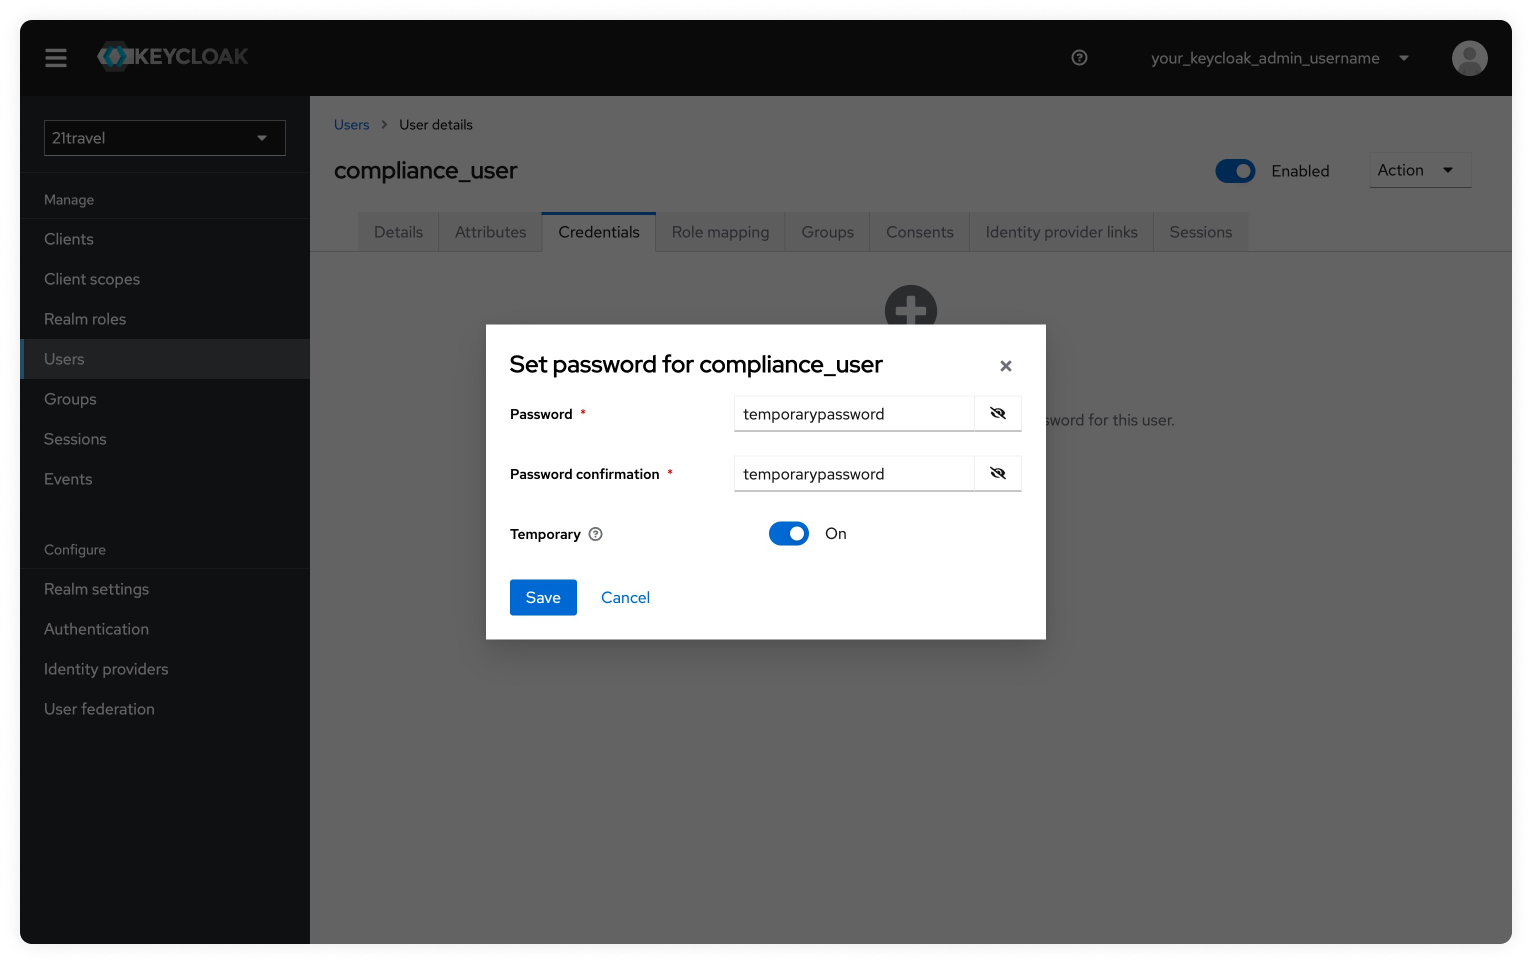
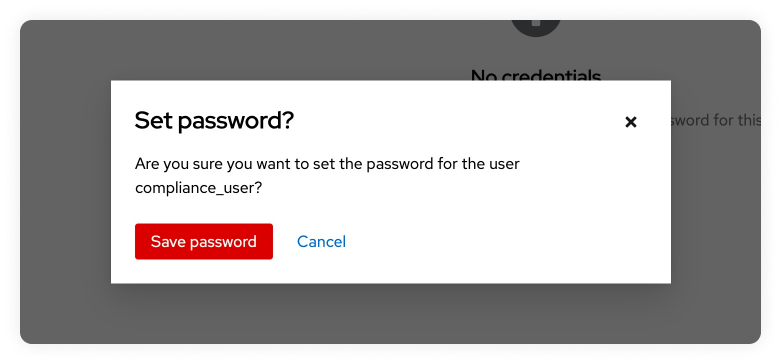
Now we will click on "Set Password" and add a temporary password. Make sure the temporary toggle is active. Once the password is set click on "Save" and then confirm by clicking on "Save Password".
Inform Compliance Officer About Created Username And Password
You can now give the username and password to the compliance officer user so they can login. They will be requested to update their password.
Afterwards, you can login with your created users into the 21travel compliance
dashboard. We will be using another user name 'Bitcoin Exchange AG' throughout
the documentation.
Upgrade Guide 6.0.0 to 7.0.0
Important Note
Backup Your Data Before Proceeding!
Moreover, this guide assumes that the steps below are executed in one session.
If the session is interrupted (e.g. due to a logout) then the passwords need to
be re-exported in given order. Only then, the upgrade procedure can be
continued at an intermediate step without receiving errors.
Acceptance Testing
Before upgrading your production instance we encourage you to exercise the upgrade scenario on your acceptance testing instance.
Shutting down 21Travel services
Enter the following to shut down 21Travel services.
The passwords assigned to the environment variables below have been chosen
during initial deployment. The
export statements can be omitted in case an .env file is used.
cd 21-travel-deployment
export POSTGRES_PASSWORD=secret_password_1
export AUTOD_DB_PW=secret_password_2
export AOPD_DB_PW=secret_password_3
export TRPD_DB_PW=secret_password_4
docker compose down
Obtaining the 7.0.0 deployment environment
To obtain the 7.0.0 deployment environment enter the following.
git fetch origin
git rebase 7.0.0
If you get stuck during the rebase you can restore your previous state by entering the following.
git rebase --abort
If you would like to switch to the 7.0.0 deployment environment discarding your
custom changes (e.g. domain names in Caddyfile) then enter the following.
git fetch origin
git reset --hard 7.0.0
# add necessary changes to Caddyfile
nano Caddyfile
git commit -m "Caddyfile: adjusted domain names" Caddyfile
Upgrading data from Postgres 14 to Postgres 16
Initiate the data migration by entering the following.
mkdir pg16_data
DOCKER_BUILDKIT=1 COMPOSE_DOCKER_CLI_BUILD=1 docker compose -f upgrade-postgres.yml up
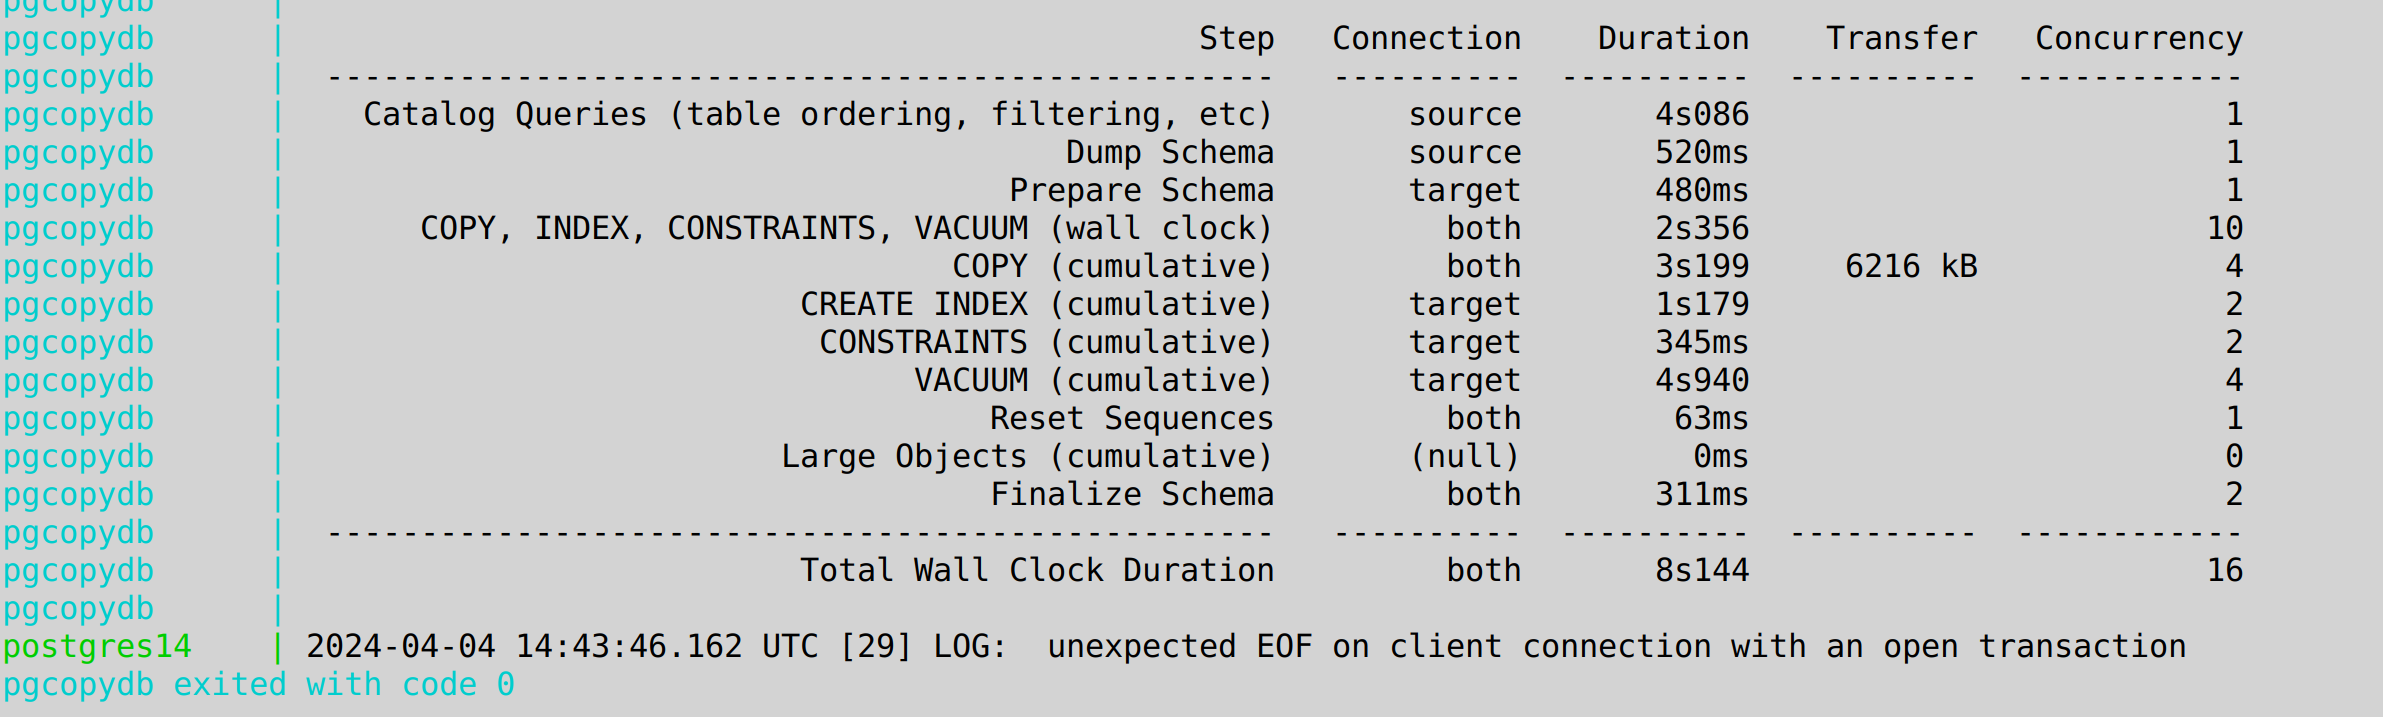
Observe the logging output. Once you can see a summary table and
pgcopydb exited with code 0
printed on the console you can press Control-C to terminate the database instances.
Changes in User Management
Version 7.0.0 is the first version to use an integrated Keycloak service for user management.
Please note that all the user information previously managed by 21travel will
be deleted. You will need to add your users to Keycloak, or configure Keycloak
to delegate to a pre-existing IAM solution.
Choose a database password for Keycloak
The value of KEYCLOAK_DB_PW should be a secure password of your choice. Please
use a password/secrets manager to store it for future use.
export KEYCLOAK_DB_PW=secret_password_5
Choose credentials for the Keycloak Admin Console
These credentials are used to log into the
Keycloak Admin console. The
value of KEYCLOAK_ADMIN_PASSWORD should be a secure password of your choice.
Please use a password manager to store the credentials for future use.
export KEYCLOAK_ADMIN=your_keycloak_admin_username
export KEYCLOAK_ADMIN_PASSWORD=secret_password_6
Create database, role and schema for Keycloak
docker compose up -d postgres
docker exec --user postgres -it postgres createdb keycloak
docker exec -i -e PGUSER=postgres -e PGDATABASE=keycloak postgres psql <<EOF
CREATE USER keycloak PASSWORD '$KEYCLOAK_DB_PW';
CREATE SCHEMA AUTHORIZATION keycloak;
\q
EOF
Starting 21Travel services
export TRAVEL_LOG=info
docker compose up -d
Configure Keycloak
To finalise the deployment it's necessary to adjust settings in Keycloak's admin console. Please see the dedicated guide for more details.
Troubleshooting
I'm seeing a Python traceback when running docker-compose
The output you see looks similar to
Traceback (most recent call last):
File "urllib3/connectionpool.py", line 670, in urlopen
File "urllib3/connectionpool.py", line 392, in _make_request
File "http/client.py", line 1255, in request
File "http/client.py", line 1301, in _send_request
File "http/client.py", line 1250, in endheaders
File "http/client.py", line 1010, in _send_output
File "http/client.py", line 950, in send
File "docker/transport/unixconn.py", line 43, in connect
FileNotFoundError: [Errno 2] No such file or directory
Those errors are usually encountered when the docker service is not running on
your machine.
I'm using docker compose with sudo and the environment variables are not set
sudo runs commands as a different user and doesn't preserve the original
user's environment unless run using the --preserve-env flag. With that said,
nowadays docker and docker compose is commonly packaged such that it doesn't
require sudo for execution. That's why our examples don't display the usage of
sudo.
I'm using an .env file and the variables are not properly set
You've likely pasted the environment variables with a leading export command
from our shell example snippet. Shell commands don't work in .env files and
need to be omitted.
I'm getting the unhelpful 'Killed' error message
Your machine has run out of memory while starting the containers. Consider using a more powerful instance. 1GB is a minimum that is known to work.
I'm seeing error messages in the SeaweedFS Container
At the start, the SeaweedFS container repeatedly shows two error messages in the log (RPC error and missing pemfile). Both can safely be ignored when using the reference deployment as they are triggered by its internal service being started while polling on each other.
I'm unable to log in to the registry: 'Cannot autolaunch D-Bus'
Docker needs
something
to store your credentials in. On Linux this is pass. If this is not installed
you might see this error:
Error saving credentials: error storing credentials - err: exit status 1, out: `Cannot autolaunch D-Bus without X11 $DISPLAY`
Simply install pass to resolve this issue.
'Invalid parameter: redirect_uri' error when trying to log in
This error originates from Keycloak and indicates a missing or erroneous configuration of Keycloak. Keycloak should be configured following this guide. If the error persists or the configuration has been set already then the valid redirect URIs should be inspected for typos.
Travel Rule
To understand the purpose of 21 Travel Rule, it is fundamental to grasp what the Travel Rule is. The Travel Rule is a recommendation set up by the Financial Action Task Force (FATF) to address Money Laundering and Terrorist Financing. According to the Travel Rule, specific personal data must be exchanged with virtual asset transactions. As the Travel Rule is a recommendation countries are not obliged to implement it by a specific date or at all, resulting in global mismatched implementation statuses. Additionally, implementing regions can deviate from the recommendation in terms of information exchanged or when information should be exchanged. Once implemented by a region, the Travel Rule becomes law, and not exchanging this information will be considered illegal. In other words, virtual asset service providers (VASPs) like exchanges and banks will be obliged to collect and store the required customer information.
Gathering, tracking and storing this information can become tedious and unreliable if not done correctly. This is where software like 21 Travel Rule comes into play. Our software allows VASP compliance teams to easily manage and store all this information for each transaction processed.
Address Ownership
Address ownership tackles a specific problem within the Travel Rule: self-hosted wallet transactions. Unlike virtual asset service providers (VASPs), which hold virtual assets on behalf of the owner, self-hosted wallets allow the owner to hold virtual assets and control the private key used to transact themselves.
Self-hosted wallets are a greater challenge when it comes to requesting and storing personal data since there is no organisation behind it, and expecting every individual who owns a wallet to store the personal information of their counterparts and the transaction is unfeasible. Moreover, it would pose a big risk regarding data security.
The closest solution so far is requesting to prove ownership of a self-hosted wallet when depositing or withdrawing from a VASP. This means VASPs have the responsibility to validate that their customer owns a given self-hosted wallet and store this proof.
AOPP (Digital Signature Proofs)
For every wallet address there's a unique corresponding private key. Such a private key is used to authorise the spending of coins belonging to said wallet address by digitally signing a transaction. The transaction is validated by the miners by verifying the correctness of the digital signature. Only when the digital signature is correct, the transaction is deemed valid and added to the next mined block.
With AOPP, the unique relationship between the wallet address and private key is utilised to prove address ownership. Instead of signing a transaction, a predetermined message (usually a human-readable text) is signed and the resulting digital signature is submitted to 21 Travel Rule. By asserting the correctness of the digital signature 21 Travel Rule can deduce that the submitter of the message's digital signature owns the private key that can also be utilised to craft a valid transaction for the corresponding wallet address.

Travel Rule Protocol (TRP) Flow
To solve the Travel Rule requirements, numerous protocols have been created. The Travel Rule Protocol (TRP) is, in our opinion, the cleanest and all-around most streamlined solution. This is why the 21 Analytics team has decided to contribute to its development and evolution.
The 21 Product Family has been working on making the TRP protocol as straightforward as possible while focusing strongly on security with the product user flow. Security is the cornerstone of TRP since financial data associated with personal information can be highly compromising for individuals, so privacy is a must.
Let’s now break down how this user flow works to get a deeper understanding of how to use the 21 Product Family products:
-
A beneficiary VASP creates a Travel Address for one of its users.
-
An originator VASP sends a transaction request to a beneficiary VASP using this Travel Address.
-
The beneficiary VASP runs chosen regulatory and security checks on the originator User. If it gets declined, this is then archived.
-
If the beneficiary VASP approves, the originator VASP performs the on chain transaction and notifies the beneficiary of the transaction by clicking on Confirm. The originator can also opt to not perform the on chain transaction and notify the beneficiary by clicking on Cancel.

Bear in mind this is an explanation of the user flow in our product; for a more in-depth explanation, of the protocol check TRP.
Email Flow
As a fallback protocol to the TRP protocol, it is highly recommended to use email to cater to VASPs in the sunrise stage that have not yet implemented TRP.
The Email Flow tackles all possible scenarios where TRP is not an option. For incoming transactions from a counterparty VASPs customer it's recommended you use the
Archive New Transaction Email Flow
For outgoing transactions coming from your customers, it's recommended you use one of the two options on the
Send Transaction Notification Email Flow
Archive New Transaction Email Flow
As the title states, this flow can be found in Archive New Transaction on the Transactions page by clicking on the Ask For Confirmation Email checkbox. This flow is used when your customer wants to receive funds from a counterparty VASPs customer. For this, a four-step process is initiated:
-
Before your customer can receive funds from a counterparty VASP's customer, you must first fill out the Archive New Transaction form, where you must provide the beneficiary information as well as the originator information provided by your customer. Once you have filled out the form 21 Travel Rule will send an email to your counterparty VASP asking for confirmation.
-
Your counterparty VASP should confirm that the originator of the transaction is indeed one of their customers and send you an email stating this.
-
You can then proceed to credit your beneficiary customer with the funds.
-
21 Travel Rule will archive the transaction for compliance purposes.
You can see the email flow for incoming transactions in the following image:

Send Transaction Notification Email Flow
This flow can be found in Send Transaction Notification on the Transactions page. You have two options within this flow which depend on the responsiveness of the counterparty VASP and on your risk appetite. One option will not require the counterparty VASP to confirm the transaction, which means you can streamline everything in one step through 21 Travel Rule. The other option will require the counterparty VASP to confirm the transaction, which means you will have more accurate data for compliance checks. Here is a breakdown of the two options:
Without Confirmation
This is a one-step process where you should:
-
Collect the counterparty customer's information from your customer.
-
Execute the transaction on the blockchain.
-
Add it to the form in the 21 Travel Rule Transactions page that will finally automatically send all the Travel Rule data to the counterparty VASP on an email.
With Confirmation
This is a three-step process which is as follows:
-
Collect the counterparty customer's information from your customer and add this information to the form in the 21 Travel Rule Transactions page. This will automatically send all data to the counterparty VASP in an email asking for confirmation.
-
The counterparty will then check if the beneficiary is indeed one of their customers. If they are, they will send you an email with the confirmation.
-
You can then proceed to execute the transaction on the blockchain.
-
21 Travel Rule will archive the transaction.
You can see this flow with the two options in the following image:

Terminology
Travel Address
The beneficiary VASP generates a Travel Address. It is a string of alphanumeric digits that, when decoded, provide information on the linked account, such as:
- To which VASP the coins are to be sent,
- Where the FATF Travel Rule information needs to go.
Where with a plain virtual asset address the VASP needs to ask all known counterparty VASP if they own this particular address, the Travel Address immediately makes this clear. Thus saving the user and the VASP time and effort. It also does not leak competitively sensitive information to counterparties.
Wallet Address
A wallet address is, in a way, like a bank account number in that it can be shared publicly without compromising the assets inside the wallet. Wallet addresses are what blockchains use to keep track of the allocation of assets and transaction chains.
Public/Private Key
For every virtual asset account created, a private key is generated, and this private key generates a public key which finally generates a Wallet Address. The private key should never be shared since it acts similarly to a pin code in traditional banking. The wallet address generated from the public key can be shared without compromising your funds.
GraphQL
GraphQL offers flexibility and the ability to define precisely the data you want to fetch.
We build our GUI on top of a GraphQL API. If you want to integrate 21 Travel Rule with your own IT infrastructure, you can use the same GraphQL API.
The API is self-documenting and can be explored through the
GraphiQL application (note the "i" in the
name). For basic testing purposes, we host a
GraphiQL instance against our
testing server. Please note that this is provided on a "best effort" basis with
limitations in availability and data persistence. Therefore usage for
exploration and basic testing only is advised. For production use, you need to
run 21 Travel Rule on your IT infrastructure and use GraphiQL served via the
/graphiql endpoint to explore the API that corresponds to your deployed
version.
You can learn more about how GraphQL works on our Introduction to GraphQL.
Authentication
The GraphQL API expects Bearer Authorisation header containing a valid OIDC
access token, usually issued by a Keycloak service which is
integrated into the 21travel
reference deployment.
By default, Keycloak is configured for usage via the web frontend using the
account Keycloak client on the 21travel realm. Below, we describe how to
create an additional Keycloak client on the realm such that API clients can
request access tokens that can subsequently be used to authenticate against the
GraphQL API. Following this recipe, both the web frontend and API clients can be
used at the same time.
Creating a Confidential Keycloak Client for API integration
Within the Keycloak Administration Console:
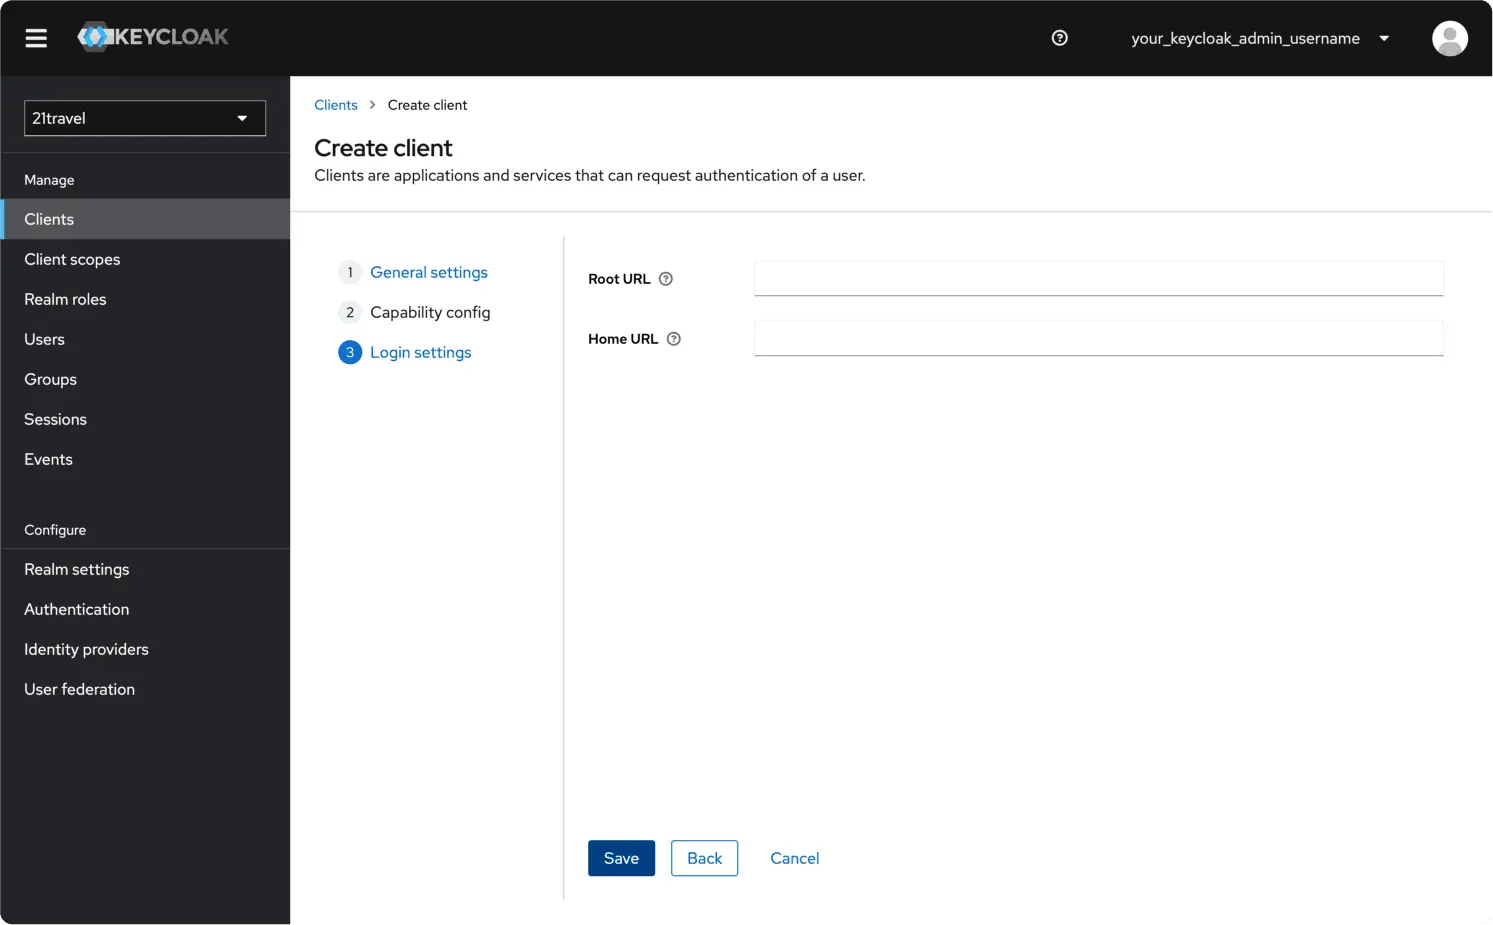
Create A New Client
Navigate to the 21travel realm

Then go to the "Clients" tab. Click "Create client".

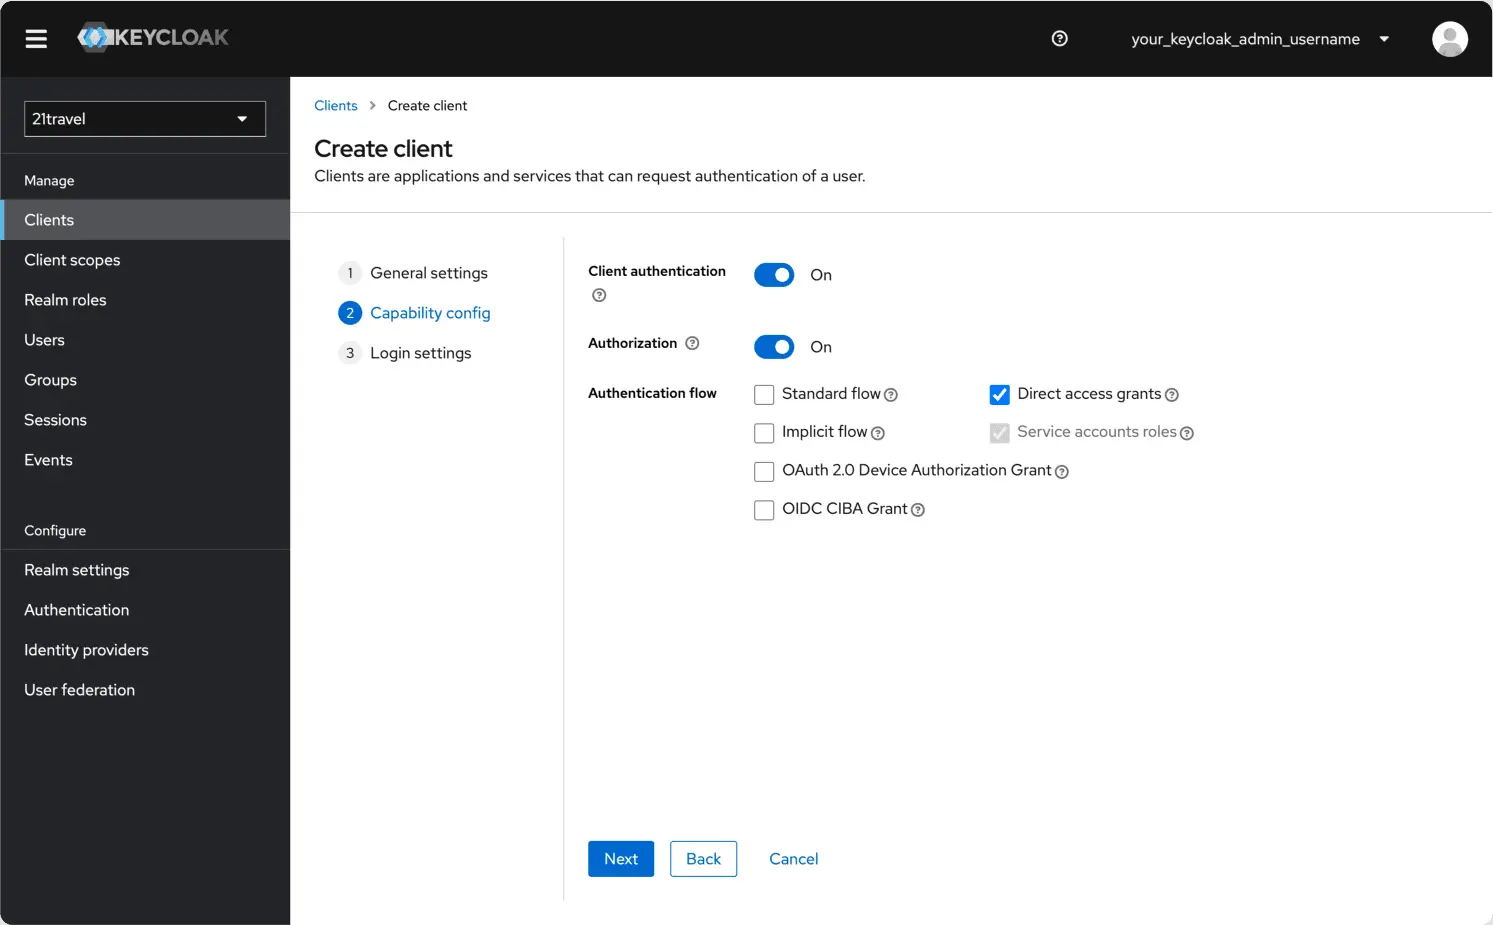
Leave the Client type as "OpenID Connect", and choose an appropriate Client ID, for example "21travel-api". Click "Next".

Switch on Client authentication and Authorization, and make sure only the
Direct access grants and Service accounts roles authentication flows are
selected. Click Next.
You can leave the final fields blank and click "Save".
Create A New Client Scope
Staying with the newly created client, under "Client scopes" click "Add client scope".
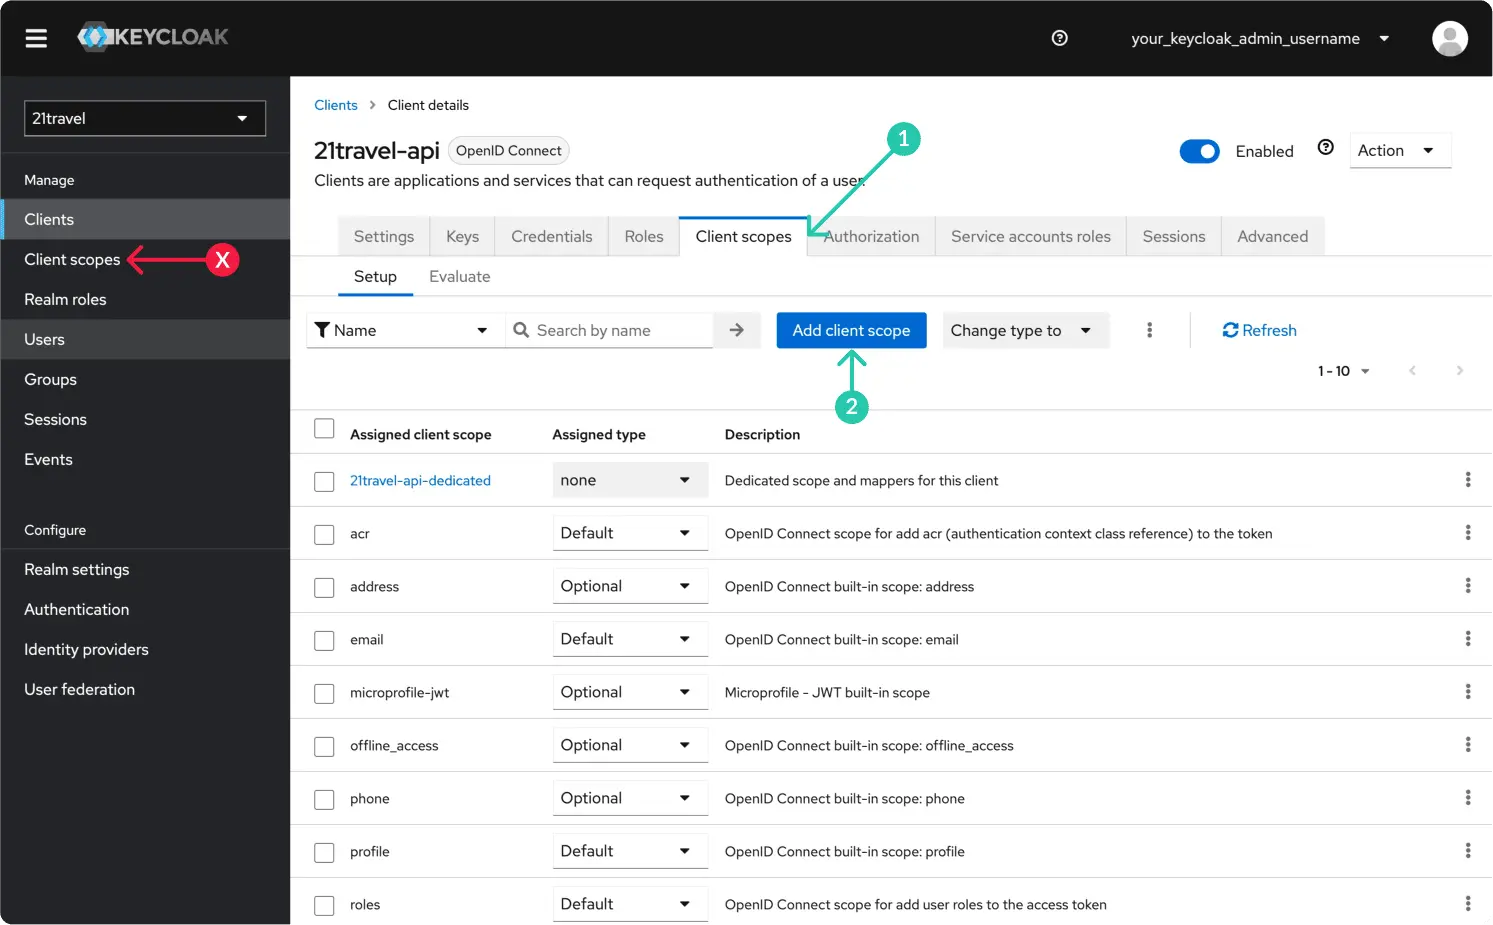
Select the "21travel-audience" scope and "Add" it as "Default".

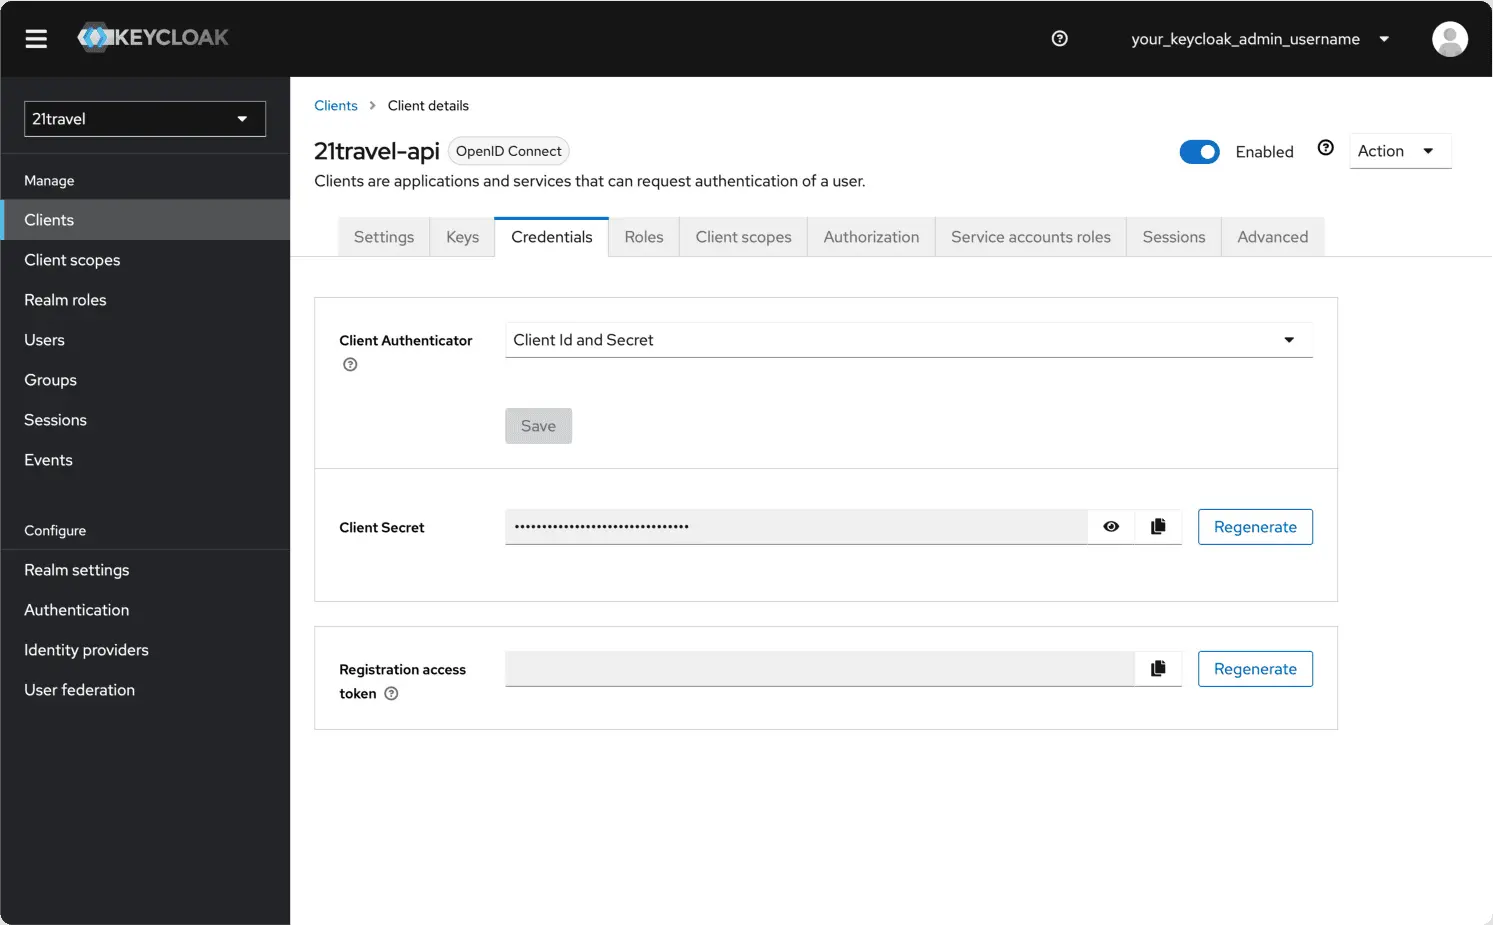
Create A New Client Secret
Subsequently, you can go to the "Credentials" tab and copy the client secret, which you will need below.
Access Token Scopes
Now we are ready to obtain an access token via an HTTP call. We demonstrate this
with the popular curl command line utility:
curl -L -X POST '<your-host>/auth/realms/21travel/protocol/openid-connect/token' \
-H 'Content-Type: application/x-www-form-urlencoded' \
--data-urlencode 'client_id=21travel-api' \
--data-urlencode 'grant_type=client_credentials' \
--data-urlencode 'client_secret=<client-secret>' \
--data-urlencode 'scope=openid'
In the above command, make sure to:
- Use the correct client ID under
client_id=.... - Replace
<your-host>with the host used in the Caddyfile. - Replace the
<client-secret>with the value you obtained above.
This will return a JSON response of the form:
{
    ...
    "access_token": "<access-token>",
    ...
}
You can now use this token to authenticate against the GraphQL API, for example querying the names of all TRP VASPs:
curl '<your-host>/graphql' --compressed -X POST -H 'Authorization: Bearer <access-token>' --data-raw '{"query":"{ trpd { vasps { name } } }"}'
Make sure to replace <your-host> with the host where the autod GraphQL API
is reachable, as well as to insert the <access-token> obtained above.
Authentication for GraphQL subscriptions
As is detailed on the subscriptions page,
the GraphQL subscriptions are run over a Websocket protocol. Authentication
happens as part of the initial handshake on an established Websocket connection.
To this end, clients must include the very same Bearer token obtained from
Keycloak mentioned above as the optional payload
in the initial
GQL_CONNECTION_INIT message
as follows:
{
    "bearer_token": "<access-token>"
}
Usually, Websocket GraphQL clients come with built-in support for setting this payload, for example the JS Apollo client.
Introduction to GraphQL
The GraphQL endpoint
The REST API has numerous endpoints; the GraphQL API has a single endpoint. If your deployment matches the reference deployment then your endpoint looks like this:
https://yourvasp.intranet/graphql
Schema
A schema defines a GraphQL API's type system. It describes the complete set of possible data (objects, fields, relationships, everything) that a client can access. Calls from the client are validated and executed against the schema.
Field
A field is a unit of data you can retrieve from an object. As the official GraphQL docs say: "The GraphQL query language is basically about selecting fields on objects."
Argument
An argument is a set of key-value pairs attached to a specific field. Some fields require an argument. Mutations require an input object as an argument.
Browsing API Docs in GraphiQL
Objective
In this section we will do a walkthrough on how to use GraphiQL to explore our API and its documentation. The goal is to understand how GraphQL queries can be derived from the API documentation and a JSON result obtained by executing those queries.
1. Open the in-browser GraphQL IDE
To start, let's open the interactive in-browser GraphQL IDE by clicking here.
NOTE: The GraphiQL application served by above link serves a development
version of the API. If you are integrating against a release version of 21
Travel then you should use GraphiQL served via the /graphiql endpoint of your
instance.
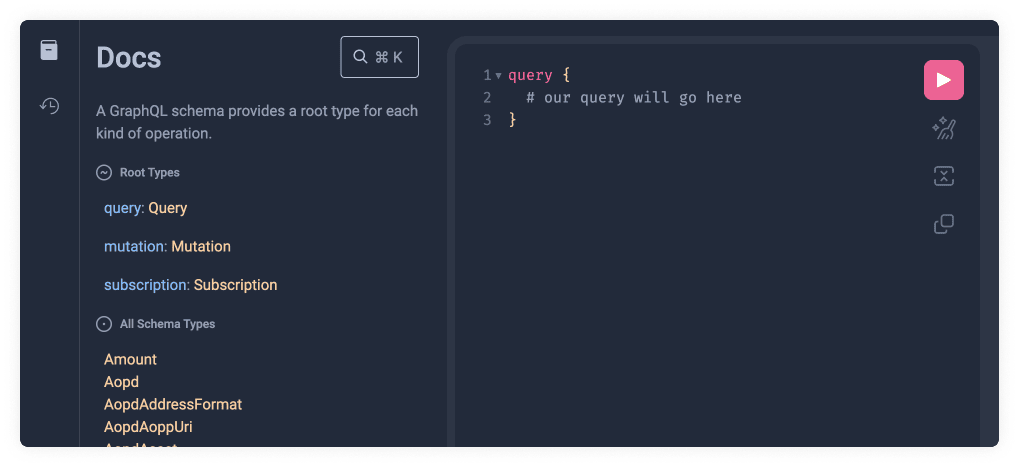
2. Reveal the docs
To reveal the docs in GraphiQL you must press the book icon button on the top left of the screen.

This will reveal a set of options and definitions.
You might see an introductory set of comments when visiting for the first time.
Comments start with # followed by the comment text. We can go ahead and delete
all the introduction comments.
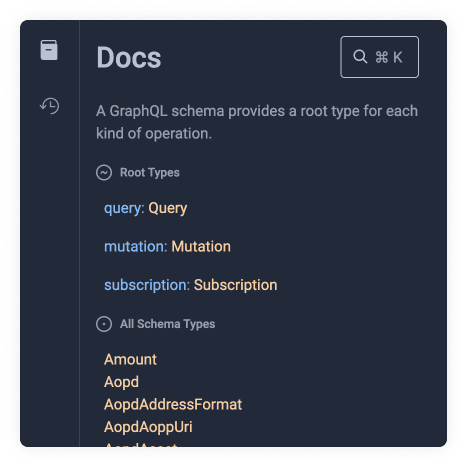
3. Root Types
These types are specific to GraphQL. The most common root type is the Query
type. To query data, we need to write query followed by some curly braces.
Copy the following code snippet into GraphiQL:
query {
  # our query will go here
}
Let's now click on the orange Query Type link (shown below as 2️⃣) on the docs.
This will unveil the query Schema Types available which we will explore in the
next section.
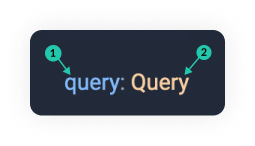
As you can see the field names(1️⃣) are shown in blue and camel-cased and the types(2️⃣) returned by that field are shown in orange and capitalised.
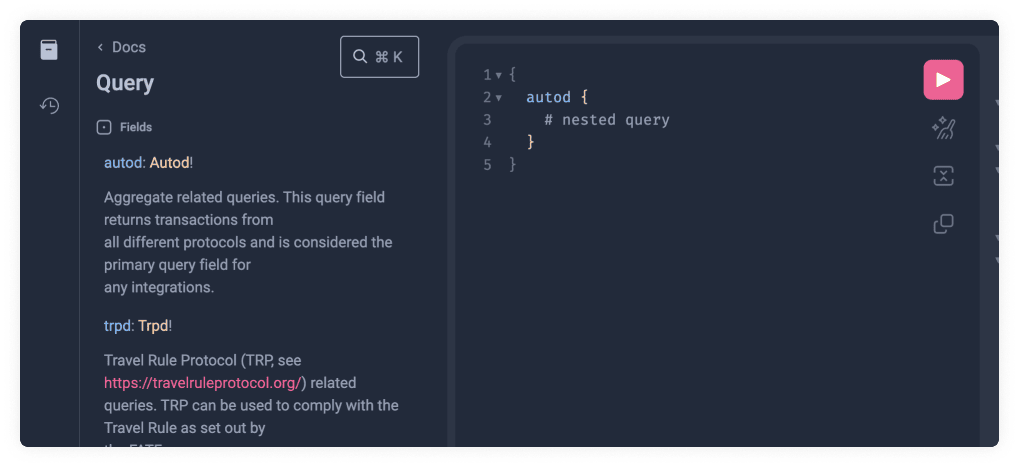
4. Schema Types
These types are specific to the 21 Travel Rule API. These can be found inside
the Root Types. Once we have clicked the Query Type link(2️⃣) we can find the
available Schema Types. We will choose one of these and add it within the
brackets. There is an auto-complete list of options available to guide us. We
will select the autod field.
To do this, copy the following code:
{
  autod {
    # nested query
  }
}
Let's now run the query by clicking the pink play button and see what happens.

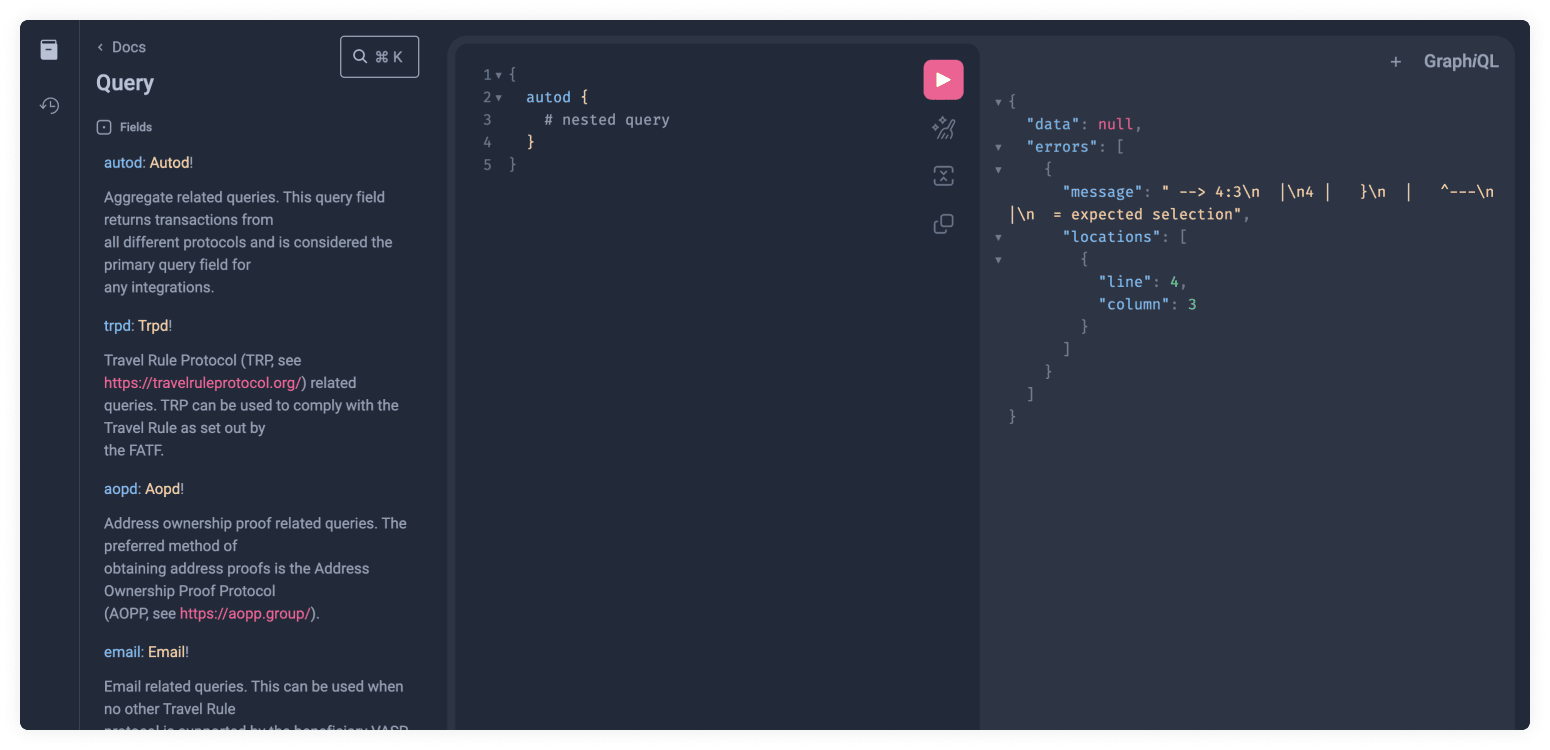
As you can see this will still not work since it has a Nested Type, which we
will explain in the next section, so an error is thrown. We can now click on the
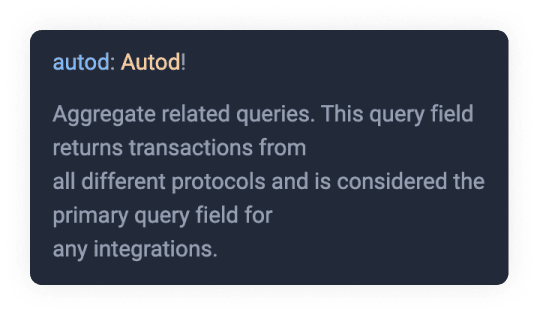
orange Autod type link like we previously did with Query. We can also see a
description of what the field does.
Another important thing to remember is the ! bang symbol. This means the Data
Type is not optional.
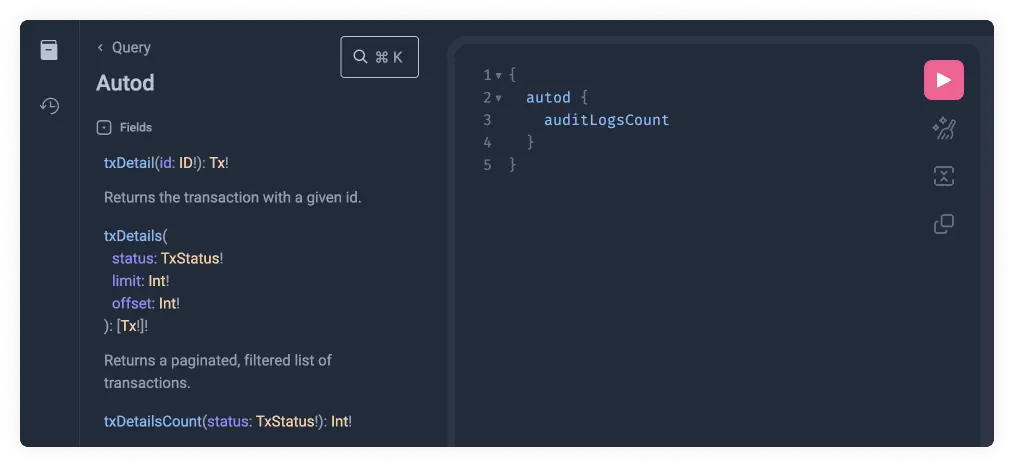
5. Nested Types
You will often find a field with other Schema Types available within it. This can have multiple levels of nesting until we reach the returned value. Let's start by retrieving a field value only two levels deep, and we can explore deeper nesting in our next step, where we explain arguments.
Copy the following code into GraphiQL:
{
  autod {
    auditLogsCount
  }
}
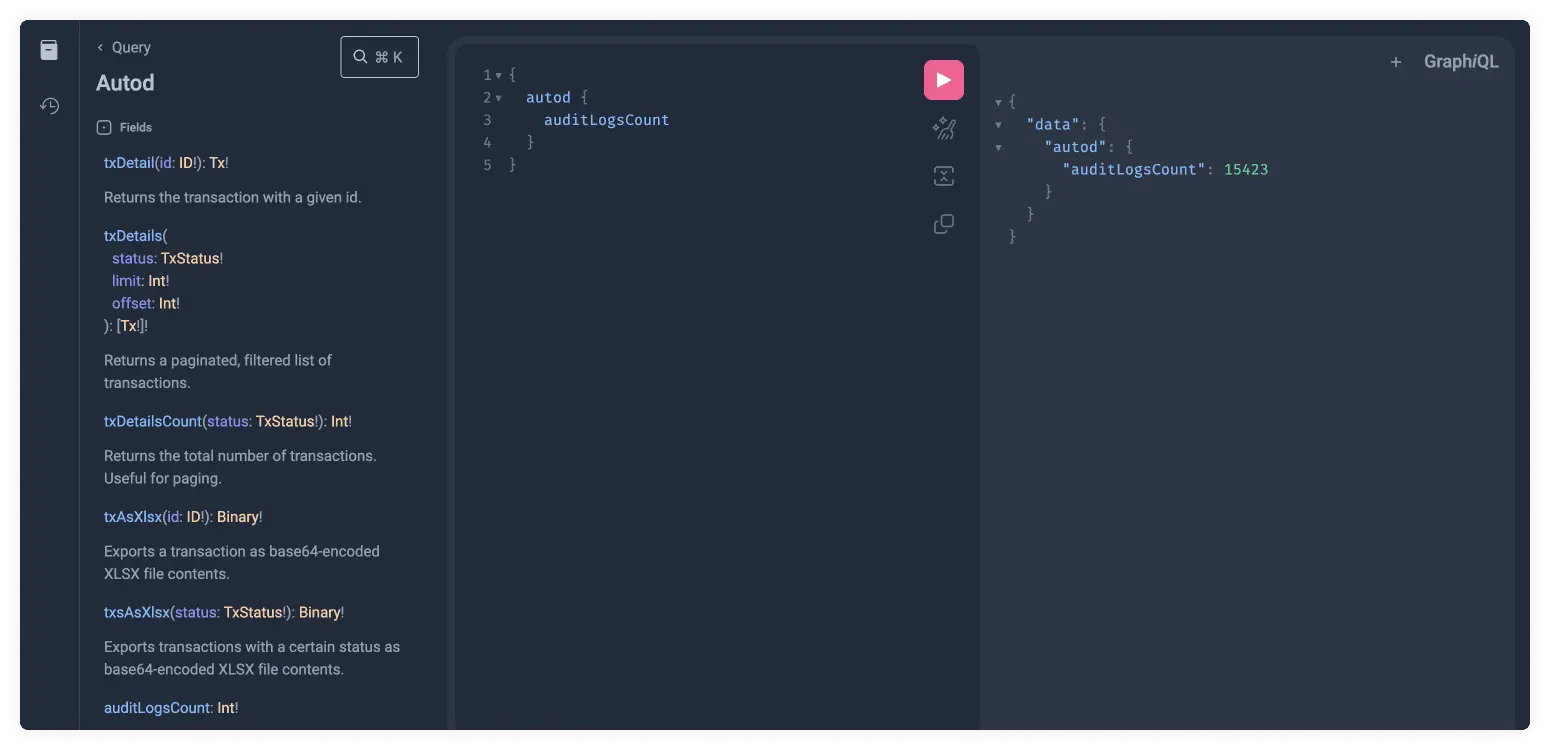
We can now click on the pink play button to finally run the GraphQL query and return its result. Such queries can be copy-pasted into client applications and used to for automation, integration or user interfaces.
Now that we understand the basics of how nesting works in GraphQL, let's have a look at arguments.
6. Arguments
We previously defined what an argument is. Let's get hands-on with how these look in GraphQL.
Some types require arguments. You can find these between parentheses. They
usually serve as a kind of filter for the data you want to retrieve. We will
look at the auditLogs field:
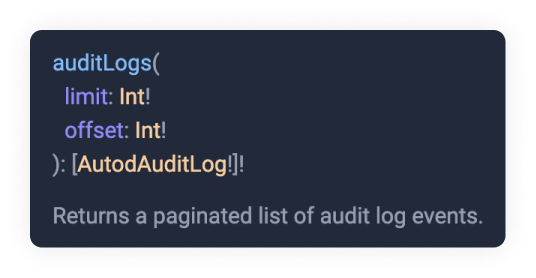
Here you can see two required arguments limit and offset. As a reminder, any
argument or type with a ! bang sign means it is required. We can see they both
require an Int type. These data types are primitive types. As you can probably
guess Int stands for Integer and you can read the full definition if you press
on the orange link.
This introduces a new level of nesting. Since it is wrapped with square brackets
it will return an array. This array is also required and has to be of type
AutodAuditLog. Let's click on the AutodAuditLog orange link and see what
fields we have available there.
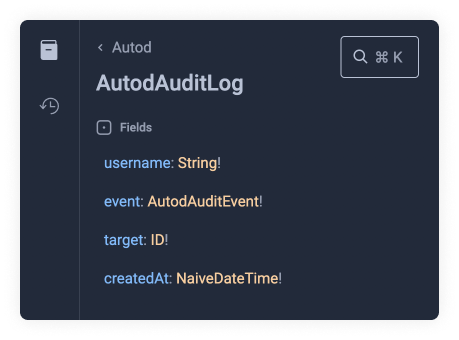
We will choose username and event within auditLogs. Let's not forget the
required arguments limit and offset.
Copy the following code snippet to see the results:
{
  autod {
    auditLogsCount
    auditLogs(limit: 2, offset: 0) {
      username
      event
    }
  }
}
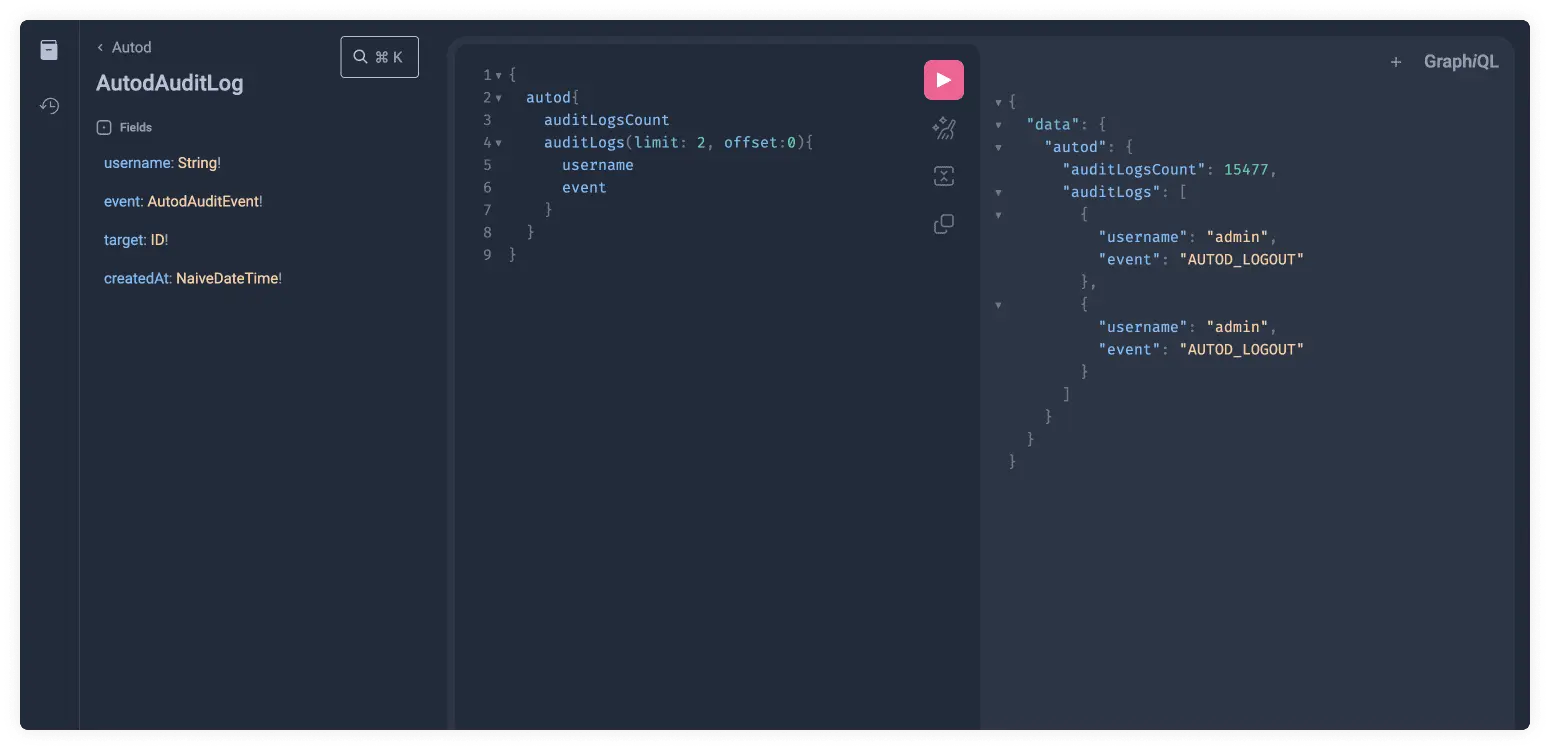
You might have noticed that the event field is not a Primitive Type, yet it gave
us a value. This is because it does not nest another type but defines an enum.
This can easily be seen by clicking on the orange AutodAuditLog link.
Examples
NOTE: that the provided example queries showcase only a tiny fraction of our API. Please use the GraphiQL API Browser to discover the full API and its documentation and derive GraphQL therefrom.
Example Queries
As the name suggests and as is the rule with GraphQL, use the operation type 'query' to return objects from the backend. There are examples for several objects available:
-
autod: autod is the internal API that provides unified access to all databases and services of 21 Travel Rule. Its GraphQL API is used by the Web User Interface and custom integrated services from the VASP.
-
trpd: trpd is the processing engine for exchanging Travel Rule data through Travel Rule Protocol (TRP). It's possible to run multiple instances of trpd for HA, failover and zero-downtime updates.
-
aopd: aopd is the processing engine for registering ownership proofs through Address Ownership Proof Protocol (AOPP; Digital Signatures), Visual Proof or Satoshi Tests. It handles communication with self-hosted (non-custodial) wallets. It's possible to run multiple instances of aopd for HA, failover and zero-downtime updates.
-
email: email is a fallback mechanism for outgoing transactions to other VASPs. It connects to your SMTP server.
Example Mutations
As the name suggests and as is the rule with GraphQL, the operation type
'mutation' can be used to affect changes in the backend. Notice that the object
type mutation is explicit in the examples. GraphQL allows omitting the query
type but not the mutation type. There would be no way to distinguish them
otherwise.
Similarly to queries, there are examples for several objects available:
-
trpd: trpd is the processing engine for exchanging Travel Rule data through Travel Rule Protocol (TRP). It's possible to run multiple instances of trpd for HA, failover and zero-downtime updates.
-
aopd: aopd is the processing engine for registering ownership proofs through Address Ownership Proof Protocol (AOPP; Digital Signatures), Visual Proofs and Satoshi Tests. It handles communication with self-hosted (non-custodial) wallets. It's possible to run multiple instances of aopd for HA, failover and zero-downtime updates.
-
email: email is a fallback mechanism for outgoing transactions to other VASPs. It connects to your SMTP server.
Example Subscriptions
The operation type 'subscriptions' is used to get pushed updates from the server
when certain data changes. GraphQL allows omitting the query type but not the
subscription type. There would be no way to distinguish them otherwise.
The GraphQL subscriptions are exposed using the GraphQL over Websocket Protocol.
A GraphQL over Websocket Protocol client implementation for Node.js can be found here.
There are currently two subscriptions available:
Authentication for Subscriptions
Please note the dedicated subscription chapter on the authentication page.
Example autod Queries
The autod query groups all the different protocols. With it, you can query the
backend for transactions, and the list of returned transactions contain a
chronologically ordered list of transactions.
This is the query we recommend using when getting transactions from 21 Travel Rule.
txDetails(status, limit, offset)
This query returns a page of transactions independent of the protocol. For example, our 'Transactions' tab in our GUI uses this object exclusively. The status argument can be INBOX, WAITING or ARCHIVE.
Example
To return the amount from the TRP and email transactions in the inbox, run
this:
{
  autod {
    txDetails(status: INBOX, limit:10 ,offset: 0) {
      ... on TrpdTx {
        trpd {
          amount
        }
      }
      ... on EmailTx {
        email {
          amount
        }
      }
    }
  }
}
txDetailsCount
This query returns the number of transactions with a particular status. Having this number is useful for pagination.
Example
{
  autod {
    txDetailsCount(status: INBOX)
  }
}
txsAsXlsx(status)
This returns all transactions formatted as a XLSX string. Please note that the returned data is not a XLSX file but a GraphQL object where a field contains the XLSX data.
Example
{
  autod {
    txsAsXlsx(status: INBOX)
  }
}
auditLogs(limit, offset)
Returns a list of event logs that have happened. Useful to view who has done what in the software.
Example
{
  autod {
    auditLogs(limit: 5, offset:0){
      username
      event
      target
      createdAt
    }
  }
}
auditLogsCount
Returns the total number of audit logs. This comes in handy when working with pagination.
Example
{
  autod {
    auditLogsCount
  }
}
Example trpd Queries
This object contains all the TRP (Travel Rule Protocol) related data. All this
data is already included in the autod query, and we suggest using that query
instead.
vasps
The vasps object describes the registered counter-party, TRP enabled, VASPs.
Only when a beneficiary LEI of an incoming TRP message matches the LEI of one of
the registered VASPs does the autod txDetails object return the TRP message.
This prevents spam.
Example
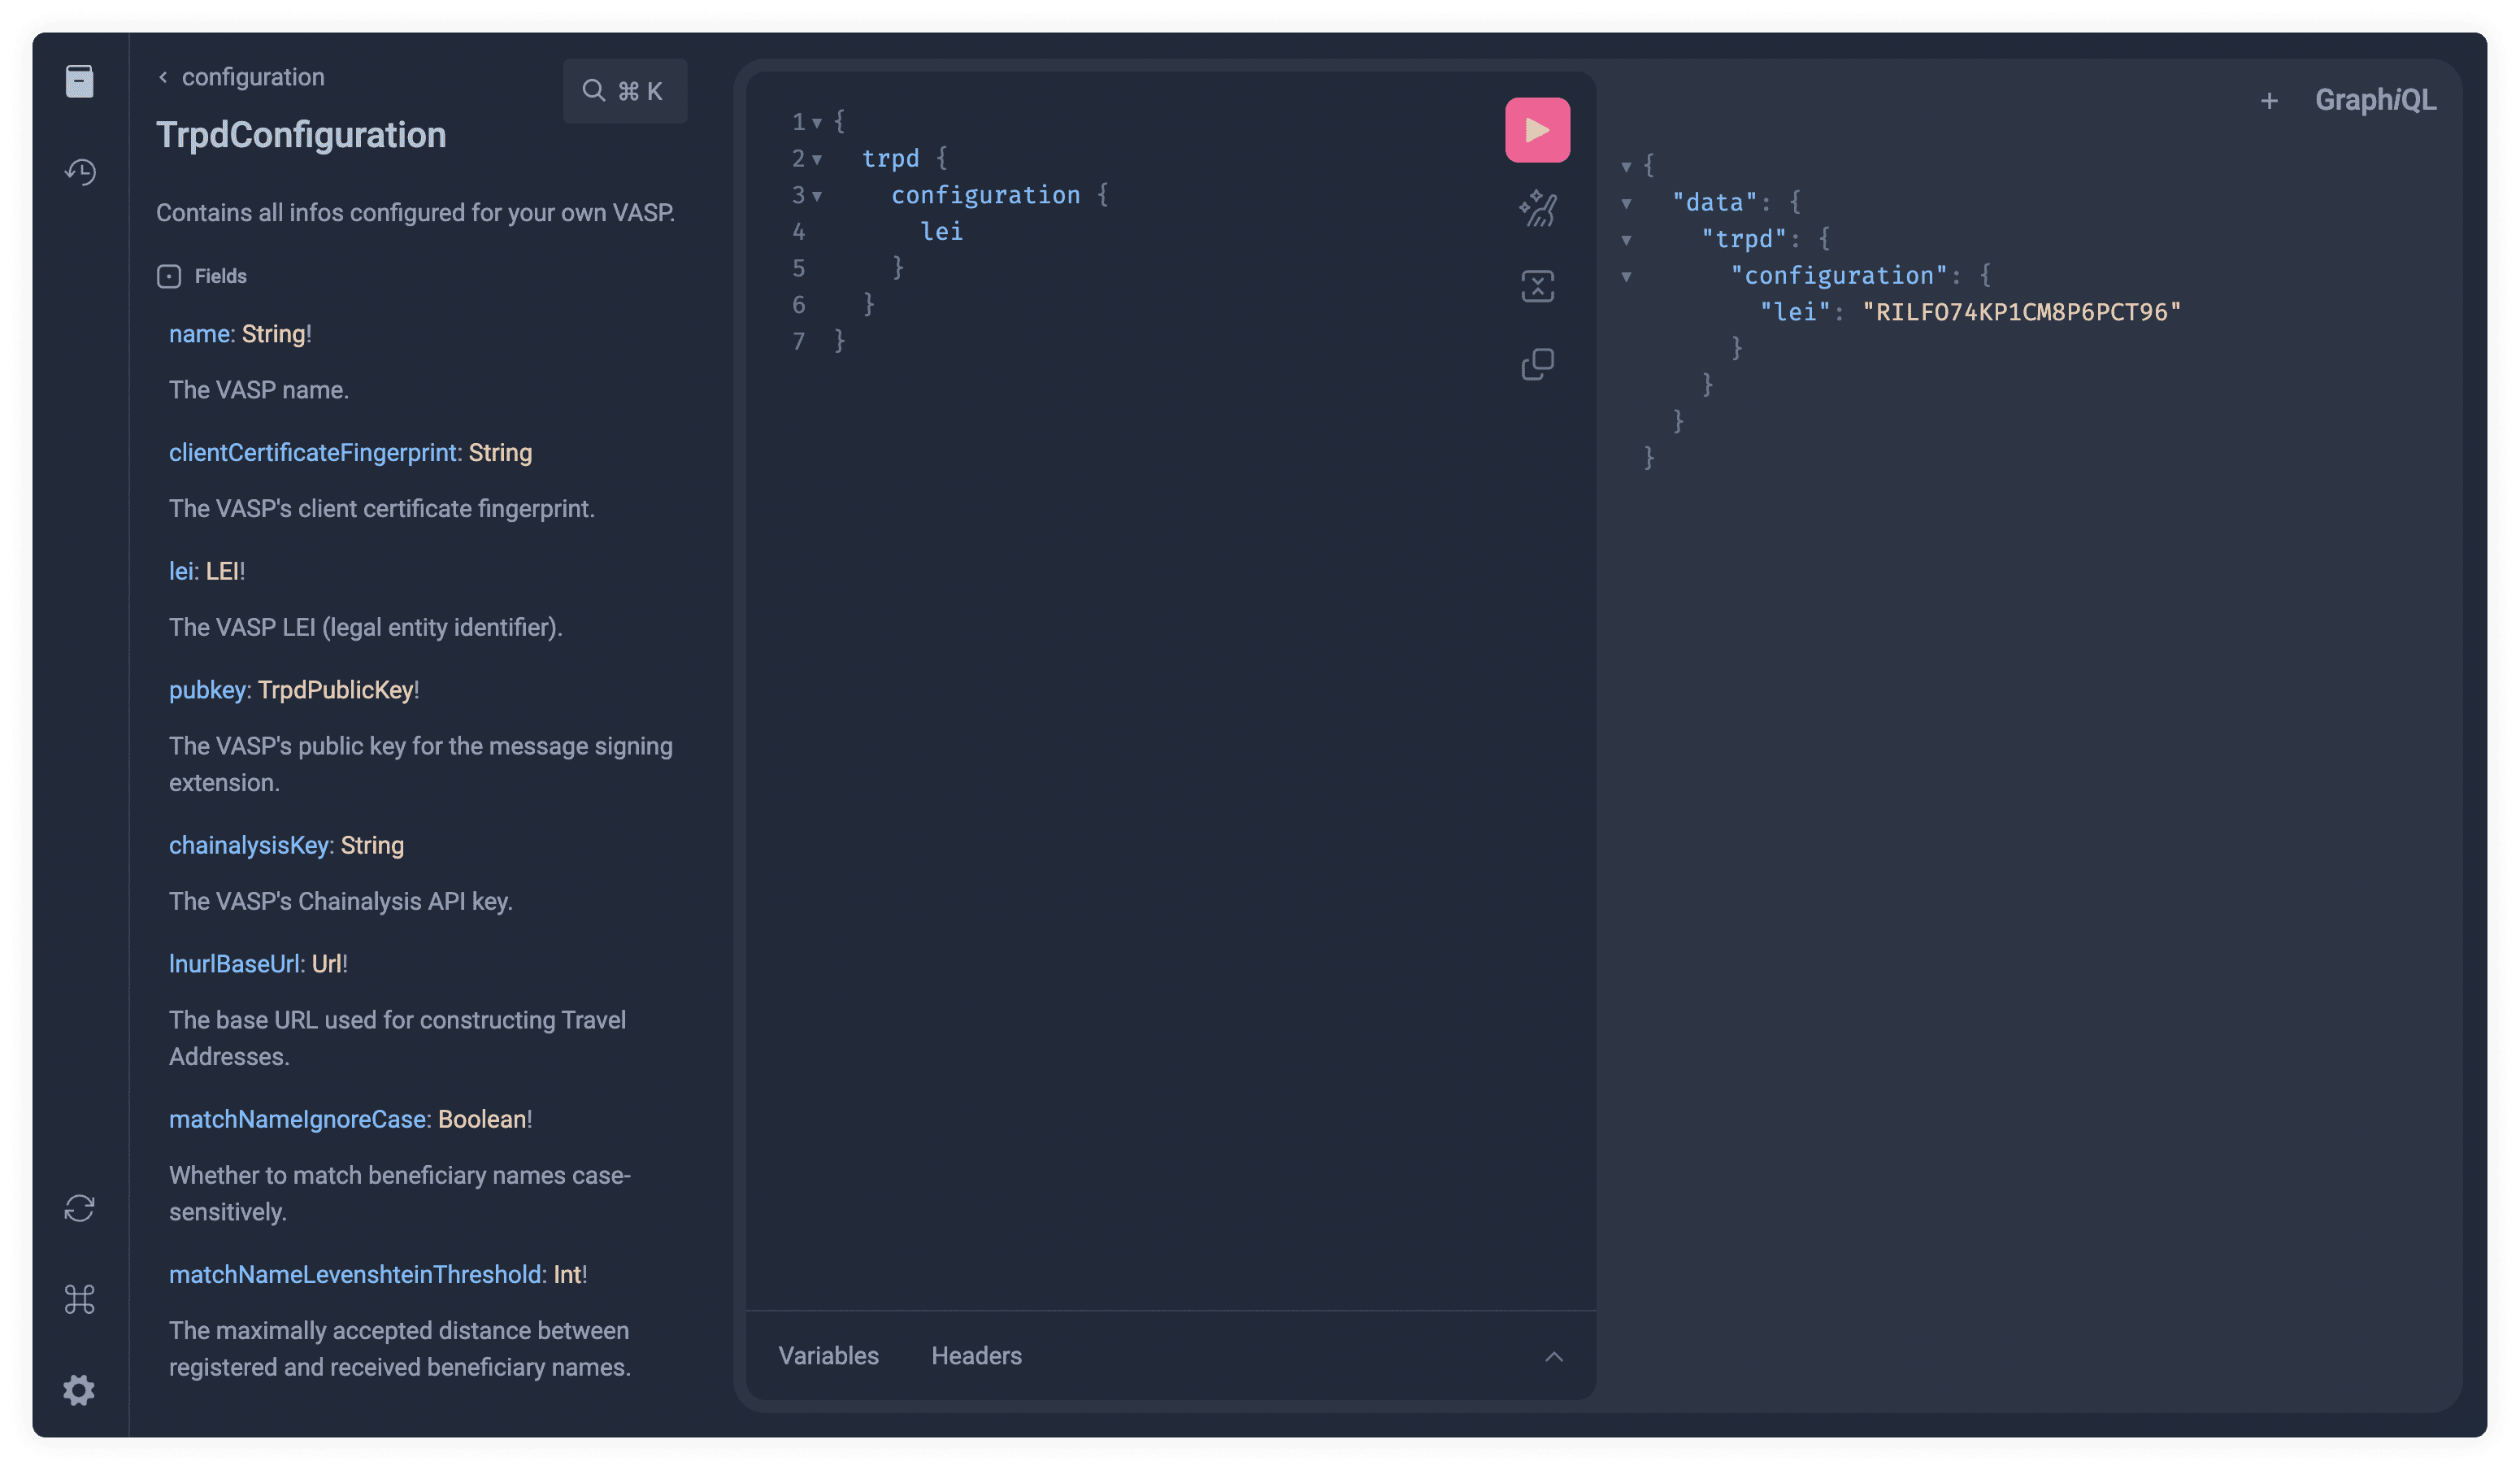
The following query returns the name and the optional public key for each configured counter-party VASP:
{
  trpd {
    vasps {
      name
      pubkey
    }
  }
}
See the live documentation for the entire list of queryable objects and fields.
custodialUsers(limit, offset)
Allows you to get a list of users and their Travel Addresses.
Example
{
  trpd{
    custodialUsers(limit:5, offset: 0){
      id
      firstName
      lastName
      asset
      walletAddress
      travelAddress
      createdAt
    }
  }
}
custodialUsersCount
Returns the number of entries in the custodial users table. You can use this number to paginate the users returned by custodialUsers(limit, offset).
Example
{
  trpd{
    custodialUsersCount
  }
}
Example aopd Queries
Querying Address Ownership Proof Protocol (AOPP; Digital Signatures), Visual Proofs and Satoshi Tests related objects happens here.
proofs
When an end-user uses AOPD to create a verified withdrawal address, it creates a
proof. Proofs currently come in three different formats: AopdSignatureProof,
AopdMediaProof and AopdSatoshiProof. Once a proof is submitted, it is
verified. Listing verified proofs happens with this object. Pagination is
supported.
Example
Get the first ten proofs with:
{
  aopd {
    proofs(offset: 0, limit: 10) {
      ... on AopdSignatureProof{
        id
    	}
      ... on AopdMediaProof{
        id
    	}
      ... on AopdSatoshiProof{
        id
    	}
    }
  }
}
proofsAsXlsx
This returns all proofs formatted as a XLSX file byte contents, encoded as base64 string. Please note that the returned data is not a XLSX file but a JSON document in which one field contains the XLSX data.
Example
{
  aopd {
    proofsAsXlsx
  }
}
proofsCount
A supporting query that returns the number of verified proofs.
Example
{
  aopd {
    proofsCount
  }
}
Example email Queries
Email is the fallback mechanism for staying compliant with the FATF Travel Rule.
vasps
As with the trpd vasps query, this returns a list of registered VASPs to whom
you can email.
Example
In essence, the same as the previously mentioned trpd vasps query.
{
  email {
    vasps {
      name
    }
  }
}
Example trpd Mutations
Everything related to the Travel Rule Protocol.
registerOrUpdateVasp
Before transactions are turned by the txDetails query, a VASP needs to be
registered.
Example
mutation {
  trpd {
    registerOrUpdateVasp(vasp: {
        url: "https://someonesvasp.ch/",
        name: "CHANGES_HERE",
        lei: "ERTV00EW0P08QHUFXO73",
        autoApproved: false
    }) {
      name
    }
  }
}
Example aopd Mutations
Changing AOPP (Digital Signatures), Visual Proof and Satoshi Test related server state happens under this object type.
registerProof
Proofs obtained via wallets that do not support AOPP can be stored with this query. For example, the end-user has manually submitted the signature for a signing challenge.
Example
mutation {
  aopd {
    registerProof(proof: {
      message: "hello",
      asset: BTC,
      address: "bc1qnshsvhrfl28g03k0vxdez6vua56r0c72xy9e93",
      signature: "H1oYVmDaWxZBPEk2ou4myn1SRC20ycBUPPD5fLS+SmQ1e04Bi1J9mIJ5fNhe3khDhJRUX2fU+VHGKlJdAjYIvBU="
    }) {
      id
    }
  }
}
Example email Mutations
Email is the fallback mechanism that when all else fails, allows you to remain compliant.
registerVasp
Sending emails can only be sent to previously registered VASPs. Use this query to register email VASPs.
Example
mutation {
  email {
    registerVasp(vasp: {
      name: "Your Vasp"
      email: "changes_here@my-vasp.com"
    }) {
      email
    }
  }
}
Example aopdAoppProofs Subscription
This subscription listens to Address Ownership Proof Protocol (AOPP) proofs and will receive a notification with the full signature proof.
The aopdAoppProofs subscription is served from /aopd/graphql-ws. Please use
GraphiQL to obtain the query and returned object details.
Unfortunately, subscriptions are not supported on GraphiQL so only the documentation can be explored there.
Sample Code
Below we provide fully functional sample code that implements authentication and listens to new verified proofs via the GraphQL subscription API.
Make sure to install Node.js on your system before proceeding.
Execute the following snippet to subscribe for obtaining new verified proofs in real-time that are submitted through https://virtualcounter.testing.21analytics.xyz/withdraw/wallet. Note, that the script will print nothing if there are no proofs submitted.
mkdir proof-listener
cd proof-listener
curl -sO https://docs.21analytics.ch/7.0.0/api/subscriptions/proofs.js
npm add graphqurl@1.0.3
node proofs.js
The source code file can be downloaded here or copy and pasted from the snippet below. Change the values of the constant variables indicated by comments starting with ❗to make the sample code work against your own 21 Travel Rule deployment.
// Copyright (c) 2024 21 Analytics AG. All Rights Reserved.

const { createClient } = require("graphqurl")

// ❗
// change the GRAPHQL_SUBSCRIPTION_URL value to the
// one you have configured following this guide (usually,
// only the host needs to be adjusted):
// https://docs.21analytics.ch/7.0.0/deployment/deployment.html
const GRAPHQL_SUBSCRIPTION_URL = new URL(
    "wss://testing.21analytics.xyz/aopd/graphql-ws",
)

// ❗
// change the CLIENT_SECRET and CLIENT_ID values to the ones
// you have configured following this guide:
// https://docs.21analytics.ch/7.0.0/api/authentication.html
const CLIENT_SECRET = "aCF79Mxowhpv3mzOpEqW5EEbI5NXeAE9"
const CLIENT_ID = "21travel-api"

const body = new URLSearchParams()
body.append("grant_type", "client_credentials")
body.append("scope", "openid")
body.append("client_id", CLIENT_ID)
body.append("client_secret", CLIENT_SECRET)

fetch(
    `https://${GRAPHQL_SUBSCRIPTION_URL.host}/auth/realms/21travel/protocol/openid-connect/token`,
    { method: "POST", body },
)
    .then((data) => data.json())
    .then((json) => json.access_token)
    .then((bearer_token) => {
        const client = createClient({
            websocket: {
                endpoint: GRAPHQL_SUBSCRIPTION_URL,
                onConnectionSuccess: () => {
                    client.subscribe(
                        {
                            subscription:
                                "subscription AopdAoppProofs { aopdAoppProofs { id } }",
                        },
                        ({ data }) => {
                            console.log(
                                `✅ received new valid proof with id: ${data.aopdAoppProofs.id}`,
                            )
                        },
                        console.error,
                    )
                },
                parameters: { bearer_token },
            },
        })
    })
trpdTransactions
This subscription is mainly used to listen for changes in 'status'. That is changes from any of the three statuses; INBOX, WAITING, or ARCHIVED.
The trpdTransactions subscription is served from /trpd/graphql-ws. Please
use GraphiQL to obtain the query and returned object details.
Unfortunately, subscriptions are not supported on GraphiQL so only the documentation can be explored.
GUI
Compliance officers are the targeted users of the GUI of 21 Travel Rule. In their day-to-day operations, they will use the GUI to send out and review incoming Travel Rule messages. The GUI also displays AOPP proofs to inspect and export.
We expect low volume (but compliant!) customers to use the GUI. High volume customers might find it helpful as a dashboard of sorts.
Handling the management of known VASPs and the configuration of your VASP happens in the GUI as well.
In summary, the GUI exposes the following functionality:
- Sending of Travel Rule messages
- Reviewing of incoming Travel Rule messages
- Own VASP configuration
- Known counterparty VASP configuration
- AOPP proof inspection
- Export of data
- View audit logs
Login
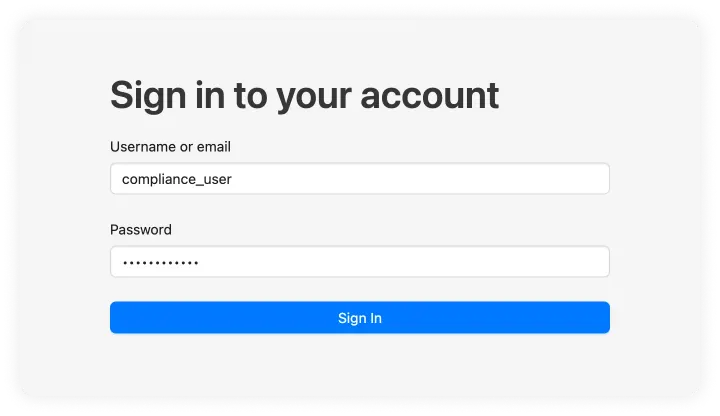
Once 21 Travel Rule is installed and used for the first time, an admin needs to set up the compliance users on Keycloak. The admin should give you a temporary password and assign a username to the compliance user.
User Name and Password
Once the username and password are set up by the admin you can add them to the following form.
Login Password Update
Since the password provided by the admin is temporary you will be required to choose a new password for future use. This password can be modified later.
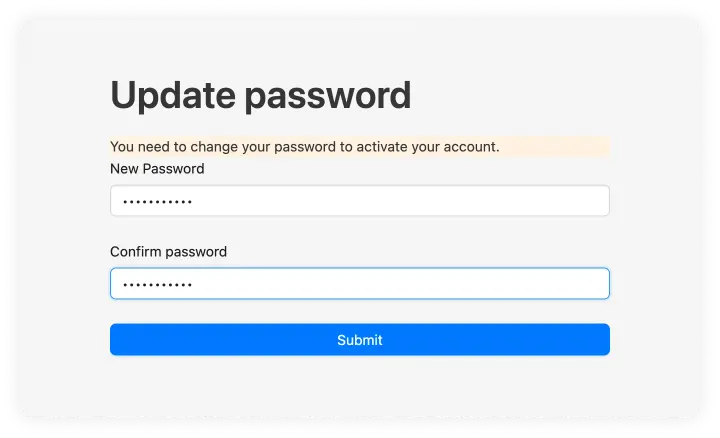
After this you will be automatically logged in and can Login with your new password the after logging out. We will be using another user named 'Bitcoin Exchange AG' throughout the documentation.
Configure Your VASP
Once logged in, you need to configure your own VASP. You can configure four different sets of attributes:
- TRP
- Address Ownership
- Other Protocols
Fill out those you feel are relevant to your VASP.
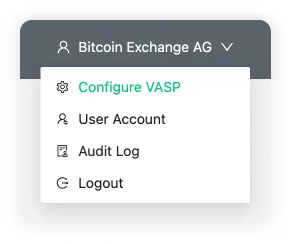
You can find these configuration settings in the dropdown menu to the right of the header.
Once you have saved a configuration, you are encouraged to configure counterparty VASPs.
TRP
TRP is our preferred protocol. First, fill out the name of your VASP and the associated LEI. Upon saving, a Signing Public Key shows. If you wish to use message signing, you can give this to a counterparty VASP.
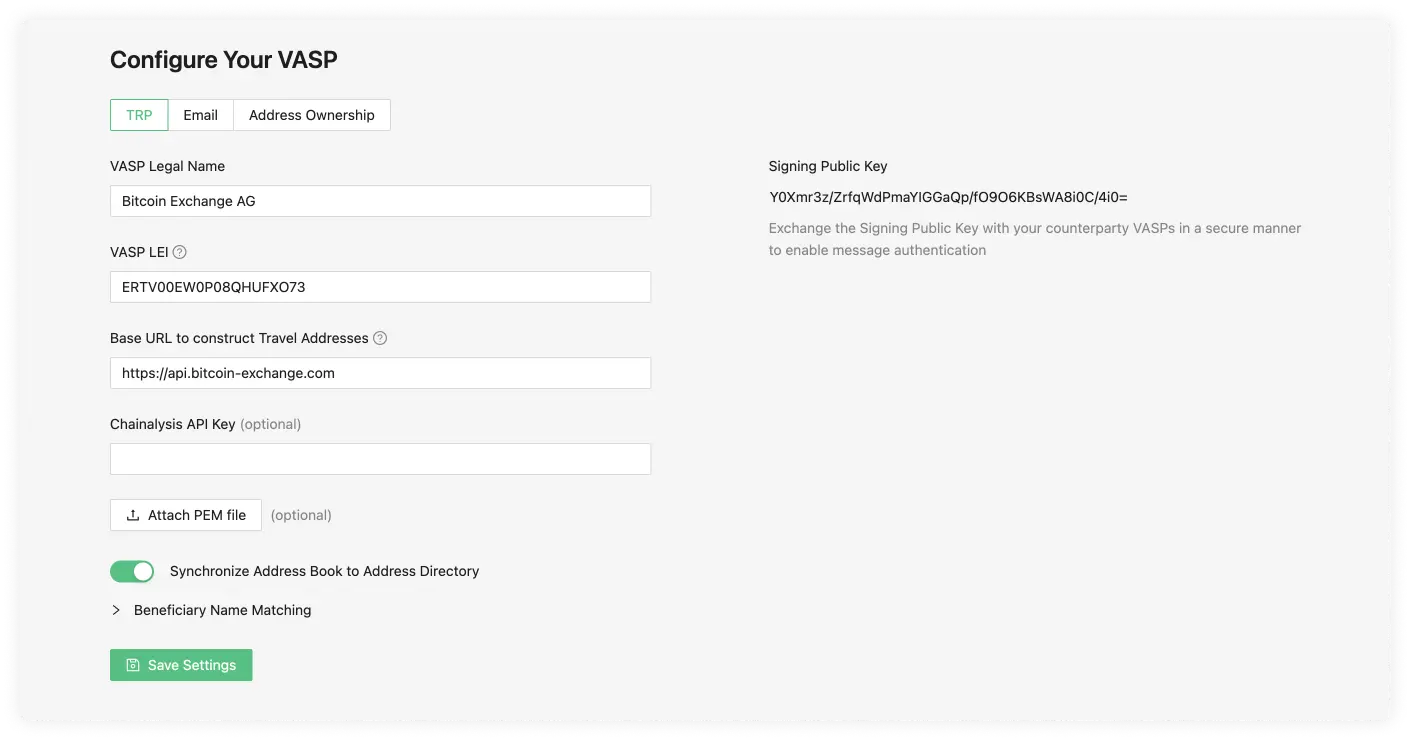
VASP Legal Name
The VASP Legal Name field is used to identify the VASP. For example, 'SDX'.
VASP LEI
The LEI (Legal Entity Identifier) field is a unique identifier for your VASP, you can register for this on the Global Legal Entity Identifier Foundation (GLEIF) website or, for testing purposes, use our LEI Generator. The owner of the VASP or a representative should present you with their LEI; however, the LEI registry is also public.
Base URL to Construct Travel Addresses (optional)
The URL 21 Travel Rule uses to resolve its
Travel Addresses. The base
URL will be auto-detected when left empty (recommended). If auto-detection fails
then usually there are configuration mistakes in the
Caddyfile.
The option to bypass auto-detection is mainly provided for users that don't use
caddy.
Signing Public Key
This key is generated once the TRP configuration data has been submitted. It is part of a public/private key that is randomly generated. The purpose of this is to add an additional layer of security by using virtual signatures to authenticate TRP messages.
Chainalysis API Key (optional)
When a Chainalysis API Key is added then all the transaction ID's and cryptocurrency addresses are submitted to Chainalysis for risk analysis. You can contact your technical team to request the Chainalysis API Key.
Synchronise Address Book to Address Directory
If active, this will send the new combinations of Wallet Address and Travel Address you add in the Address Book to the Address Directory so that other VASPs using TRP can easily find your customer's Travel Address.
Beneficiary Name Matching
Next, choose how strict or lenient you want to be regarding beneficiary name matching. Opt to ignore the letter case altogether or allow up to 2 mistakes in the spelling or case size. This flexibility will work on the counterparty VASP sending a transaction.
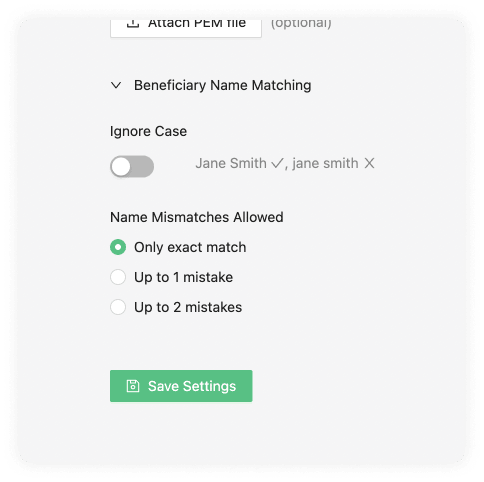
Enabling this option allows you to be lenient with names submitted to you. It has no effect on names you submit to others.
Ignore Case
The ignore case will allow the counterparty VASP sending the transaction to do this even if the beneficiary name matching the Travel Address cases doesn't match.
Name Mismatches Allowed
Name mismatch allows your counterparty to be more lenient with the names associated to one of your users' Travel Address. You can choose between one or two mistakes. Mistakes are counted using Levenshtein distance.
For example:
'cat' and 'cot' has distance 1 'cat' and 'calm' has distance 2
You can test it here.
If a counterparty VASP does not support any Travel Rule protocol, 21 Travel Rule can send an email with the relevant information instead. This makes you compliant with the Travel Rule nonetheless.
If you want to configure email, and we recommend you do, you can do that on the 'Email' tab. If you are unsure of this information, consult your IT team to complete the fields.
We have provided the settings for Google (Gmail) below.
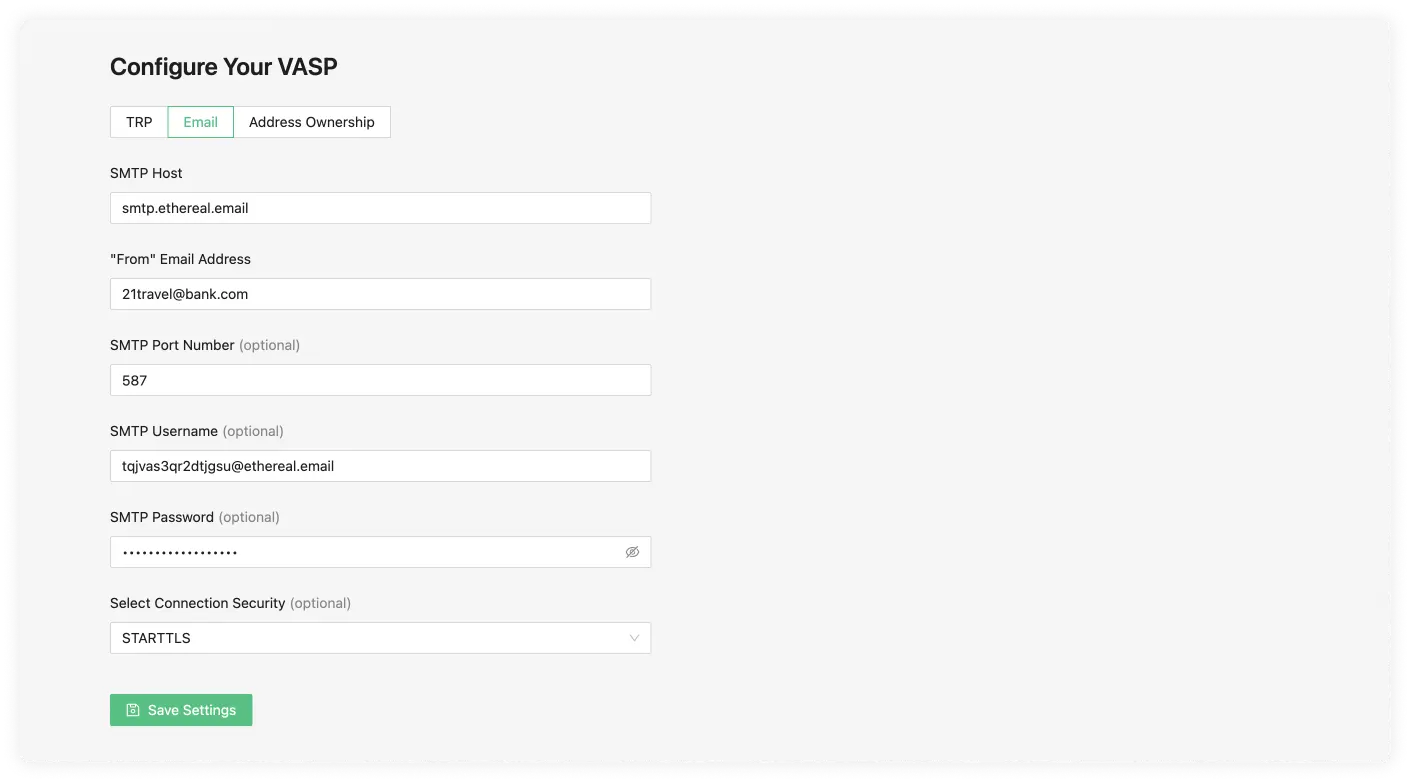
SMTP Host
An SMTP server is used to send and receive emails. Your SMTP server is either managed by your IT department or an external company. Gmail is an example of a host. If you are unsure of this information, it is best to check with your IT team.
"From" Email Address
This is the email address you will use to send information from.
SMTP Port Number (optional)
This is the port number of your SMTP. The standard secure SMTP port is 587. As a common alternative, port 2525 is usually used. With this said, this field is optional and defaults to 587; if you are unsure, leave this empty.
SMTP Username (optional)
This is the name of the user on the SMTP server you want to use. This will usually be configured on the SMTP server by your IT team.
SMTP Password (optional)
Once your IT team configures the SMTP username in the SMTP server configuration, a password will also be required.
Select Connection Security (optional)
These can be one of three options:
- STARTTLS
- TLS
- OPTIONAL STARTTLS
The default value we use is usually STARTTLS, although 21 Travel Rule will automatically choose the option more appropriate for you. If issues do appear you can consult your IT team.
Gmail and Google Workspace SMTP Setup
Objective
In this guide you will learn how to set up the SMTP settings for Gmail and
Google Workspace email accounts. Note, that Gmail and Google Workspace email
addresses don't necessarily end in @gmail.com. Hence, your company's email
accounts might be managed by Google even if the email address doesn't reveal it.
Instructions
Gmail SMTP Host
smtp.gmail.com
Gmail "From" email address
For the "From" email address, use the email address of your Gmail account.
Gmail SMTP Port Number
587
Gmail SMTP Username
The same full email used in the "From" email address must be used as the SMTP Username.
Gmail SMTP Password
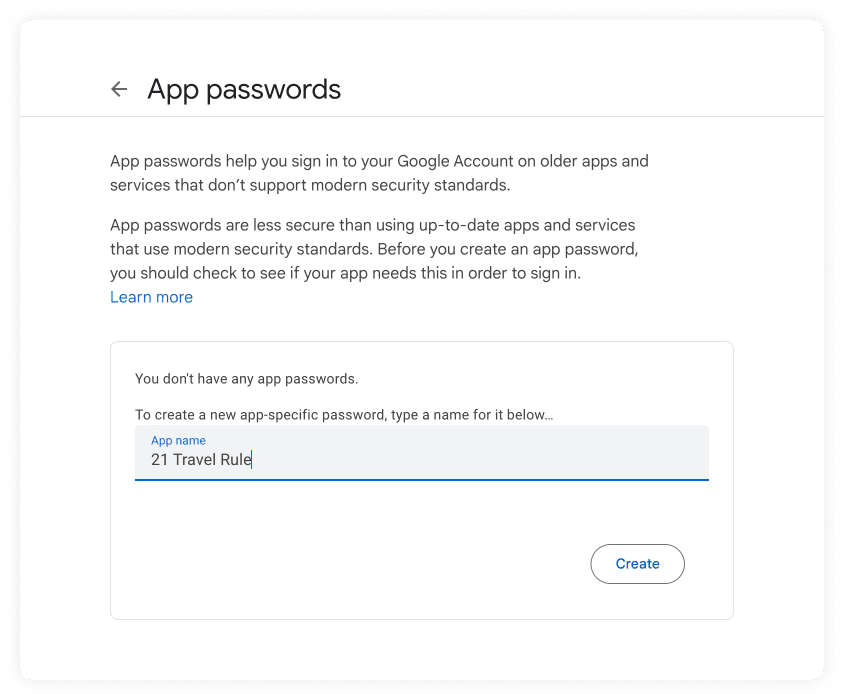
To generate the SMTP Password, go to https://myaccount.google.com/apppasswords.
When creating the app password you will need to add a App Name. This name can be
anything you want, we have used 21 Travel Rule in the following example.
After you click create, a pop-up will appear with the app password. At the time of the writing the password is displayed with spaces. Copy the password and remove the white spaces from the password.
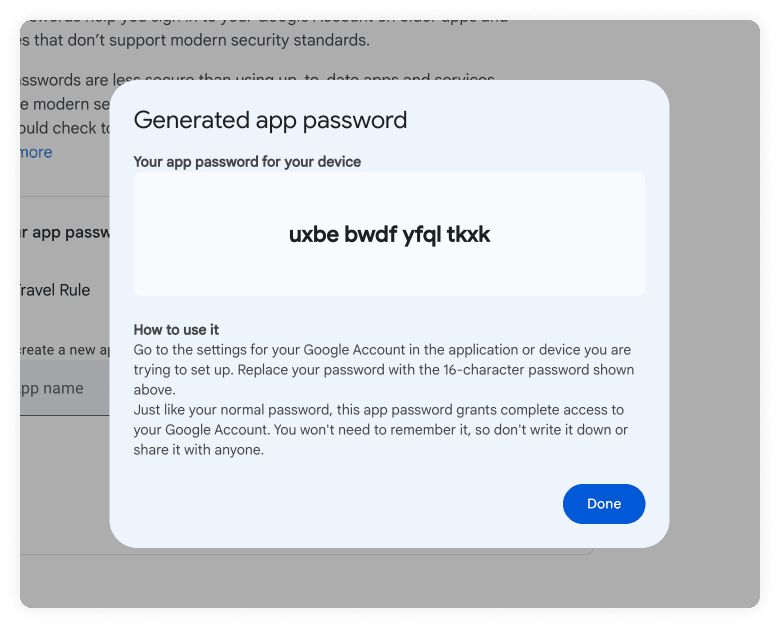
Note: Remember to remove the white spaces from the password when you copy it to the SMTP Password.
Gmail Connection Security
STARTTLS
Putting all of this together, the final Google configuration should look like this:

Address Ownership
On the tab 'Address Ownership', you can configure the AOPP callback URL and Satoshi Test base amounts.
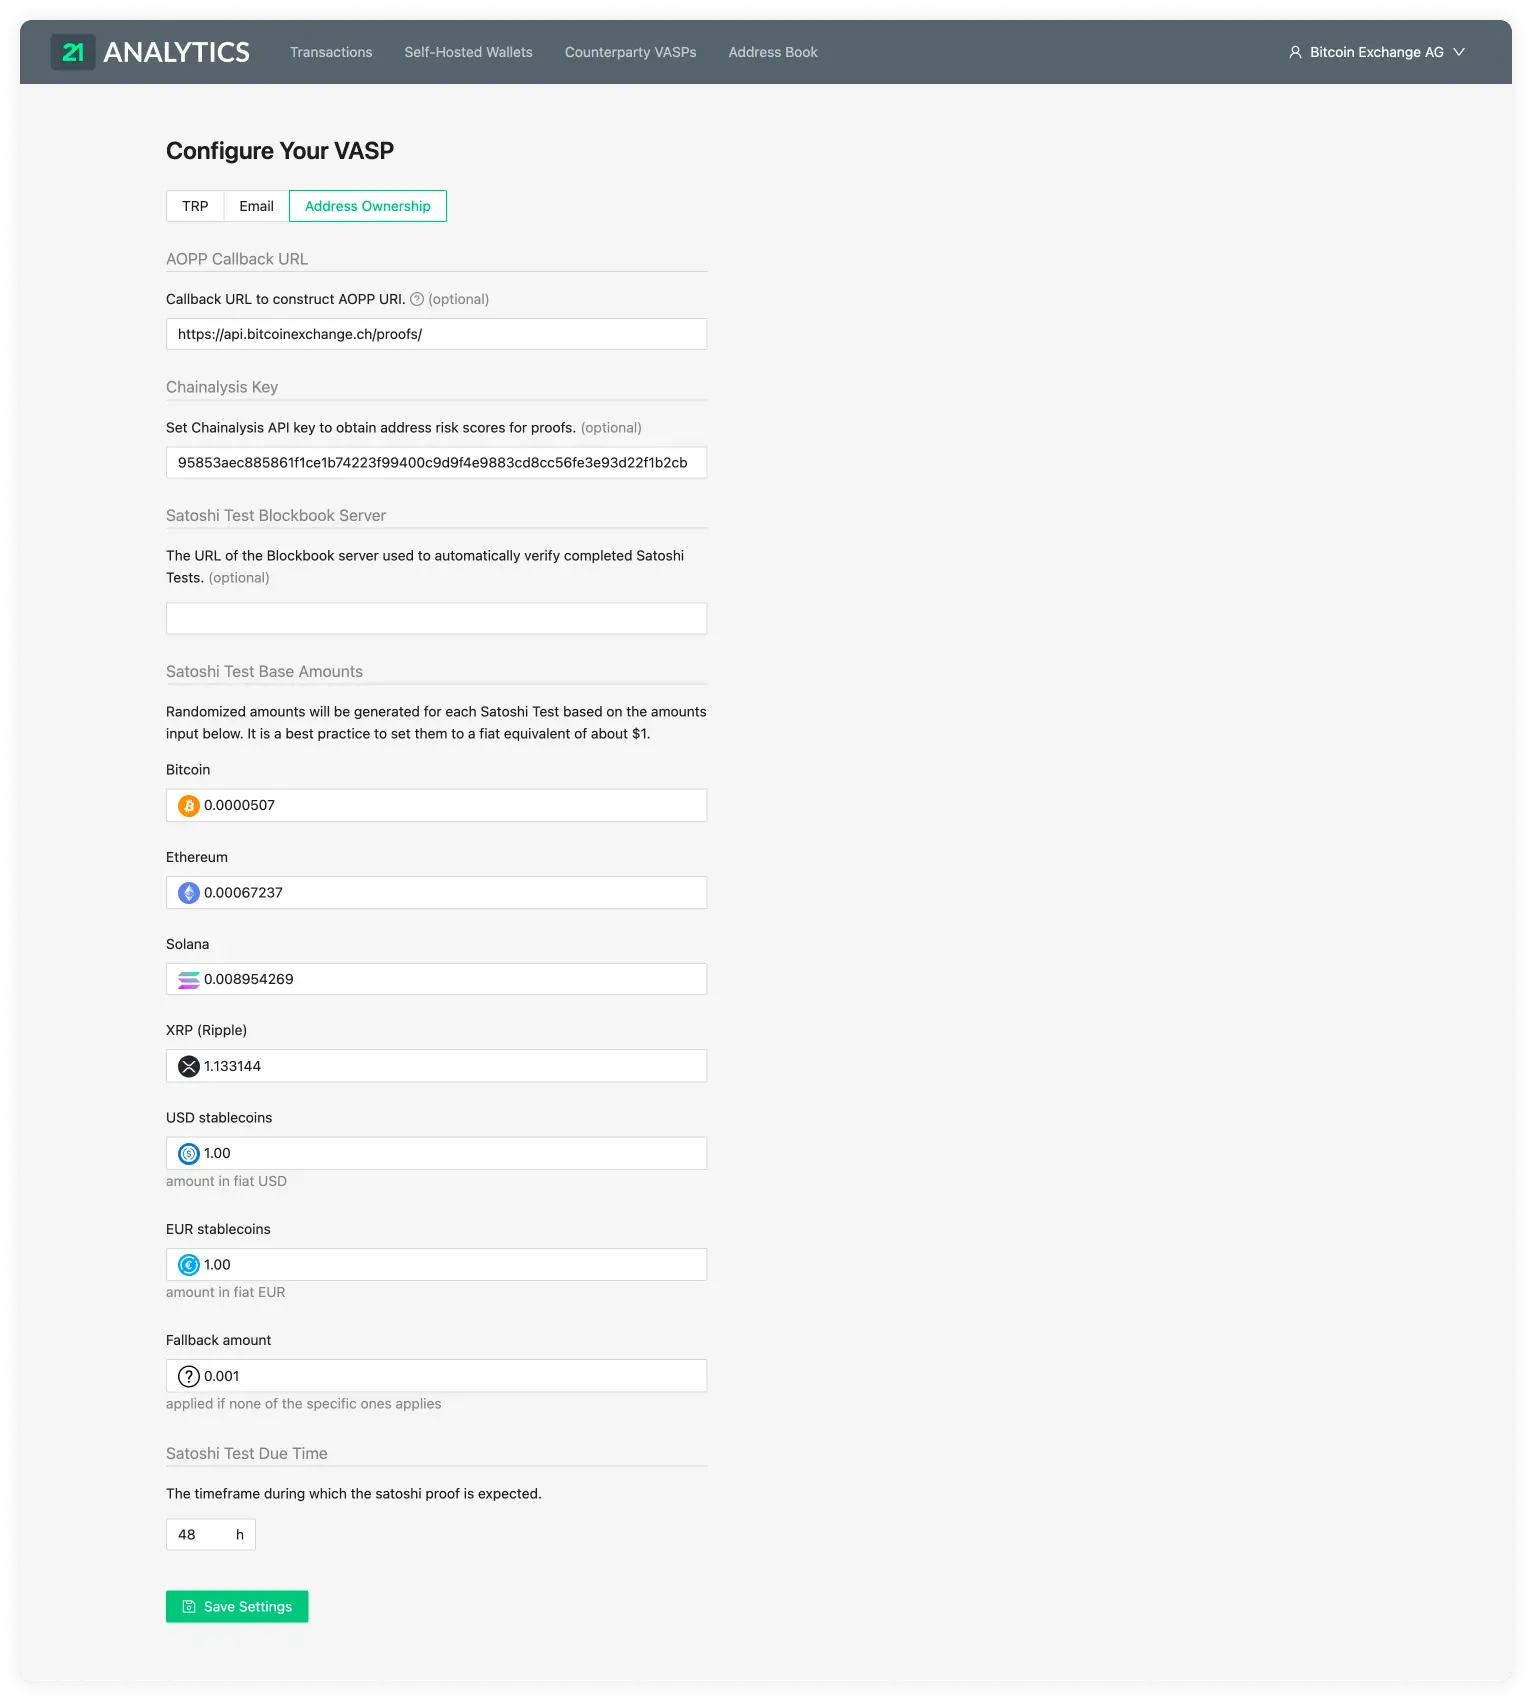
AOPP Callback URL (optional)
The end user's wallet uses this URL to submit an address ownership proof to 21
Travel Rule for verification. The callback URL will be auto-detected when left
empty (recommended). If auto-detection fails then usually there are
configuration mistakes in the
Caddyfile.
The option to bypass auto-detection is mainly provided for users that don't use
caddy.
NOTE: The callback URL is not meant to be used by API integrators to
obtain a submitted proof. Instead, use the
aoppAoppProofs GraphQL
subscription for that purpose.
Chainalysis Key (optional)
When a Chainalysis API Key is added then all the cryptocurrency addresses from the proofs are submitted to Chainalysis for risk analysis. The risk results are shown in the Proofs Overview Table. You can contact your technical team to request the Chainalysis API Key. The risk scores can be found in the Self-hosted Wallet Proof Overview page.
Satoshi Test Blockbook Server (optional)
When the Blockbook Server URL is added, submitted Satoshi Tests transactions will be automatically recognised by the 21 Travel Rule, which will monitor the blockchain for incoming transactions. This is done using a Blockbook server. Blockbook is an open-source blockchain indexing software (for more information see here) which can be run by anyone - the VASP who runs 21 Travel Rule, a 3rd party or 21 Analytics (get in touch with us for more information). If no URL is added then this feature will be disabled and the compliance officer will have to manually verify the Satoshi Test transaction using a block explorer application of their preference.
Satoshi Test Base Amounts
Randomised amounts will be generated for each Satoshi Test based on the amounts input below. It is a best practice to set them to a fiat equivalent of about $1.
Satoshi Test Due Time
You can select how much time the user has to conduct the transaction (Satoshi Test). After this time a check will be done to see if the values match.
Other Protocols
Our software offers to configure any protocol upon request. For this, one must contact the 21 Analytics team and request access.
Counterparty VASPs
21 Travel Rule helps you to conduct and manage proper counterparty VASP due diligence as mandated by the Travel Rule. Once counterparty VASP due diligence is finalized, you should add the VASP to the list of trusted VASPs you want to maintain a business relationship with.
21 Travel Rule allows you to check and manage the list of trusted VASPs, sorted by the means of communication, which are TRP and Email.
Add VASP
You can add a trusted counterparty VASP to interact with by clicking on the 'Add VASP' button on the top right of the 'Counterparty VASP' page.

This will prompt a pop-up on which you can select which protocol you will use to interact with the counterparty VASP.
Perform Counterparty Due Diligence
A thorough check of the counterparty VASP needs to be performed before adding it to the list of trusted counterparty VASPs. This is to ensure that counterparty due diligence is performed as per the Travel Rule's requirements, bearing in mind that the Travel Rule requires that a VASP has assessed the counterparty's anti-money laundering and counter-terrorism financing policies and regulatory status before initiating transactions.
Upon successful completion of counterparty due diligence, that VASP can be manually added to the list of trusted counterparty VASPs. 21 Travel Rule will require a valid LEI or a valid email address.
Add TRP VASP
Under the TRP tab, we see the following input data fields:
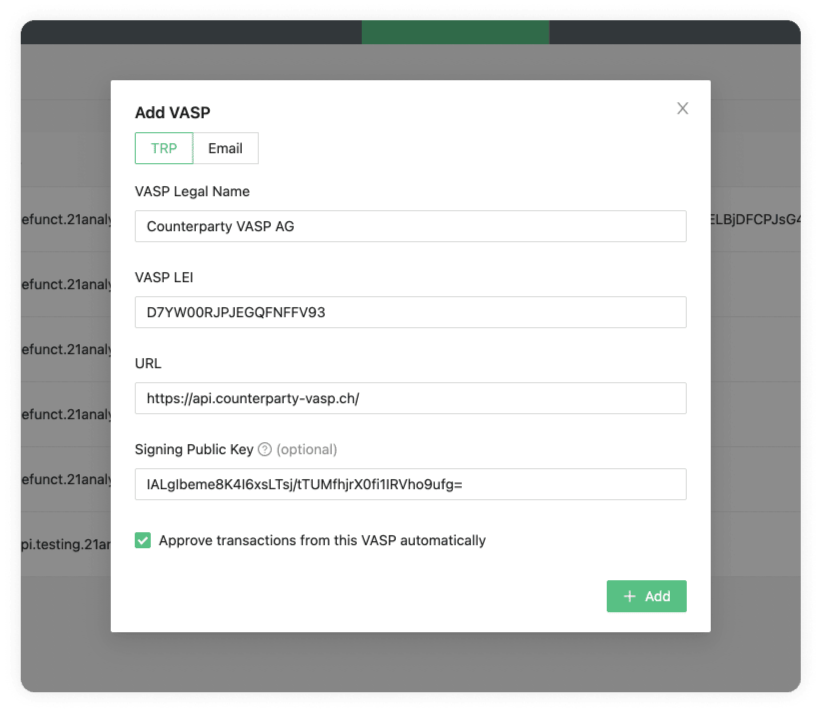
The required data for those fields is usually obtained during counterparty due diligence.
VASP Legal Name
Enter the counterparty's company name as incorporated in the commercial registry.
VASP LEI
Enter the counterparty's LEI (Legal Entity Identifier). You can search in the public LEI registry for your counterparty's LEI. Also, you can obtain the counterparty's legal name from there.
URL
Enter the URL your counterparty uses for TRP. Your counterparty will provide this.
Signing Public Key (optional)
Enter your counterparty's signing public key. This adds a layer of security by digitally signing TRP messages. The counterparty VASP should provide this Signing Public Key.
21 Travel Rule will enforce that your counterparty configures your Signing Public Key if you have configured theirs. Otherwise, their messages will be rejected. You can find your Signing Public Key in the Configure your VASP page.
Approve Transactions from This VASP Automatically
Tick this checkbox to activate auto-approval of incoming TRP messages from this counterparty.
Add VASP Email
As a fallback method, you can use Email; this is very simple to set up but comes with numerous drawbacks. Under the Email tab, we see the following input data fields:

The required data for those fields is usually obtained during counterparty due diligence.
Name
Enter the counterparty's company name as incorporated in the commercial register.
Enter the email address of the counterparty.
TRP
On the Counterparty VASP page you can find the TRP tab.
Here you will find a table with a list of vasps your team added choosing the TRP protocol.
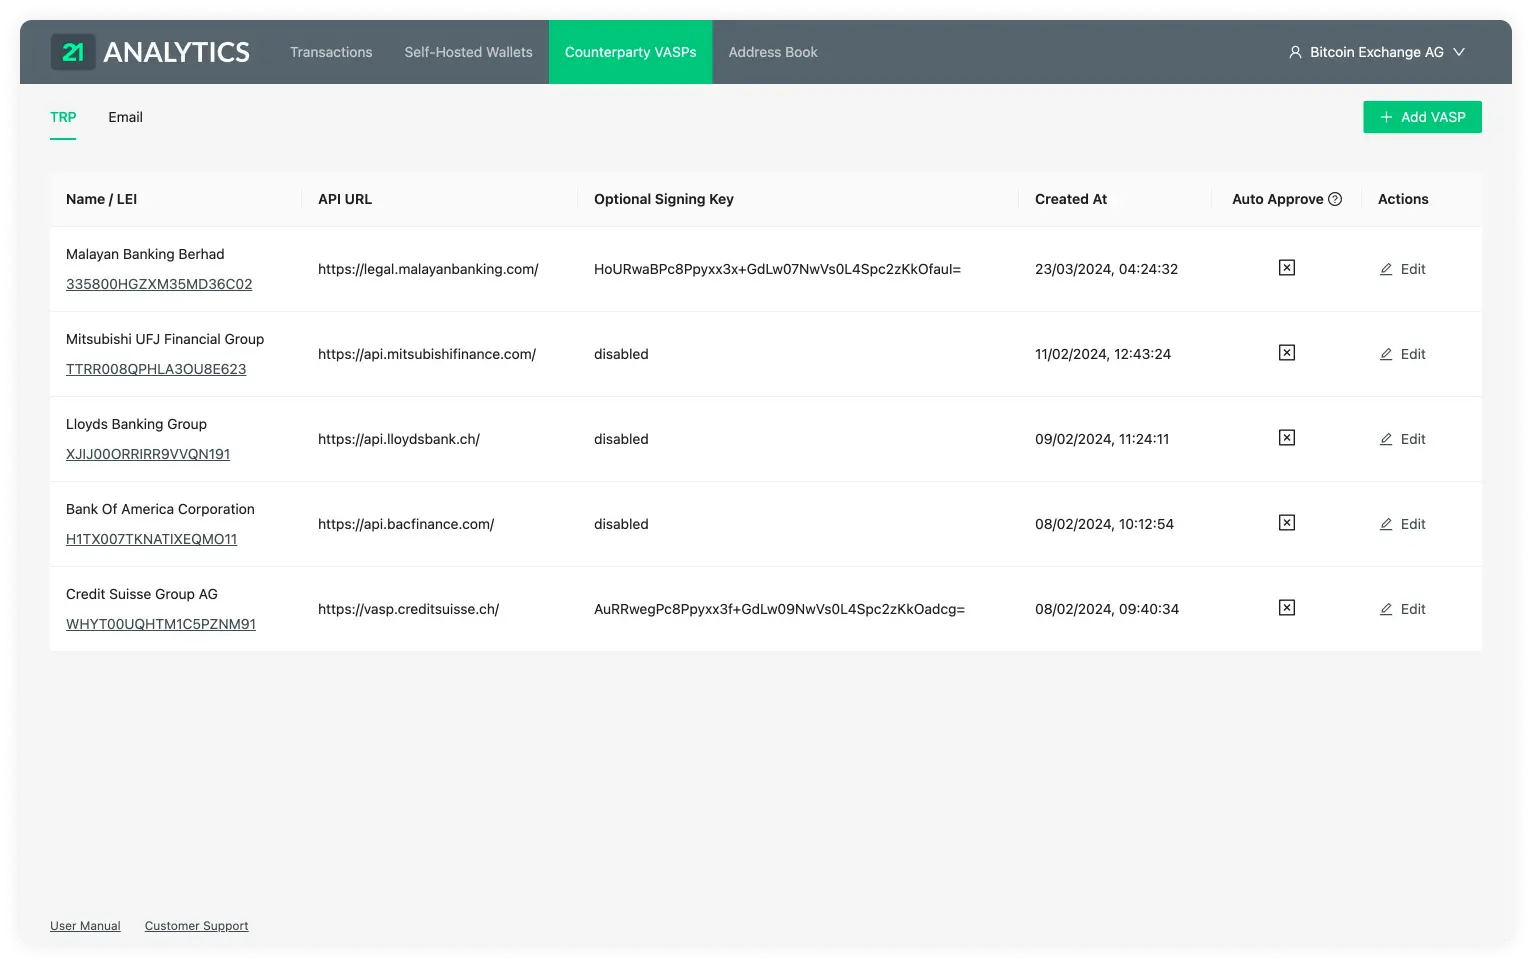
This table contains the data introduced by you or someone with access to the account. To add additional VASPs you should use the Add VASP button stated previously and choose the TRP tab. This table has the following columns:
Name / LEI
List of the chosen VASP names associated with the LEI (Legal Entity Identifier). The LEI is provided by the counterparty VASP when it is added to the table.
API URL
The list of URLs associated with the LEI (Legal Entity Identifier). This is required to establish a connection through TRP (Travel Rule Protocol).
Optional Signing Key
The list of signing keys provided by the counterparty VASP. This field is
optional; if your team decides not to use it, the text will be disabled in
this field. Ensure your IT team has also provided your own Public Signing Key to
the counterparty VASP for communication to work correctly with additional
security.
Created At
The time and date when the VASP was added to the Counterparty VASPs.
Auto Approve
This field is indicated if the auto-approve feature is enabled. You will see either a tick or a cross within a box.

If you see a tick, it has indeed been activated, and all the steps in the TRP flow will trust and accept all transactions that come from the associated counterparty VASP.

If you see the cross, it's disabled, and transactions will need to be approved or declined by you manually. This adds a layer of control and filtering if desired.
Actions
Here you can find the Edit button.

Clicking on this button allows you to change all the fields in the row except the LEI. The LEI works as the ID associated with all the previous transactions linked to this VASP; this can not be changed.

Once changes have been made you will now see two options under the actions column. These are Save VASP:

or Cancel:

which reverts all changes made.
On the Counterparty VASP page, you can find the Email tab.
Here you will find a table with a list of VASPs your team added choosing the Email protocol.

This table contains the data introduced by you or someone with access to the account. To add additional VASPs you should use the Add VASP button stated previously and choose the Email tab. This table has the following columns:
Name
List of the chosen VASP names.
The email associated with the VASP name. This must be correct to establish communication between the counterparty VASP.
Actions
There are two actions available under the Email tab:
Edit
By clicking on the Edit button,
you will be able to edit the row and change the email of the VASP. This is in case the VASP changes its email.

Once changes have been made, you will see two options under the actions column. These are Save VASP:
or Cancel:
which reverts all changes made.
Distrust
This option allows you to sever further communication with the counterparty VASP by blocking emails. You simply need to click on the Distrust button.
This will be reflected in the row associated with the VASP in the GUI.

Address Book
Under the Address Book tab in the header, you will find the Address Book page. This page allows you to have all your customers organised in one place and easily create Travel Addresses for them. It is recommended that this process be automated through the API or by preparing a script to integrate with your custodial system if you have one. The GUI is intended for low-volume customers. There are two main parts on this page:
Register A Customer
Note: We recommend that you automate this manual process using the API.
The Register A Custom button allows you to add a new customer to the table.

This will prompt a pop-up with the information required to register the customer.
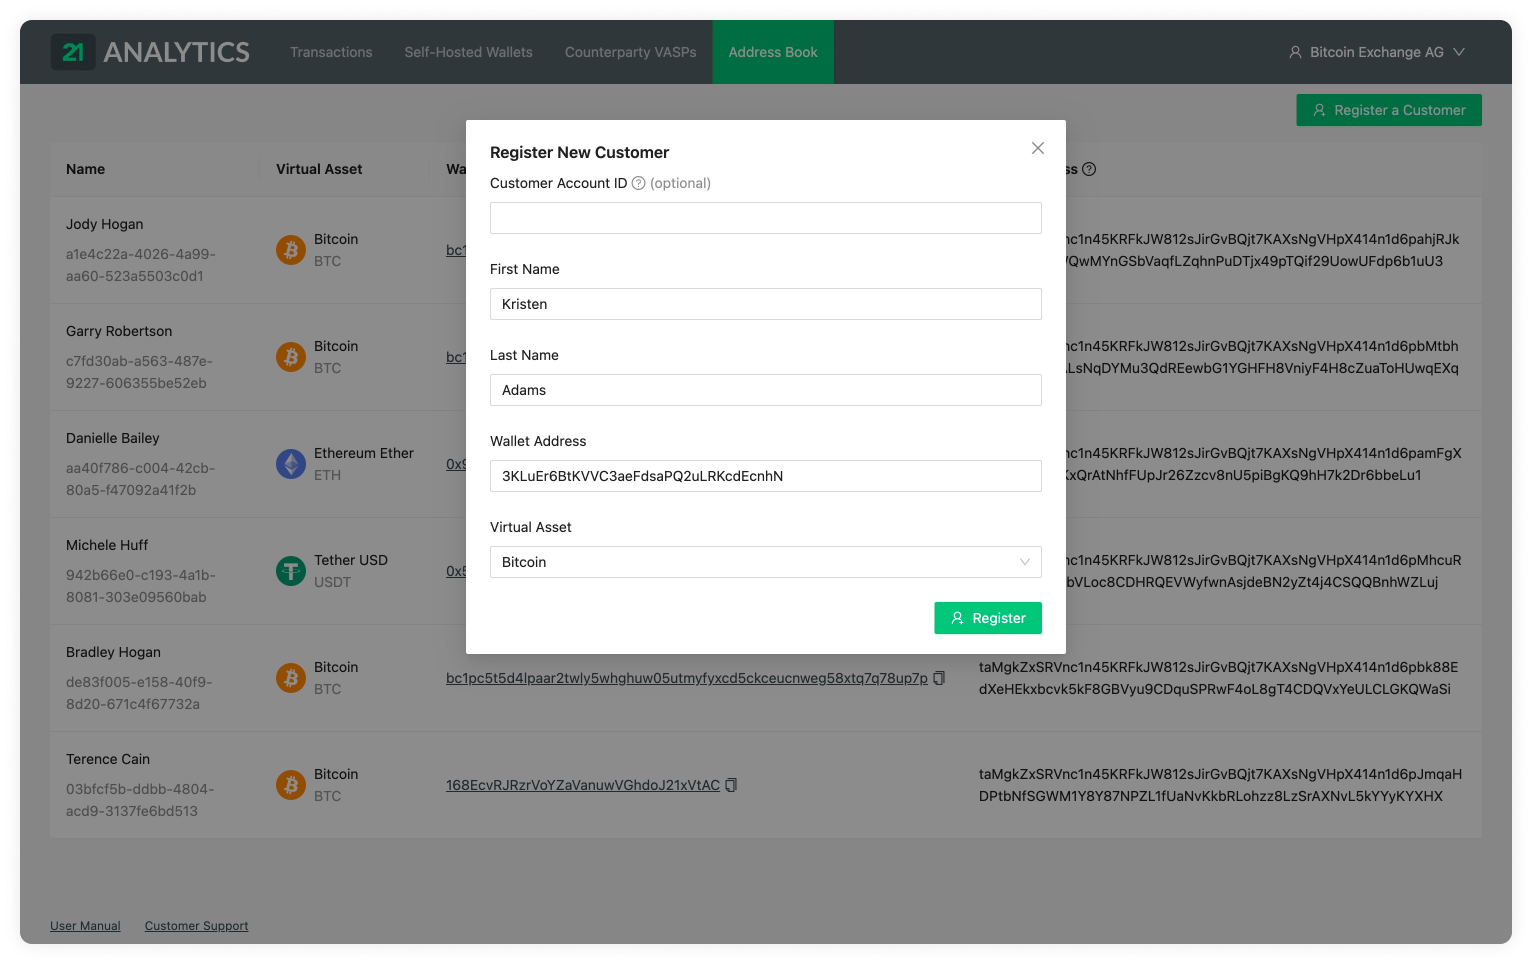
Here you can find the following input fields:
Customer Account ID (optional)
If your VASP already has a custodial system in place, you can use this field to keep the IDs the same. If left empty, 21 Travel Rule will automatically generate an ID for your customer.
First Name
The legal first name of the customer you want to register.
Last Name
The legal last name of the customer you want to register.
Wallet Address
The virtual asset wallet address of the customer you want to register. An
example of this could be bc1q76lt4wgz4kr30mq3e9gayzgnmd0hy74v8ekrla for
Bitcoin or 0xcBfa884044546d5569E2abFf3fB429301b61562A for Ethereum.
Virtual Asset
Here you can find a dropdown with all the virtual assets we support. You should choose the asset associated with the customer's wallet address. If we do not yet support a virtual asset you need, you can always contact the 21 Analytics team and request it.
Customers Overview
The customer table shows all the listed customers that were registered through the Register a Customer button.
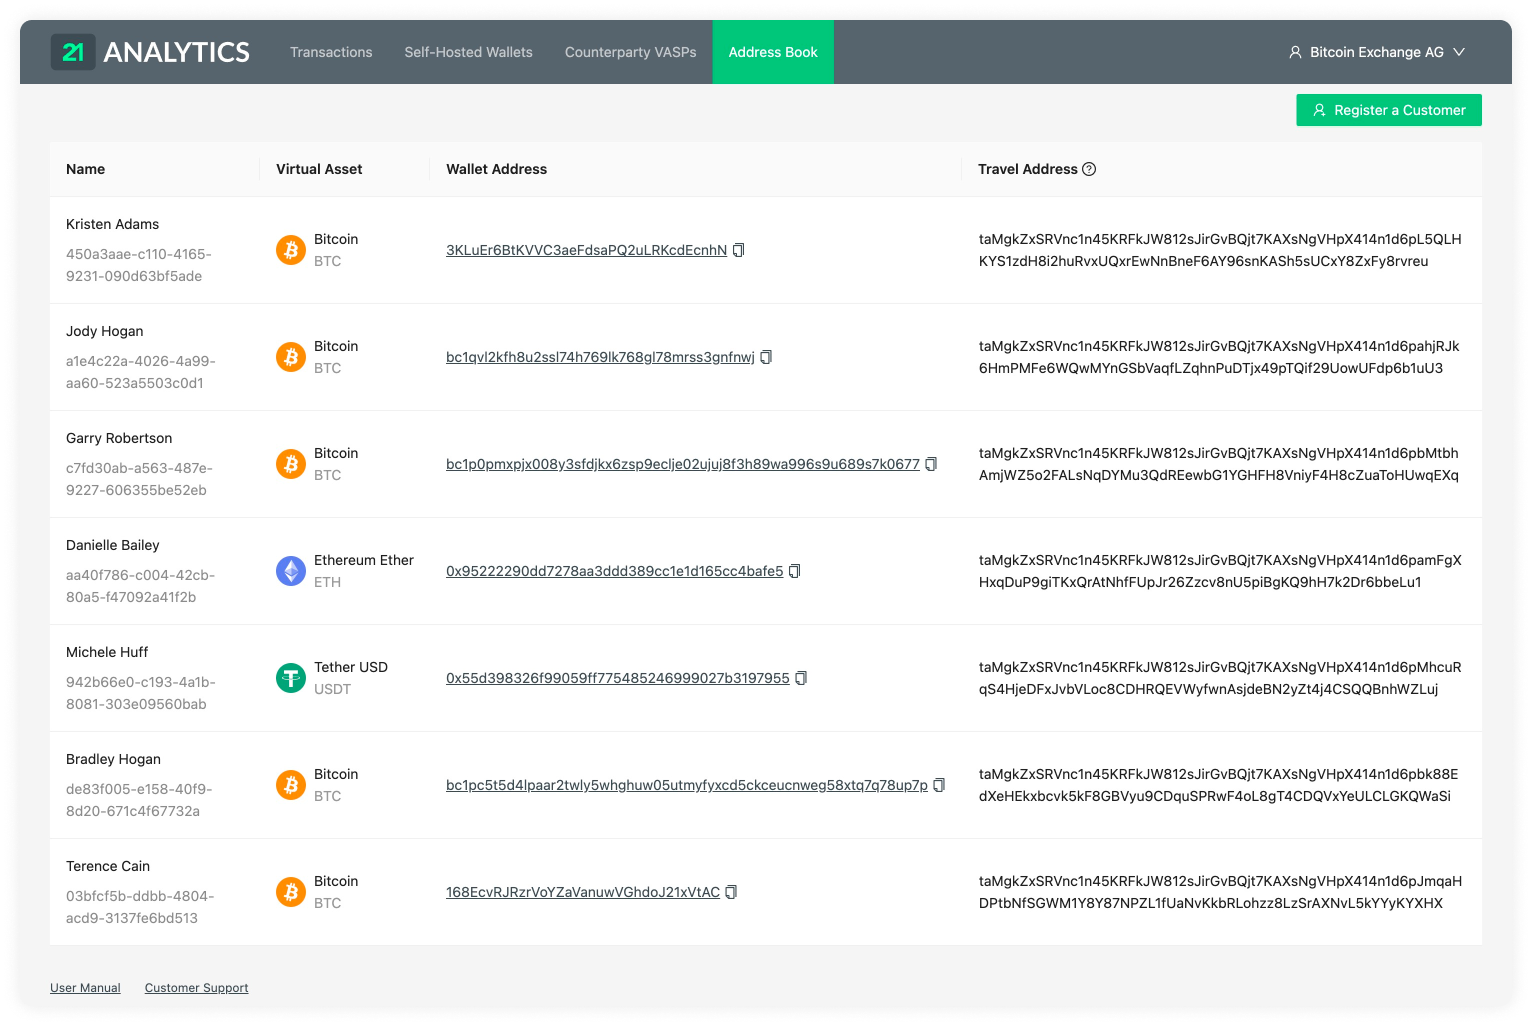
In this table, you can find the following columns:
Name And ID
A list of the first and last name of your customers.
This is followed by the IDs associated with the registered customers. Our software might have created this if the field had been left empty. If you or your team added it, it is most likely an ID associated with your current custodial system.
Virtual Asset
A list of the virtual assets associated with the customers’ wallet addresses.
Wallet Address
This column shows a list of the wallet addresses used by your customers to generate the Travel Address.
Travel Address
A list of Travel Addresses automatically generated for your customers. This allows you to easily use the TRP protocol. You can use this when Sending a Transaction Notification.
Transactions
Our Transactions page consists of three tabs:
Inbox
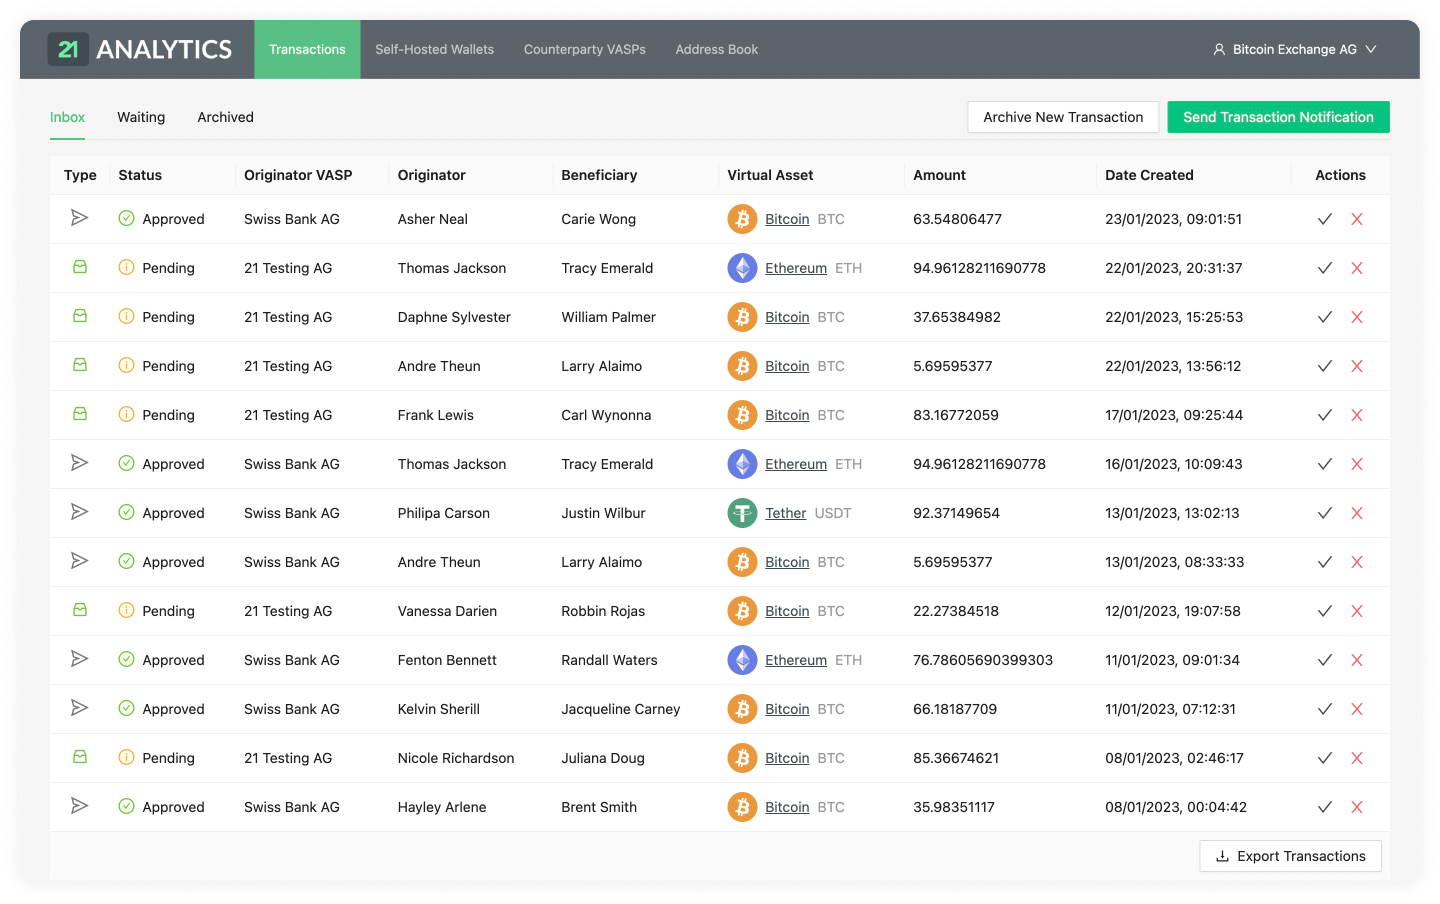
Waiting
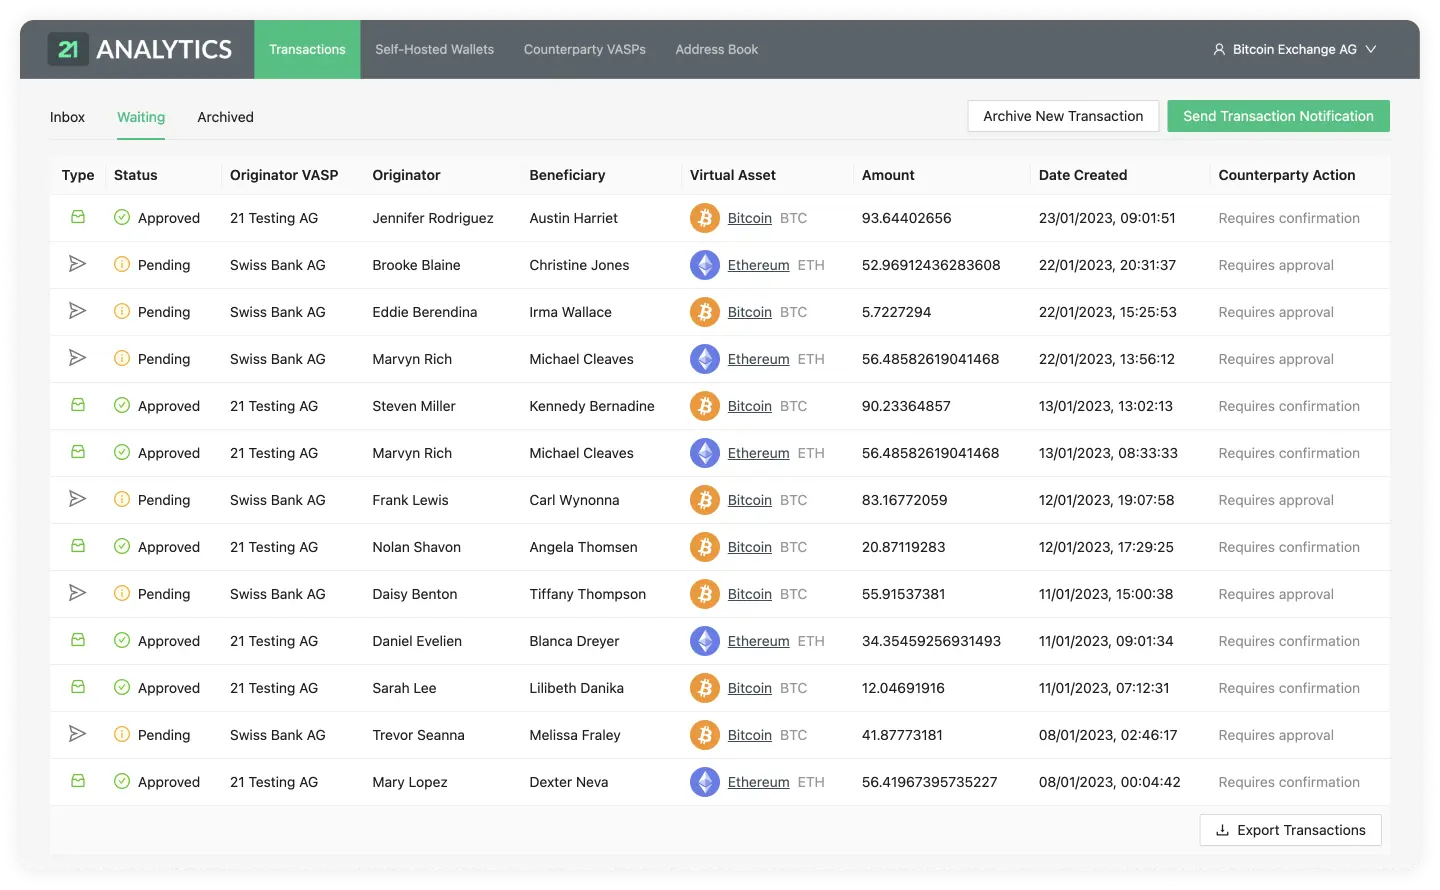
Archived
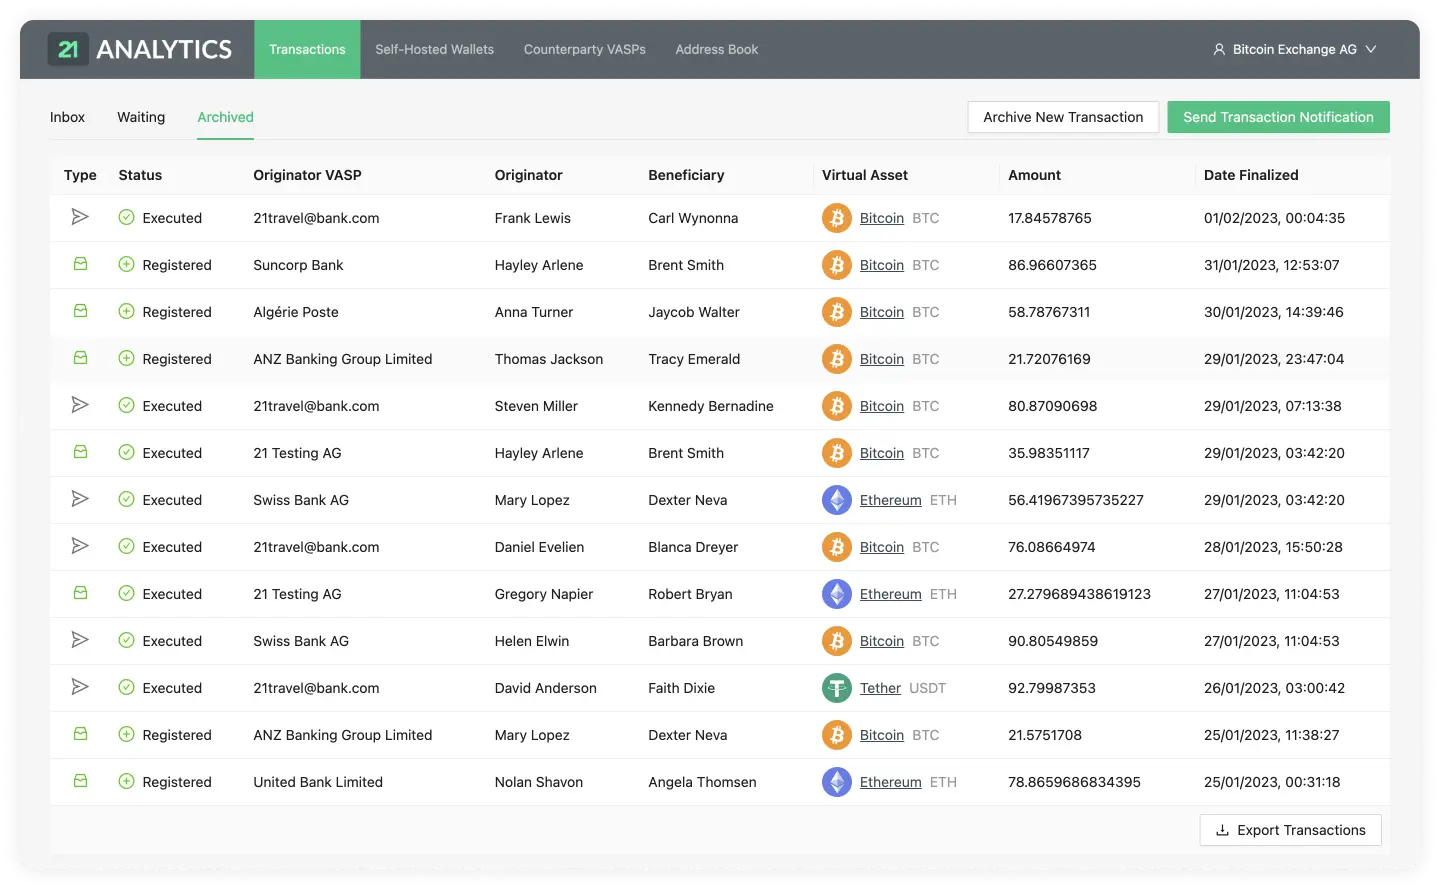
Available Actions on Tabs
Send Transaction Notification

Archive New Transaction

Export Transactions

Pagination
To understand this page it is recommended to have a basic understanding of the TRP flow.
Send Transaction Notification
Note: We recommend that you automate this manual process using the API.
Use Case
Click the Send Transaction Notification button when your customer is the
originator of the transaction. This will notify your counterparty VASP about
the transaction, including all required Travel Rule data. Depending on the
counterparty VASP, 21 Travel Rule will automatically pick TRP or email to send
the notification.
For email notifications, the presence of the transaction ID will determine whether the email will contain a request to the counterparty to confirm the correctness of the beneficiary details. Upon which you will proceed in executing the transaction on the blockchain. This is typically used when the beneficiary details are provided by your customer. See below for more details.
Step-by-step Guide
Clicking the Send Transaction Notification button will prompt a three-stage
form pop-up consisting of:
1. Beneficiary Information
The Beneficiary Information step of the form will show two options depending on the protocol the counterparty VASP uses.
TRP
If a valid Travel Address is provided by your counterparty VASP this means you can use the TRP protocol.
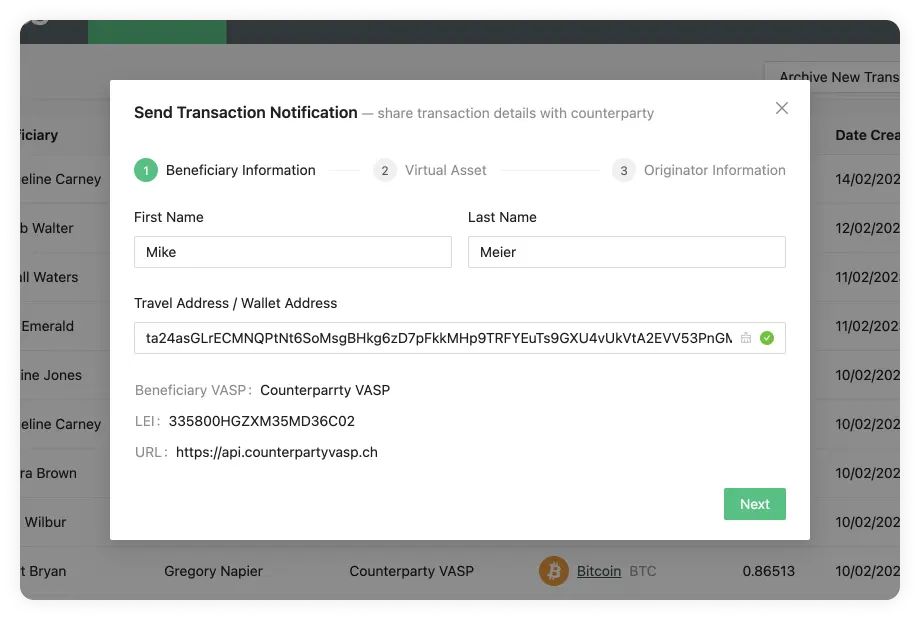
First Name
If a Travel Address is used, the first name must be the one associated with the Travel Address.
Last Name
If a Travel Address is used, the last name must be the one associated with the Travel Address.
Travel Address
The Counterparty VASP must provide the Travel Address. This Travel Address contains information about the customer of the Counterparty VASP that wishes to conduct the transaction. If this is introduced correctly, 21 Travel Rule will infer which counterparty VASP data the Travel Address is associated with.
If a VASP does not have TRP as a fallback, email can be used. To use this protocol, you can simply add a Wallet Address instead of a Travel Address.
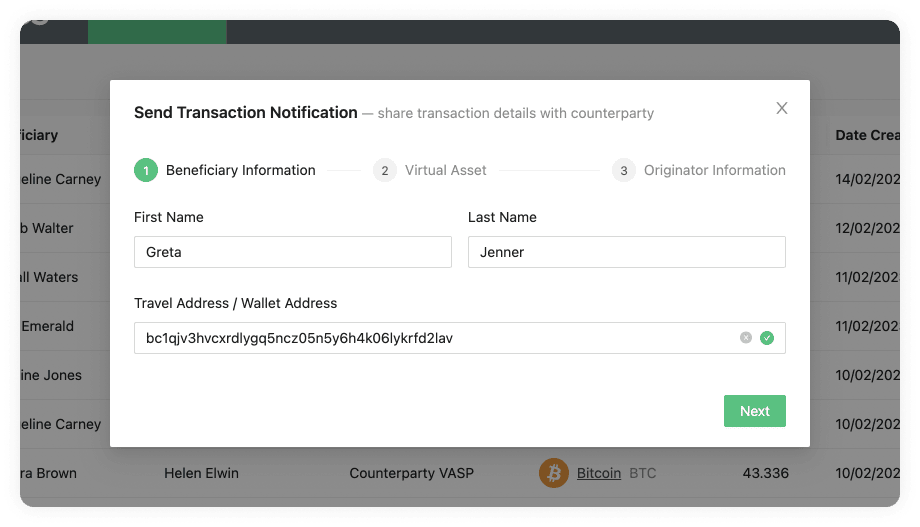
First Name
The first name of the customer who owns the Wallet Address.
Last Name
The last name of the customer who owns the Wallet Address.
Wallet Address
A Wallet Address with the correct format for any of our supported virtual assets.
2. Virtual Asset
This step will show different fields depending on your chosen protocol in the Beneficiary Information step. You will see the following fields on both flows:
Virtual Asset
Here you can find a list of all the assets we support. 21 Travel Rule supports the complete list of ISO24165 DTIs (Digital Token Identifiers). If you can't find an asset, you can always contact 21 Analytics and request to add an asset. You should choose the virtual asset used in the transaction.
Amount
The amount of the virtual asset selected for the transaction.
TRP
If you are using the TRP protocol, you will now see the second step of the form:
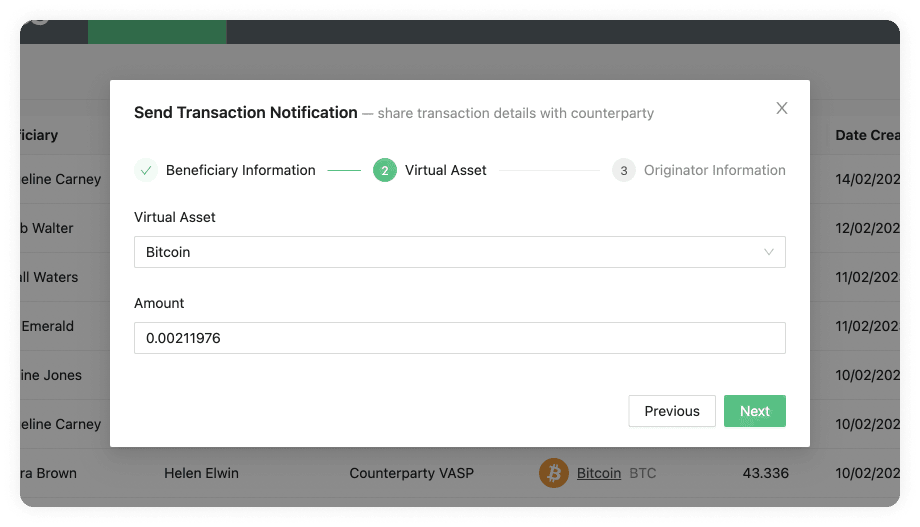
If you are using the Email protocol, you will now see the second step of the form:

This has some additional fields apart from Virtual Asset and Amount; these are:
Beneficiary VASP
A choice of trusted counterparty VASPs maintained at Counterparty VASPs. You should choose the VASP the beneficiary has an account with.
Transaction ID (TxID) (optional)
A virtual asset transaction will create a Transaction ID for this particular transaction in the blockchain. You can usually find these either on your wallet or on a blockchain explorer.
Since this field is optional, there are two possible contents that are sent in the email notification:
- By adding the TxID, a blockchain transaction must be executed beforehand (hence, we have a TxID) and the counterparty VASP will be informed about the corresponding Travel Rule data.
- Leaving the field empty, the Travel Rule data is sent before the blockchain transaction (hence, we don't know the TxID) and the blockchain transaction must be executed only after the counterparty has confirmed the validity of the data.
3. Originator Information
The third and last step of the form is the Originator Information.
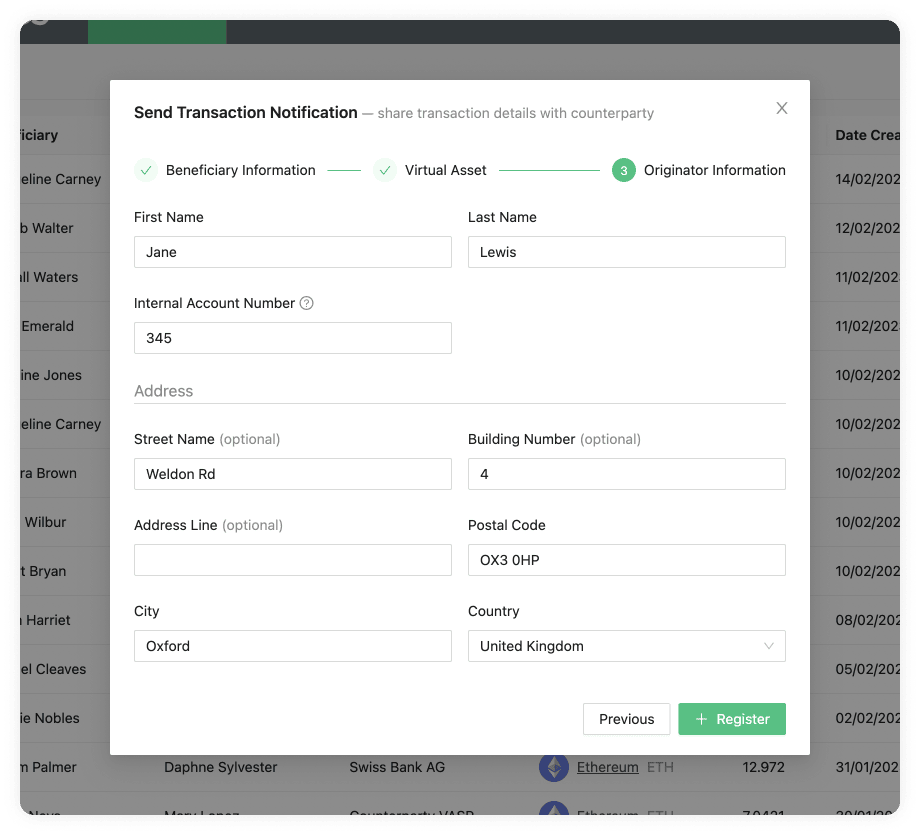
Here you will find the following steps:
First Name
The first name of the originator customer of your VASP.
Last Name
The last name of the originator customer of your VASP.
Internal Account Number
A number used to identify your customer within your system. This can be mapped to an external custodial system. Each customer should have a unique Account Number.
Street Name (optional)
The name of the street the originator customer of your VASP resides at on their ID. This is optional unless you are using TRP. If TRP is used, either this field or Address Line is required, as well as the Building Number.
Building Number (optional)
The building number on either the street or address in which the originator customer of your VASP resides at on their ID. This is optional unless using the TRP flow. This would be required alongside either the Street Name or Address Line fields.
Address Line (optional)
The Address Line where the originator customer of your VASP resides, as shown on their passport or ID. This is optional unless using the TRP flow. If TRP is used, either this field or Street Name is required, as well as the Building Number.
Postal Code
The postal code of the originator customer of your VASP. This postal code is tied to the address on the customer's passport or national ID.
City
City where the originator customer resides.
Country
Country where the originator customer resides.
Archive New Transaction
Note: We recommend that you automate this manual process using the API.
Use Case
Click the Archive New Transaction button when your customer is the
beneficiary of the transaction. Optionally, 21 Travel Rule can request your
counterparty VASP via email to confirm the validity of the originator details.
This is typically requested when the originator details are provided by your
customer, but you are required to confirm the validity thereof before crediting
your customer. See below for more details.
Step-by-step Guide
Once you click the Archive New Transaction button, a three-stage form will
appear:
1. Beneficiary Information
Similar to the Send Transaction Notification button we saw in the Inbox tab, the first step is the Beneficiary Information:
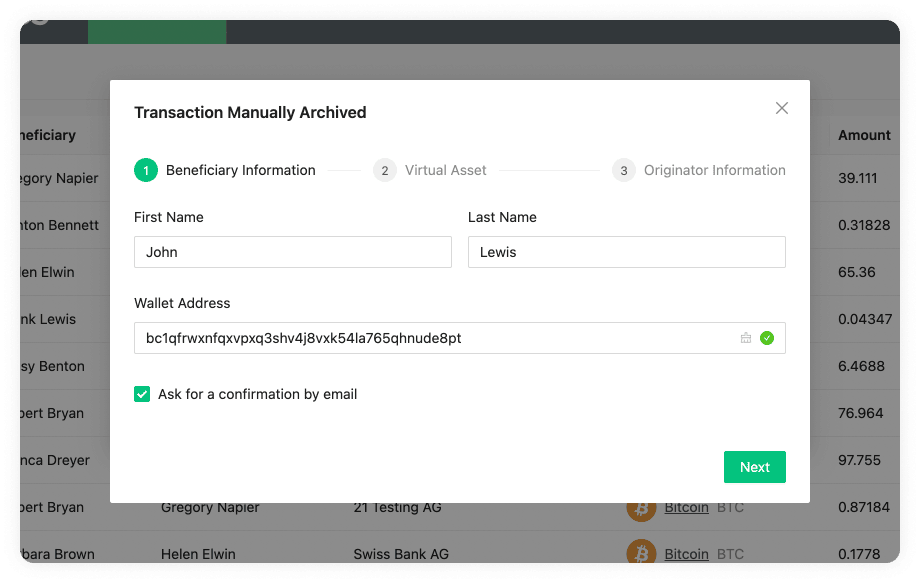
First Name
The first name of the person's receiving the virtual asset. This name should match the one found in the person's passport or legal identity document.
Last Name
The last name of the person's receiving the virtual asset. This name should match the one found in the person's passport or legal identity document.
Wallet Address
The wallet address of the person's receiving the virtual asset. An example of
this could be bc1phdhfqtjwwweu3xdsw40mje5g48cgnnks6u00ajaf7xh3jn8vtk3srps2sp
for Bitcoin or 0xcBfa884044546d5569E2abFf3fB429301b61562A for Ethereum.
Ask For Confirmation Email
When this checkbox is ticked this sends an email that asks the originator to confirm the correctness of all submitted travel rule and transaction details. After receiving the confirmation from the originator you can credit the transaction's beneficiary. The transaction is archived in 21 Travel Rule and available for future reference in the Compliance Dashboard's archive transactions overview.
When this checkbox is left unticked no emails are sent but the transaction details are immediately archived.
2. Virtual Asset
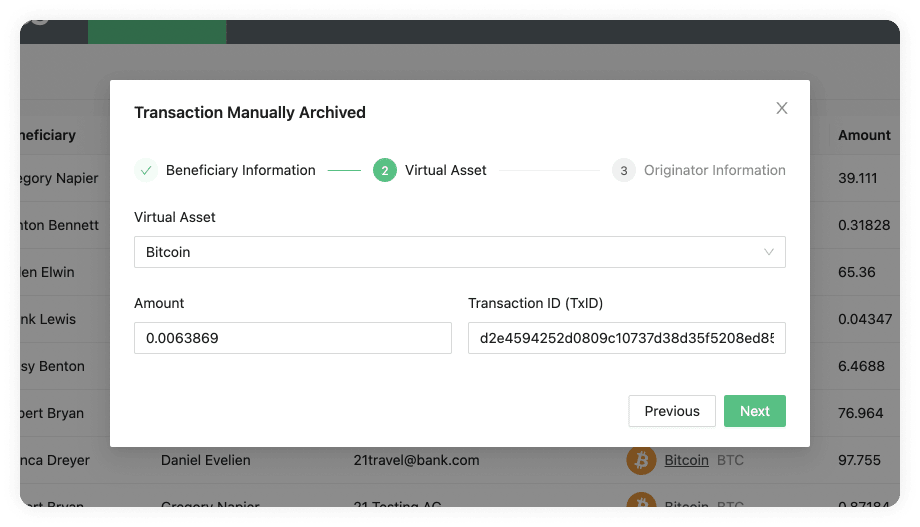 Without confirmation email
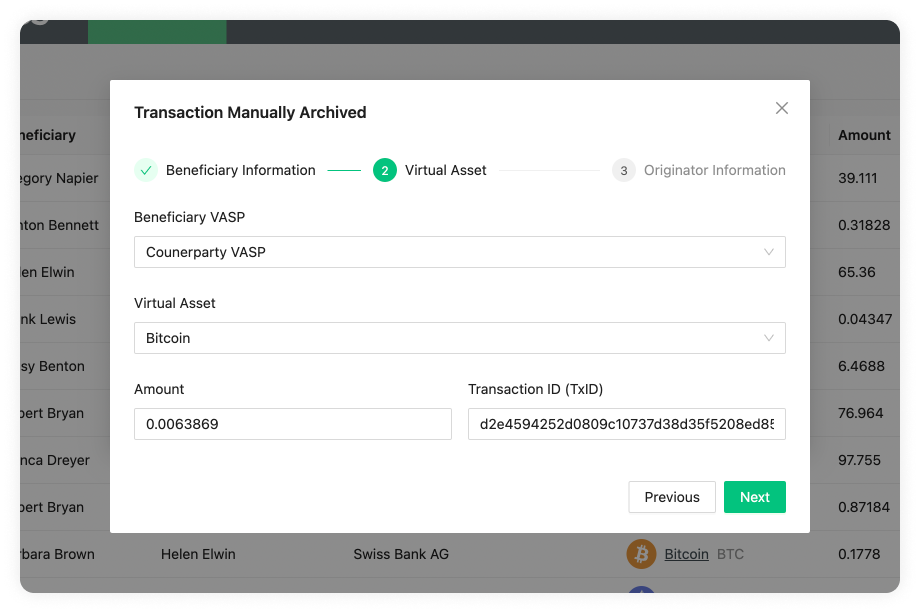 With confirmation email
Beneficiary VASP
A dropdown with a list of available Beneficiary VASPs reachable via email. You can add additional beneficiary VASPs on the Counterparty VASPs page. The Beneficiary VASP dropdown is only displayed if the Ask For Email Confirmation checkbox has been ticked.
Virtual Asset
Here you can find a dropdown with all the virtual assets we support. You should choose the asset used in the transaction. 21 Travel Rule supports the complete list of ISO24165 DTIs (Digital Token Identifiers). If we do not yet support a virtual asset you need, you can always contact the 21 Analytics team and request it.
Amount
The amount of the virtual asset selected for the transaction.
Transaction ID (TxID)
A virtual asset transaction will create a Transaction ID for this particular transaction in the blockchain. You can usually find these either on your wallet or on a blockchain explorer.
3. Originator Information
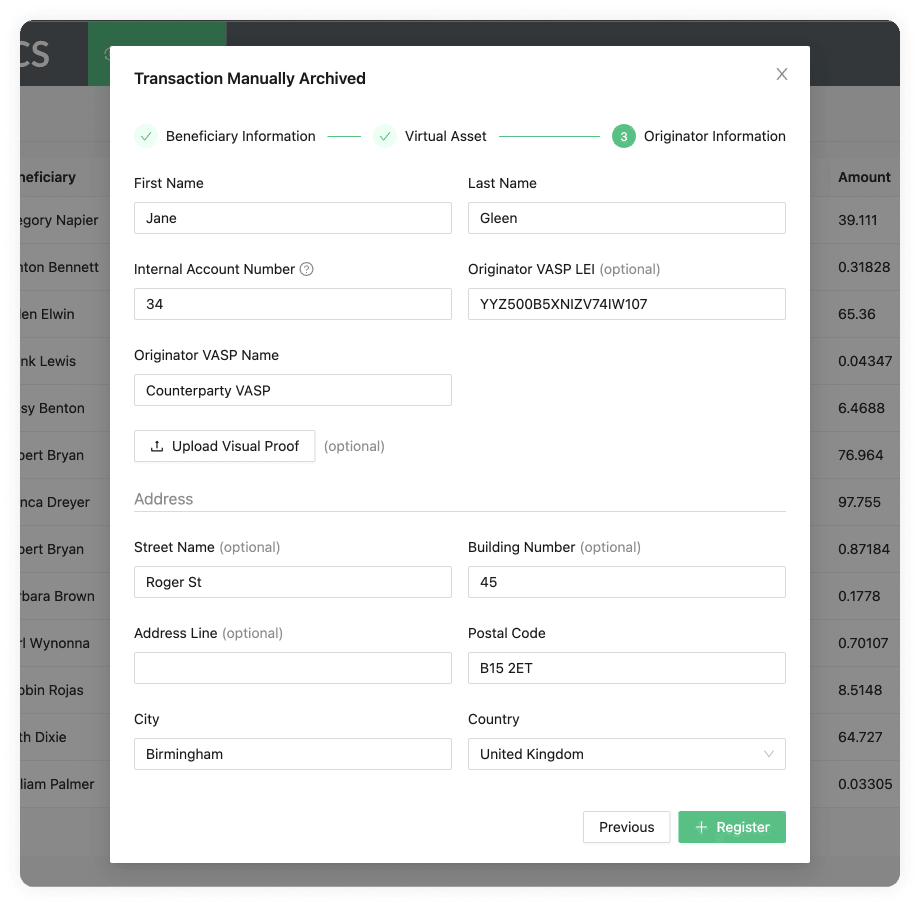 Without confirmation email
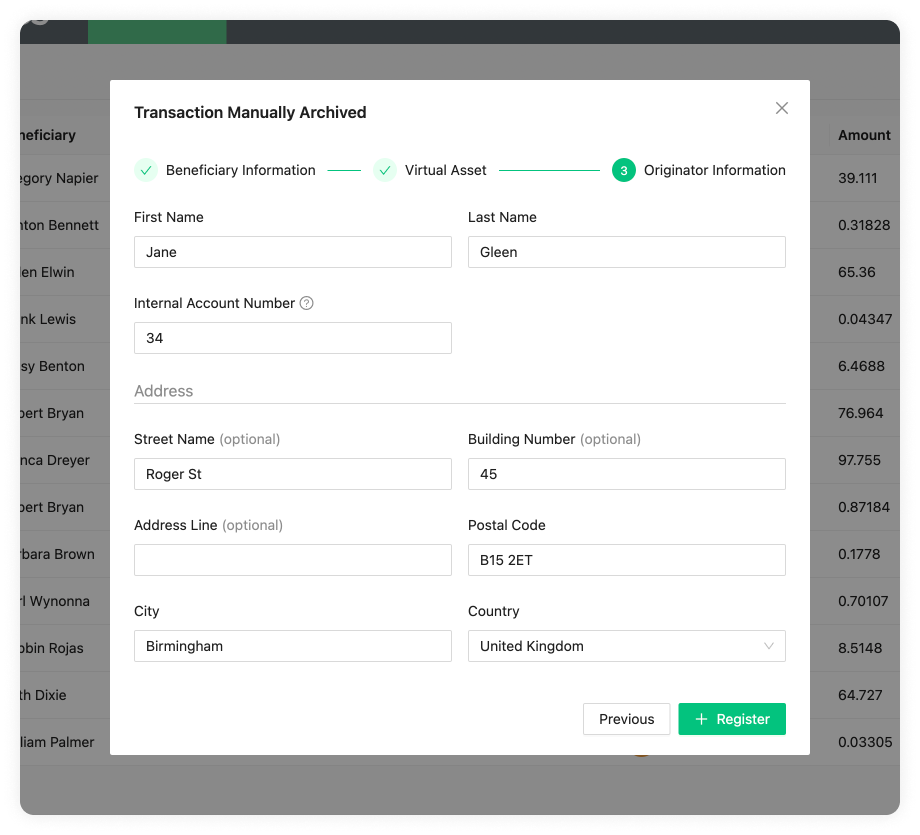 With confirmation email
First Name
The first name of the person sending the virtual asset. This name should match the one found in the person's passport or national identity document.
Last Name
The last name of the person sending the virtual asset. This name should match the one found in the person's passport or national identity document.
Internal Account Number
A number used to identify your customer within your system. This can be mapped to an external custodial system. Each customer should have a unique Account Number.
Originator VASP LEI (optional)
The VASP LEI (Legal Entity Identifier) of the VASP sending the virtual asset, this will most likely be your VASP LEI. These are public and can be found in the Global Legal Entity Identifier Foundation (GLEIF) website. This field is optional.
Originator VASP Name
The name of the VASP sending the transaction. A dropdown will appear with all the VASPs added to using the email protocol in Counterparty VASPs. You can also add a different one if that one doesn't appear.
Upload Visual Proof (optional)
Allows you to add additional proof by uploading a screenshot or screen recording
of the transaction. This field is optional. The Upload Visual Proof button is
only displayed if the Ask For Email Confirmation
checkbox has not been ticked.
Under address you can find the following fields:
Street Name (optional)
The name of the street as found on the passport or national identity document of the person sending the transaction. This field is optional.
Building Number (optional)
If an address line or street name was added this will be the number of the building found on the passport or national identity document.
Address Line (optional)
The address line as found on the passport or national identity document of the person sending the transaction. This field is optional.
Postal Code
The postal code of where the originator customer resides, as found on their passport or national identity document.
City
The city of where the originator customer resides, as found on their passport or national identity document.
Country
The country of where the originator customer resides, as found on their passport or national identity document.
Export Transactions
The Export Transaction button allows you to export all the transactions as an .xlsx (Excel) file. This can then be imported to a spreadsheet software to manipulate further if needed, which is handy for filtering and ordering data in a specific way. It also allows you to search for a specific entry. The 21 Analytics team prioritised the export functionality since it allows compliance officers to use software they are familiar with and allows for an additional storage method. Please contact our team if you have any extra functionality requirements.
Pagination
Once enough transactions have been populated, pagination appears at the bottom left, under the table.
A new page will be created when 15 rows have been populated on the overview table. You can navigate these by either clicking on the page number or going to the next or previous pages using the arrows.
Note: Our screenshots currently display 13 rows. This was done to show extra elements like the Export Transactions button. The software will display 15, as mentioned.
Transactions Inbox
Transactions Overview

Detailed Transaction
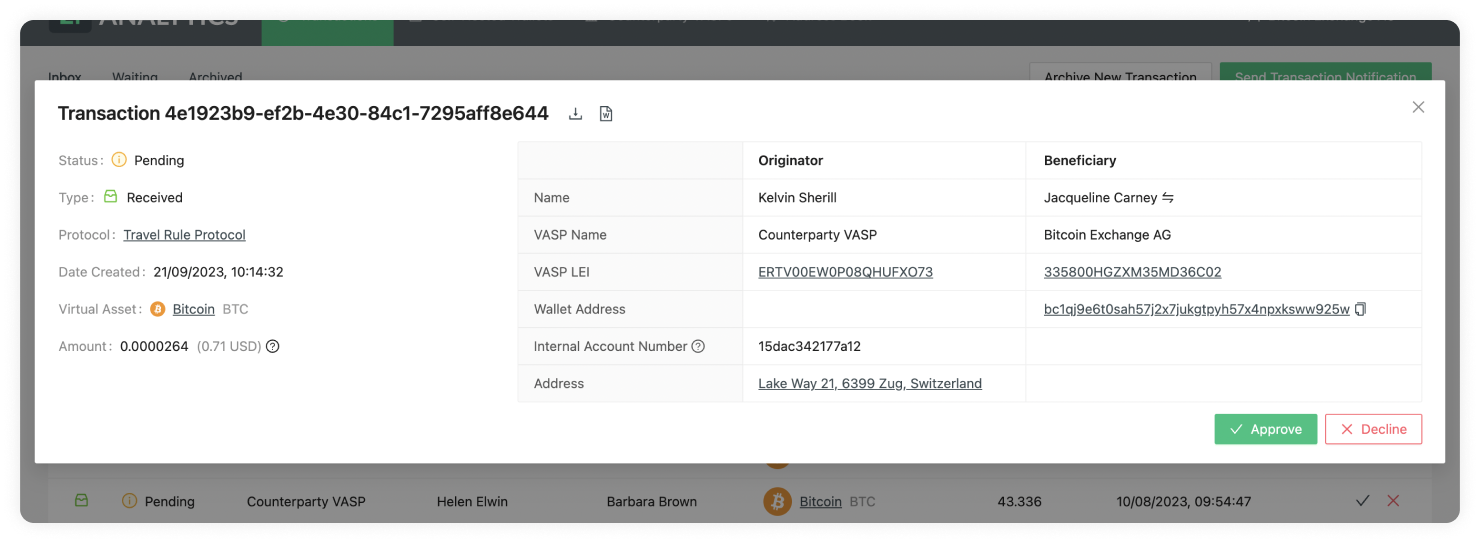
Transactions Inbox Overview
Our transactions inbox overview lets you easily navigate through all transactions that require an action from your side.
Let's now do a breakdown of the tables row.

As you can see, this row contains the following fields:
Type
Status
Beneficiary
Originator
Originator VASP
Virtual Asset
Amount
Date Created
Actions
Type
Can be either Sent or Received. Hovering over the icon will reveal a tooltip
with the type of transaction.
![]()
When the Type has the Received value, represented by the box logo above, a
counterparty VASP has sent you, the compliance officer, a transaction. This
transaction is then waiting for you to Approve it or
Decline it.
![]()
When the Type has the Sent value, it means you have sent a transaction to a counterparty VASP through the Send Transactions Notifications button, and the counterparty VASP has then approved or declined the transaction. This is then waiting for the last step, which is for you to Confirm or Cancel the transaction.
Status
Can be either Pending or Approved.

Once a counterparty VASP has sent a transaction to you, the transaction in your
inbox will go into a Pending status until you Approve or
Decline the transaction. The status of Pending is of
Type Received when it is in the inbox.

If, on the other hand, you have sent a transaction to a counterparty VASP through the button and the counterparty VASP has clicked , the Status of will appear in your inbox for that particular transaction. The Status of Approved is of when it's in the inbox.
If, on the other hand, you have sent a transaction to a counterparty VASP through the Send Transactions Notification button and the counterparty VASP has clicked Approve, the Status of Approved will appear in your inbox for that particular transaction. The Status of Approved is of Type Sent when it's in the inbox.
Beneficiary
The name and surname, as registered in a legal identity document of the person receiving the transaction.
Originator
The name and surname, as registered in a legal identity document of the person sending the transaction.
Originator VASP
The VASP of the customer who sent the transaction.
Virtual Asset

Shows the symbol, name and currency code of the Virtual Asset Sent or Received in the transaction. Clicking on the name will redirect you to Coinmarketcap, where you can see live information about the transaction’s asset.
Amount
The amount of a particular Virtual Asset sent from the Originator to the Beneficiary. Yes, we do support the entire 18 decimals for Ethereum.
Date Created
The time and date the transaction was Sent or Received. The format shown is day/month/year and hour/minutes/seconds. The time will be shown in the time zone configured in your browser and can be seen by hovering over the transaction date. This will reveal a tooltip with the timezone: continent/city format.
Actions

You will find a “tick” and “cross” sign under the actions column. Moving the cursor over the icons will show “approve” and “cancel” on a tooltip box.
If you click approve, a pop-up will open requesting the user to introduce the transaction ID of the transaction in hand. This can usually be found in your wallet when doing a transaction. It can also be found in a blockchain explorer or through a command line tool for more technical users. Once the transaction has been confirmed by clicking the “confirm” button, the row will disappear from the inbox and move to the archived table.
If the user presses the cancel option, a different pop-up will appear, allowing the user to optionally add a comment as to why he has decided to cancel the transaction. Once the “cancel transaction” button has been clicked, the row will disappear from the inbox and move to the archived table.
Detailed Transaction
When you click on one of the rows in the Transactions Overview table, a pop-up will display.
Travel Transaction ID
At the top left of the pop-up, you can find a title. This title shows the ID of the transaction in 21 Travel Rule. This should not be confused with the blockchain transaction ID. This is used to find specific transactions from all your list of transactions.
Transaction Status
Can be either Pending or Approved.
Once a counterparty VASP has sent a transaction to you, the transaction in your
inbox will go into a Pending status until you Approve or
Decline the transaction. The status of Pending is of
Type Received when it is in the inbox.
If, on the other hand, a counterparty VASP has sent you a transaction and you have approved it, the Status of Approved will appear in your waiting table for that particular transaction. The Status of Approved is of Type Received when it's in the waiting table.
Transaction Type
Can be either Sent or Received.

When the Type has the Received value, it means a counterparty VASP has sent
you, the compliance officer, a transaction. This transaction is then waiting for
you to Approve it or Decline it.

When the Type has the Sent value, it means you have sent a transaction to a counterparty VASP through the Send Transactions Notifications button, and the counterparty VASP has then approved or declined the transaction. This is then waiting for the last step, which is for you to Confirm or Cancel the transaction.
For a better understanding of the whole workflow, check: TRP.
Protocol
The protocol used for the transaction to be compliant.
Date Created
The time and date the transaction was Sent or Received. The format shown is day/month/year and hour/minutes/seconds. The time will be shown in the time zone configured in your browser and can be seen by hovering over the transaction date. This will reveal a tooltip with the timezone: continent/city format.
Virtual Asset
Shows the symbol, name and currency code of the Virtual Asset Sent or Received in the transaction. Clicking on the name will redirect you to Coinmarketcap, where you can see live information about the transaction’s asset.
Amount
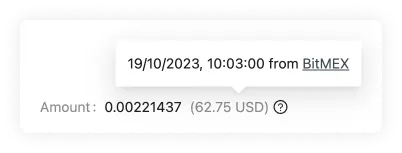
The amount of a particular Virtual Asset sent from the originator to the beneficiary. Yes, we do support the entire 18 decimals for Ethereum. You can also find the equivalent of the chosen Virtual Asset as a US dollar equivalent. This is fetched from BitMEX, and if you hover over the USD value, you will see the date and time when the inquiry was converted.
Beneficiary Name
The first and last name of the customer who is receiving the virtual asset. If you have configured the beneficiary name matching, when receiving a transaction from the originator that is withing the typo tolerance you have selected, you will see the following on the beneficiary name on the transaction details table:
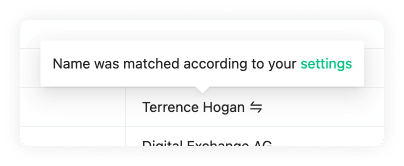
Beneficiary VASP Name
The name of the VASP of the customer receiving the virtual asset. This name is associated with a LEI.
Beneficiary VASP LEI
The LEI (Legal Entity Identifier) of the VASP who is receiving the virtual asset.
Beneficiary Wallet Address
The Wallet Address of the customer receiving the virtual asset of the transaction. Clicking on it will open a new tab showing the Blockbook Block Explorer where you will be able to see the details of this particular address.
Originator Name
The first and last name of the customer sending the virtual asset.
Originator VASP Name
The name of the VASP of the customer sending the virtual asset. This name is associated with a LEI.
Originator VASP LEI
The LEI (Legal Entity Identifier) of the VASP who is sending the virtual asset.
Originator Internal Account Number
An account number to identify the customer sending the transaction. Each customer should have their own Account Number.
Originator Address
The Address where the customer resides. This can be found on their passport or country ID.
Actions
Can be either Approve or Decline if the transaction was received by a counterparty VASP.

Approve
If approved, this will be sent to the counterparty VASP to finish the verification of the transaction.
Decline
If declined, the transaction won't go through.
If the transaction is sent by you and then approved by a counterparty VASP, there will be two actions: Confirm or Cancel.

Confirm
If the transaction was previously approved by the counterparty VASP, this button will confirm the transaction and finish the verification process.
Cancel
If the transaction was previously approved by the counterparty VASP, this button will cancel the process, and the transaction won't go through.
Export

This will download an .xlsx (Excel) spreadsheet with the data of this particular transaction. This can later be imported to any spreadsheet software for further manipulation of data.
Download Report

This will download a .doc file with a written report template of the transaction. You can manipulate this on text editing software.
Transactions Waiting
Transactions Overview

Detailed Transaction
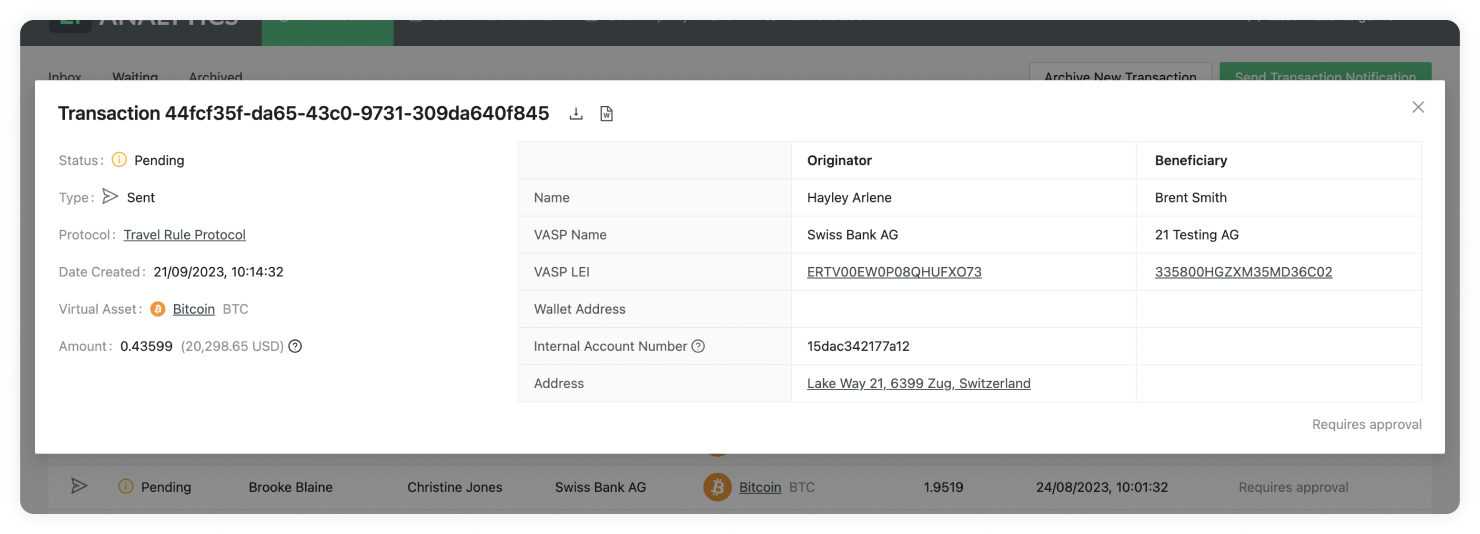
Transactions Waiting Overview
Our transactions waiting overview lets you easily navigate through all transactions requiring an action from the counterparty VASP you are communicating with.
Let's now do a breakdown of the tables row.

As you can see this row contains the following fields:
Type
Status
Beneficiary
Originator
Originator VASP
Virtual Asset
Amount
Date Created
Counterparty Action
Type
Can be either Sent or Received. Hovering over the icon will reveal a tooltip
with the type of transaction.
![]()
When the Type has the Received value, represented by the box logo above, a counterparty VASP has sent you, the compliance officer, a transaction. You then approved this transaction and are now waiting for the counterparty VASP to either Confirm or Cancel.
![]()
When the Type has the Sent value, it means you have sent a transaction to a counterparty VASP through the Send Transactions Notifications button, and the counterparty VASP and are now waiting for the counterparty VASP to either Approve or Decline the transaction.
Status
Can be either Pending or Approved.

Once you have sent a transaction to a counterparty VASP, the waiting transaction
will go into a Pending status until the counterparty VASP
Approves or Declines the
transaction. The status of Pending is of Type Sent when it's waiting.

If you have received a transaction from a counterparty VASP and then Approved, the Status of Approved will appear, and the transaction will be in a waiting state until the counterparty VASP either Confirms or Cancels the transaction. The Status of Approved is of Type Received when it's waiting.
Beneficiary
The name and surname, as registered in a legal identity document of the person receiving the transaction.
Originator
The name and surname, as registered in a legal identity document of the person sending the transaction.
Originator VASP
The VASP of the customer who sent the transaction.
Virtual Asset

Shows the symbol, name and currency code of the Virtual Asset Sent or Received in the transaction. Clicking on the name will redirect you to Coinmarketcap, where you can see live information about the transaction's asset.
Amount
The amount of a particular Virtual Asset sent from the Originator to the Beneficiary. Yes, we do support the entire 18 decimals for Ethereum.
Date Created
The time and date the transaction was Sent or Received. The format shown is day/month/year and hour/minutes/seconds. The time will be shown in the time zone configured in your browser and can be seen by hovering over the transaction date. This will reveal a tooltip with the timezone: continent/city format.
Counterparty Action
Can be either Requires Approval or Requires Confirmation.
If Requires Approval shows, that means you sent a transaction and the transaction is waiting for the counterparty VASP to either Approve or Decline the transaction.
If, on the other hand, Requires Confirmation appears on this field that means that the counterparty VASP sent you a transaction and you then approved it. Now the transaction is waiting for the last step which is for the counterparty VASP to either Confirm or Cancel the transaction.
Detailed Transaction
A pop-up will display when you click on one of the rows in the Transactions Overview table.
Travel Transaction ID
At the top left of the pop-up, you can find a title. This title shows the ID of the transaction in 21 Travel Rule. This should not be confused with the blockchain transaction ID. This is used to find specific transactions from all your list of transactions.
Transaction Status
Can be either Pending or Approved.
Once you have sent a transaction to a counterparty VASP, the transaction will go into a Pending status on your waiting table until it gets Approved or Declined by the counterparty VASP. The status of Pending is of Type Sent when it's waiting.
If you have sent a transaction to a counterparty VASP through the Send Transactions Notification button and the counterparty VASP has clicked Approve, the Status of Approved will appear in your inbox for that particular transaction. The Status of Approved is of Type Sent when it's in the inbox.
Transaction Type
Can be either Sent or Received.

When the Type has the Received value, it means a counterparty VASP has sent
you, the compliance officer, a transaction, you have then approved this and its
waiting for the last step which is for the counterparty VASP to either Confirm
or Cancel the transaction.

When the Type has the Sent value, it means you have sent a transaction to a counterparty VASP, and the counterparty VASP has to now either Approve or Decline the transaction. Until then the transaction will be on the waiting table.
For a better understanding of the whole workflow, check: TRP.
Protocol
The protocol used for the transaction to be compliant.
Date Created
The time and date the transaction was Sent or Received. The format shown is day/month/year and hour/minutes/seconds. The time will be shown in the time zone configured in your browser and can be seen by hovering over the transaction date. This will reveal a tooltip with the timezone: continent/city format.
Virtual Asset
Shows the symbol, name and currency code of the Virtual Asset Sent or Received in the transaction. Clicking on the name will redirect you to Coinmarketcap, where you can see live information about the transaction’s asset.
Amount

The amount of a particular Virtual Asset sent from the Originator to the Beneficiary. Yes, we do support the entire 18 decimals for Ethereum. You can also find the equivalent of the chosen Virtual Asset as a US dollar equivalent. This is fetched from BitMEX, and if you hover over the USD value, you will see the date and time when the inquiry was converted.
Beneficiary Name
The first and last name of the customer who is receiving the virtual asset. If you have configured the beneficiary name matching, when receiving a transaction from the Originator that is within the typo tolerance you have selected, you will see the following on the beneficiary name on the transaction details table:

Beneficiary VASP Name
The name of the VASP of the customer receiving the virtual asset. This name is associated with a LEI.
Beneficiary VASP LEI
The LEI (Legal Entity Identifier) of the VASP who is receiving the virtual asset.
Beneficiary Wallet Address
The Wallet Address of the customer receiving the virtual asset of the transaction. Clicking on it will open a new tab showing the Blockbook Block Explorer where you will be able to see the details of this particular address.
Originator Name
The first and last name of the customer sending the virtual asset.
Originator VASP Name
The name of the VASP of the customer sending the virtual asset. This name is associated with a LEI.
Originator VASP LEI
The LEI (Legal Entity Identifier) of the VASP who is sending the virtual asset.
Originator Internal Account Number
An account number to identify the customer sending the transaction. Each customer should have their own Account Number.
Originator Address
The Address where the customer sending the transaction resides. This can be found on their passport or country ID.
Export

This will download an .xlsx (Excel) spreadsheet with the data of this particular transaction. This can later be imported to any spreadsheet software for further manipulation of data.
Download Report

This will download a .doc file with a written report template of the transaction. You can manipulate this on text editing software.
Archived Transactions
Transactions Overview

Detailed Transaction
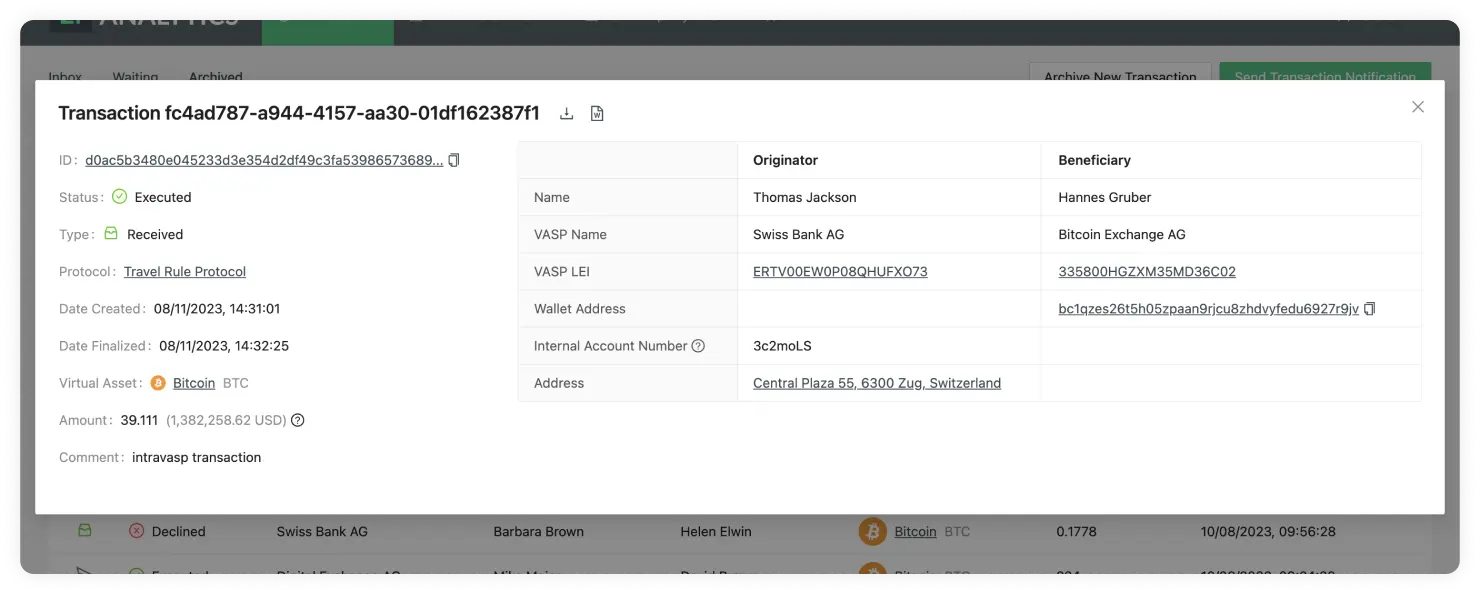
Archived Transactions Overview
Our archived transactions overview lets you easily navigate through all transactions that have gone through one of our supported protocols.
Let's now do a breakdown of the tables row.

As you can see, this row contains the following fields:
Type
Status
Beneficiary
Originator
Originator VASP
Virtual Asset
Amount
Date Finalised
Type
Can be either Sent or Received. Hovering over the icon will reveal a tooltip
with the type of transaction.
![]()
When the Type has the Received value, represented by the box logo above, a
counterparty VASP has sent you, the compliance officer, a transaction. This
transaction was either Executed, Declined,
Cancelled or Registered.
![]()
When the Type has the Sent value, it means you have sent a transaction to a counterparty VASP through the Send Transactions Notifications button. This transaction was either Executed, Declined or Cancelled.
Status
On the archived tab there are a few possible statuses:
The best and most common status should be Executed.

If most of your transactions have the status of Executed this means things are working correctly and the transaction is compliant; one of the viable protocols has been used to verify this transaction as compliant.
If the transaction has the status of Declined this means the beneficiary VASP has decided to not allow the transaction to go through. This could be due to KYC checks not meeting the requirements expected by the beneficiary VASP.

If the transaction has the status of Cancelled this means the beneficiary VASP approved it, but then the originator decided to cancel the transaction from going through at the last stage of the handshake. This could be due to KYC checks ran on the beneficiary VASP not being validated.

Last of all, as a fallback to the viable protocols, transactions can be manually archived. This might not be fully compliant in some cases but it's useful to keep for future references or for countries that request less information. This will go into a status of Registered.

Beneficiary
The name and surname, as registered in the passport or national identity document of the person receiving the transaction.
Originator
The name and surname, as registered in the passport or national identity document of the person sending the transaction.
Originator VASP
The VASP of the customer who sent the transaction.
Virtual Asset

Shows the symbol, name and currency code of the Virtual Asset Sent or Received in the transaction. Clicking on the name will redirect you to Coinmarketcap, where you can see live information about the transaction’s asset.
Amount
The amount of a particular Virtual Asset sent from the Originator to the Beneficiary. Yes, we do support the entire 18 decimals for Ethereum.
Date Finalised
The time and date the transaction was either Executed, Declined, Cancelled or Registered. The format shown is day/month/year and hour/minutes/seconds. The time will be shown in the time zone configured in your browser and can be seen by hovering over the transaction date. This will reveal a tooltip with the timezone: continent/city format.
Detailed Transaction
When you click on one of the rows in the Transactions Overview table, a pop-up will display.
Travel Transaction ID
At the top left of the pop-up, you can find a title. This title shows the ID of the transaction in 21 Travel Rule. This should not be confused with the blockchain transaction ID. This is used to find specific transactions from all your list of transactions.
Transaction ID
This field is only visible if the transaction is of type Received and was Executed or Registered. This is the transaction ID generated on blockchain for this particular transaction. This can be found on the wallets of the originator or beneficiary as well as in a blockchain explorer. Clicking on it will redirect to the Blockbook Block Explorer where you will be able to see the details of this particular transaction.
Transaction Status
Can be either Executed, Declined, Cancelled or Registered.
If the transaction is of status Executed it means the transaction went through correctly and the transaction is compliant.
If the transaction has the status of Declined this means the beneficiary VASP has decided to not allow the transaction to go trough. This could be due to KYC checks not meeting the requirements expected by the beneficiary VASP.
If the transaction has the status of Cancelled this means the beneficiary VASP approved but then the originator decided to cancel the transaction from going through at the last stage of the handshake. This could be due to KYC checks ran on the beneficiary VASP not being validated.
Last of all, as a fallback to the viable protocols, transactions can be manually archived, this might not be fully compliant in some cases but it's useful to keep for future references or for countries that request less information. This will go into a status of Registered.
Transaction Type
Can be either Received or Sent.

When the Type has the Received value, it means a counterparty VASP has sent
you a transaction or you have manually archived a transaction.

When the Type has the Sent value, it means you have sent a transaction to a counterparty VASP through the Send Transactions Notifications button, and then the transaction was either approved, declined or cancelled.
For a better understanding of the whole workflow, check: TRP.
Protocol
The protocol used to check if the transaction was compliant.
Date Created
The time and date the transaction was Sent or Received. The format shown is day/month/year and hour/minutes/seconds. The time will be shown in the time zone configured in your browser and can be seen by hovering over the transaction date. This will reveal a tooltip with the timezone: continent/city format.
Date Finalised
The time and date the transaction was either Executed, Declined, Cancelled or Registered. The format shown is day/month/year and hour/minutes/seconds. The time will be shown in the time zone configured in your browser and can be seen by hovering over the transaction date. This will reveal a tooltip with the timezone: continent/city format.
Virtual Asset
Shows the symbol, name and currency code of the Virtual Asset Sent or Received in the transaction. Clicking on the name will redirect you to Coinmarketcap, where you can see live information about the transaction’s asset.
Amount

The amount of a particular Virtual Asset sent from the Originator to the Beneficiary. Yes, we do support the entire 18 decimals for Ethereum. You can also find the equivalent of the chosen virtual asset as a US dollar equivalent. This is fetched from BitMEX, and if you hover over the USD value, you will see the date and time when the inquiry was converted.
Comment
If you have received a transaction the GUI allows you to add a comment on the approve decline step. This comment is internal and won't be seen by the originator VASP.
Risk Score
This field will appear if you setup a risk analysis tool such as Chainalysis, and the transaction is of type Received and was Executed using TRP. For this you need to add the Chainalysis API key in the configure your VASP page.
Beneficiary Name
The first and last name of the customer who is receiving the virtual asset. If you have configured the beneficiary name matching, when receiving a transaction from the originator that is withing the typo tolerance you have selected, you will see the following on the beneficiary name on the transaction details table:

Beneficiary VASP Name
The name of the VASP of the customer receiving the virtual asset. This name is associated with a LEI.
Beneficiary VASP LEI
The LEI (Legal Entity Identifier) of the VASP who is receiving the virtual asset.
Beneficiary Wallet Address
The Wallet Address of the customer receiving the virtual asset of the transaction. This field will only show up if the transaction is of type Received and was Executed or Registered. Clicking on it will open a new tab showing the Blockbook Block Explorer where you will be able to see the details of this particular address.
Originator Name
The first and last name of the customer sending the virtual asset.
Originator VASP Name
The name of the VASP of the customer sending the virtual asset. This name is associated with a LEI.
Originator VASP LEI
The LEI (Legal Entity Identifier) of the VASP who is sending the virtual asset.
Originator Internal Account Number
An account number to identify the customer sending the transaction. Each customer should have their own Account Number.
Originator Address
The Address where the customer resides. This can be found on their passport or country ID.
Export

This will download an .xlsx (Excel) spreadsheet with the data of this particular transaction. This can later be imported to any spreadsheet software for further manipulation of data.
Download Report

This will download a .doc file with a written report template of the transaction. You can manipulate this on text editing software. Take into account this button will not show on transactions that used email as a protocol.
View Visual Proof

On manually archived transactions you can view a visual proof of the transaction. By clicking on this button the file that was uploaded will appear for future reference.
Self-hosted Wallets
This is the page used to verify self-hosted wallets to prove address ownership.
This page consists of:
Proofs Overview
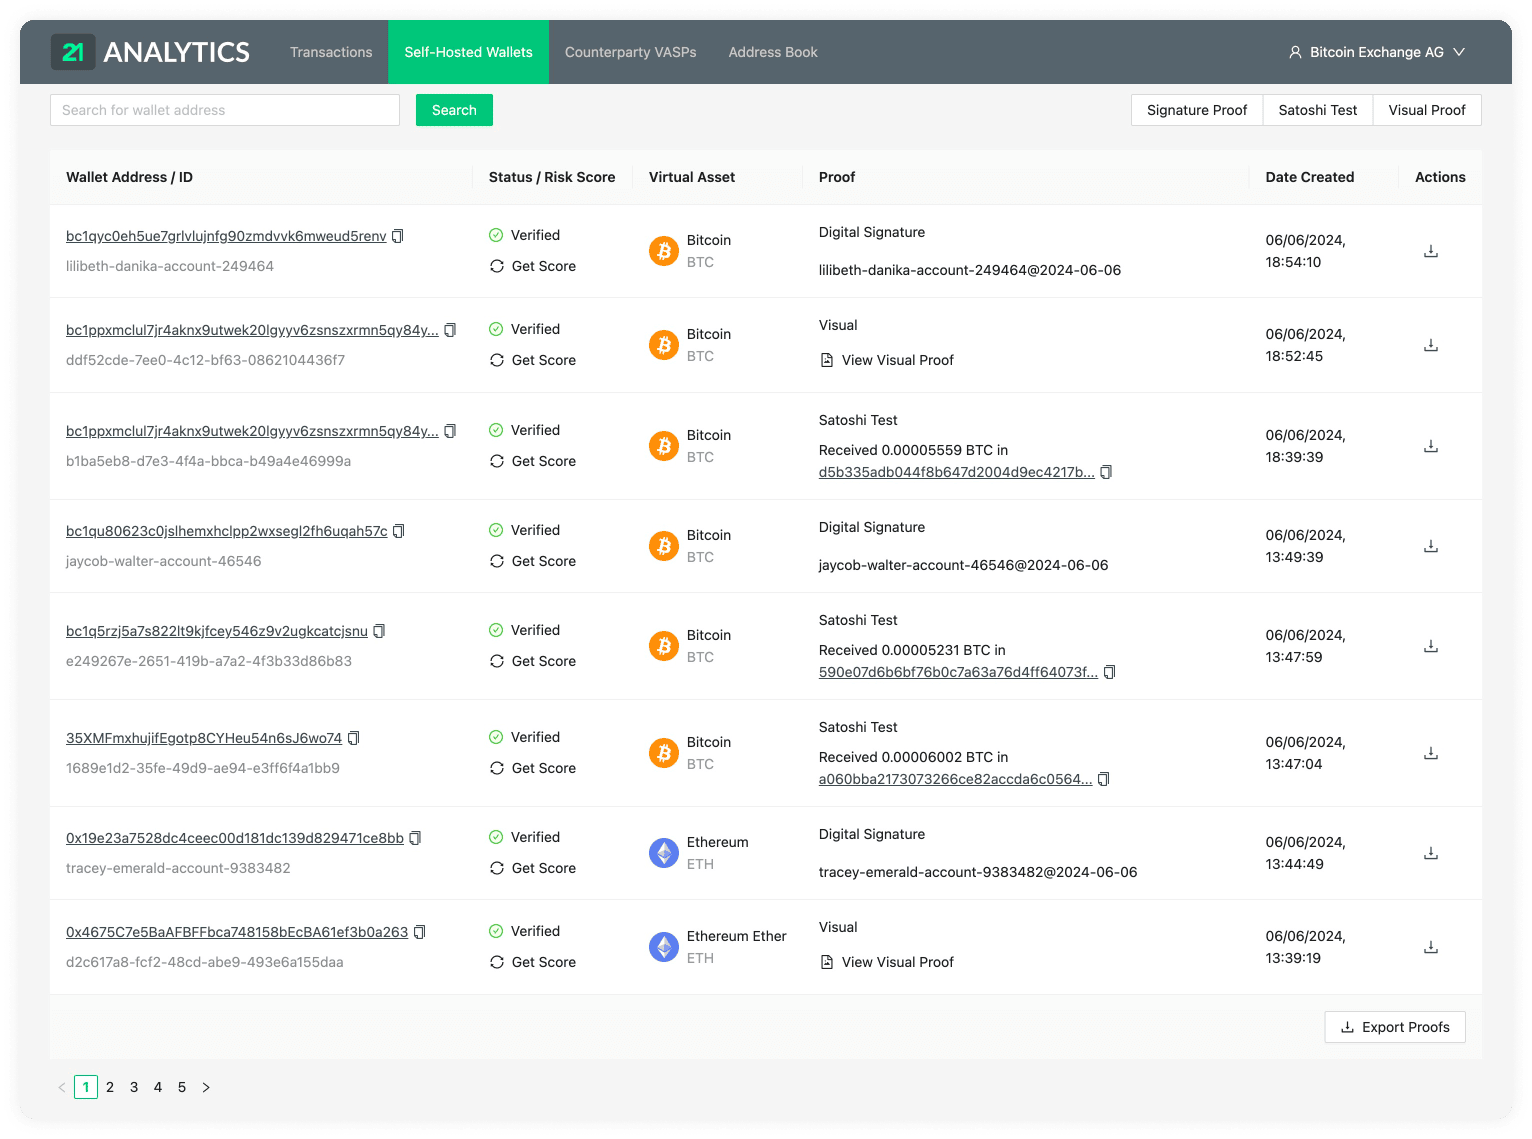
Wallet Address Search Bar

Address Ownership Proof Methods:

Export Proofs

Proofs Overview
Our proofs overview allows you to easily navigate through all the self-hosted address ownership proofs.
The table consists of the following fields:
Wallet Address / ID
Status / Risk Score
Virtual Asset
Proof Type
Proof
Date Created
Actions
Wallet Address / ID
The wallet address that is being checked for proof of ownership. These refer to an external self-hosted address of one of the customers of your VASP. Clicking on it will open a new tab showing the Blockbook Block Explorer where you will be able to see the details of this particular address.
Each proof has a unique ID which can be found under the wallet address.
Status / Risk Score
Can be either Verified, Pending or Failed.

Proofs that were successfully confirmed will go into a Verified status.
Pending and Failed are specific to the Satoshi Test proof type.

If it’s Pending, it means the blockchain transaction has not yet been transferred; this means the wallet ownership is not yet confirmed.

If the specified amount was not sent within the 48 hour time frame from the Date Created, the transaction will fail, and there will be no proof of ownership for this particular address.
For the risk score, a blockchain analytics tool needs to be set up and you will see a score of either Severe, High, Medium or Low.
Virtual Asset
The Virtual Asset that the external self-hosted wallet holds.
Proof
The method type used to show proof of ownership of the customer's self-hosted wallet. We currently have three options:
- Signature Proof
- Satoshi Test
- Visual Proof
The method type selected will be displayed above the proof data on each row.
Signature Proof
If you used the signature proof method, this field would show the message used to create the digital signature.
Satoshi Test
If successfully verified, this will show a message like the following:
Received 0.00005175 BTC in 232025407cae6b158c67af3d4c590012f...
if pending, it will show the following message:
14UAZPRVtNb5T5nbRLoGJmj5U6n9CmeY2Q must be verified within {HOURS_SET_ON_CONFIG}h
If you hover over this, a tooltip will display the full message with a copy button for the whole message.
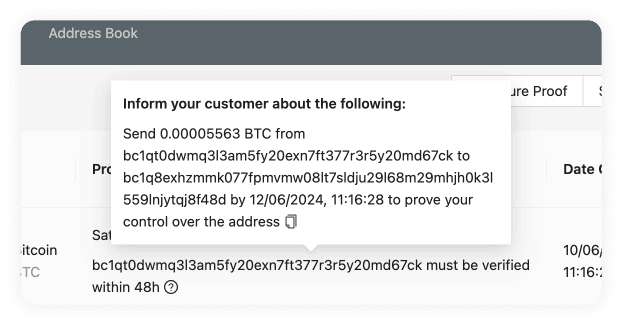
In the case the transaction fails, the field will show something like this:
Expired without proof on 21/02/2023, 13:46:18
Visual Proof
For Visual Proof, this field will show a button to view the proof. This should open a new tab with the file.

Date Created
The time and date the proof method was created. The format shown is day/month/year and hour/minutes/seconds. The time will be shown in the time zone configured in your browser and can be seen by hovering over the transaction date. This will reveal a tooltip with the timezone: continent/city format.
Actions
There are two actions available on the actions field; the Save As File and the Verify buttons.
Save As File

This allows you to download an .xlsx (Excel) with the data about this proof.
Verify

This action is specific to the Satoshi Test. Once the transaction has been checked on either a VASP wallet address or a blockchain explorer, you can click this button to verify the transaction.
Detailed Proof
Can be any of the three proof types:
When you click on one of the rows in the Proofs Overview table, a pop-up will open.
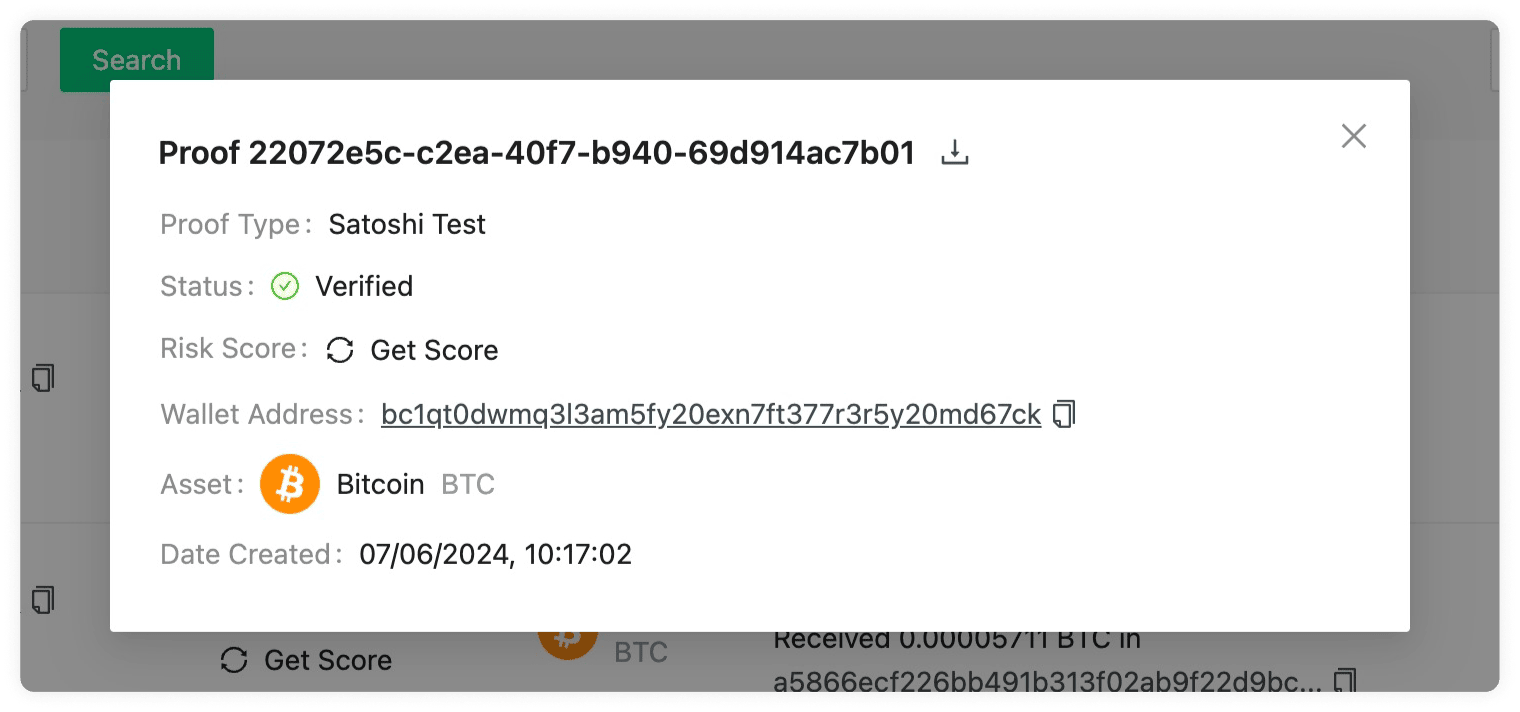
You can find the descriptions to these fields on the Proofs Overview page. All the proofs have the following fields:
- Proof ID
- Export Proof
- Proof Type (Signature Proof, Satoshi Test, Visual Proof)
- Status (Verified, Pending, Failed)
- Risk Score (Severe, High, Medium, Low)
- Wallet Address
- Asset
- Date Created
Signature Proof
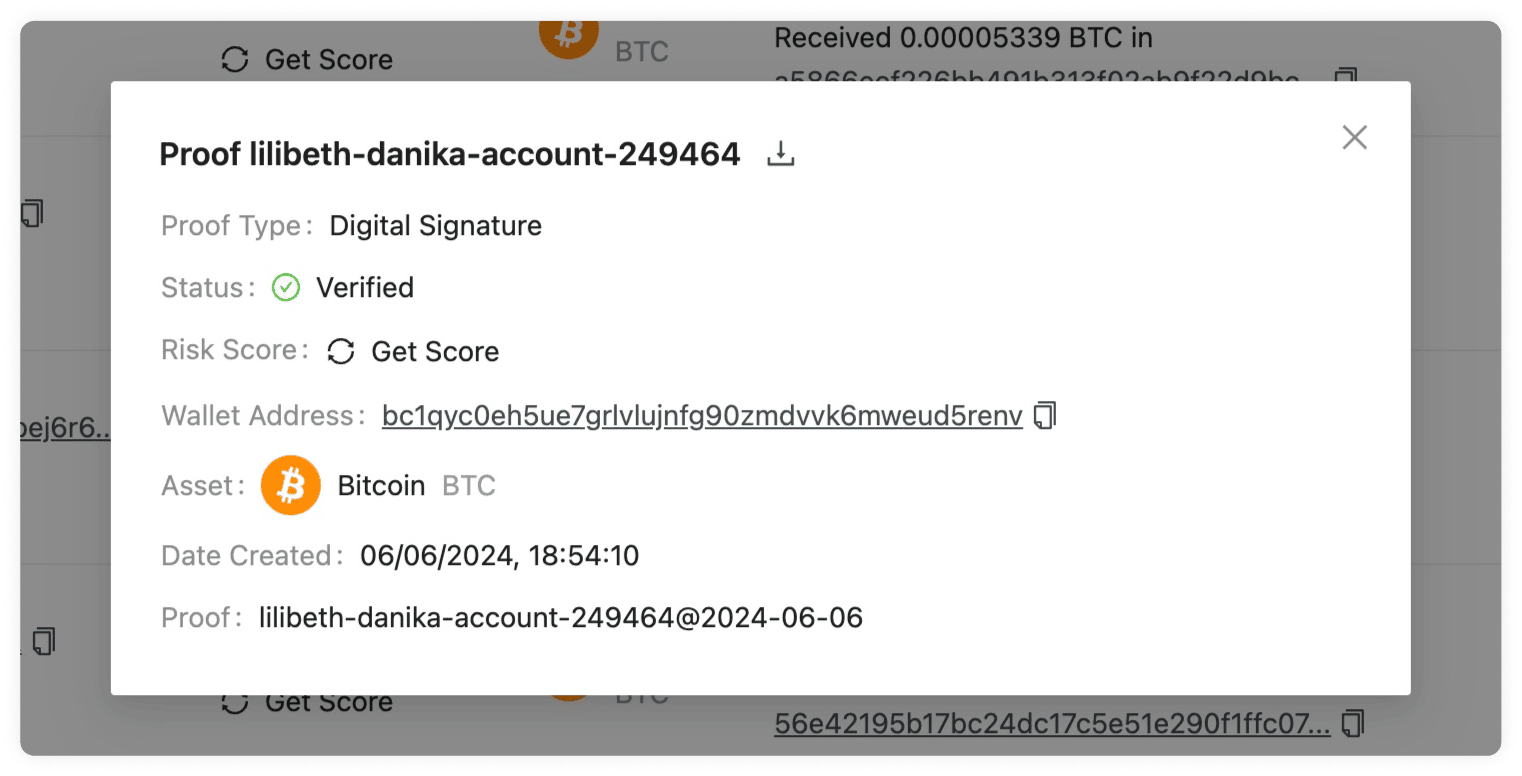
Has the additional Proof field which shows the message used to create the
digital signature. To add a signature proof you can follow the instructions on
the Signature Proof page.
Satoshi Test
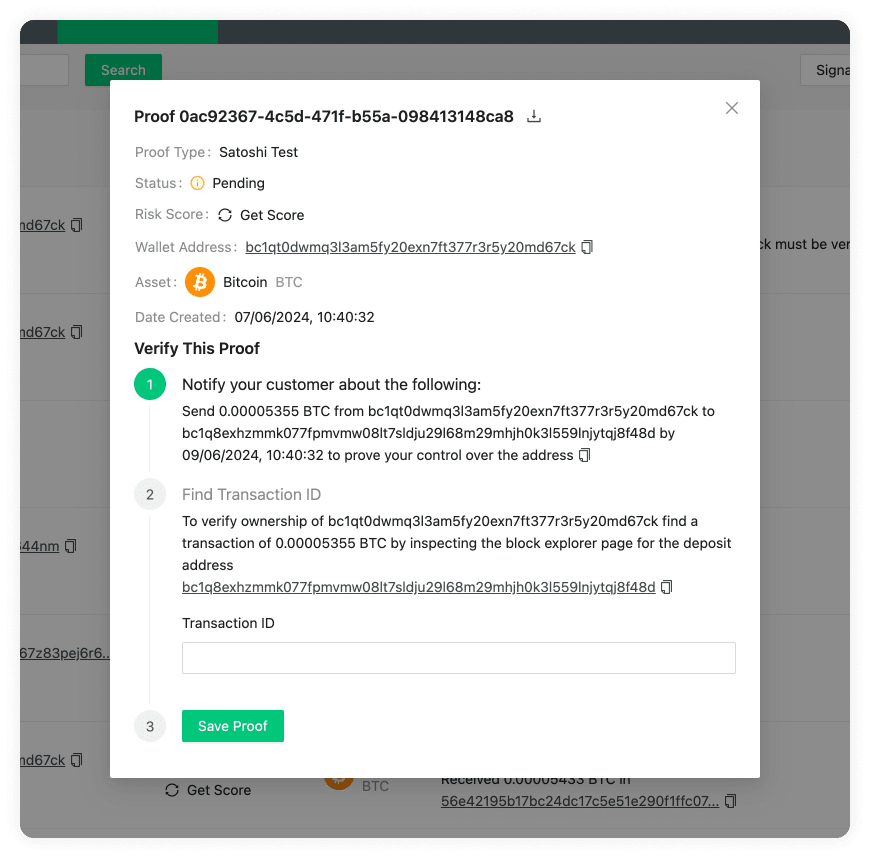
If pending it will show the Satoshi Test steps pop-up. If successful it will show the fields shown in the example image above. You can find more information about the Satoshi Test on the Proofs Overview page. To add a Satoshi Test you can follow the instructions on the Satoshi Test page.
Visual Proof
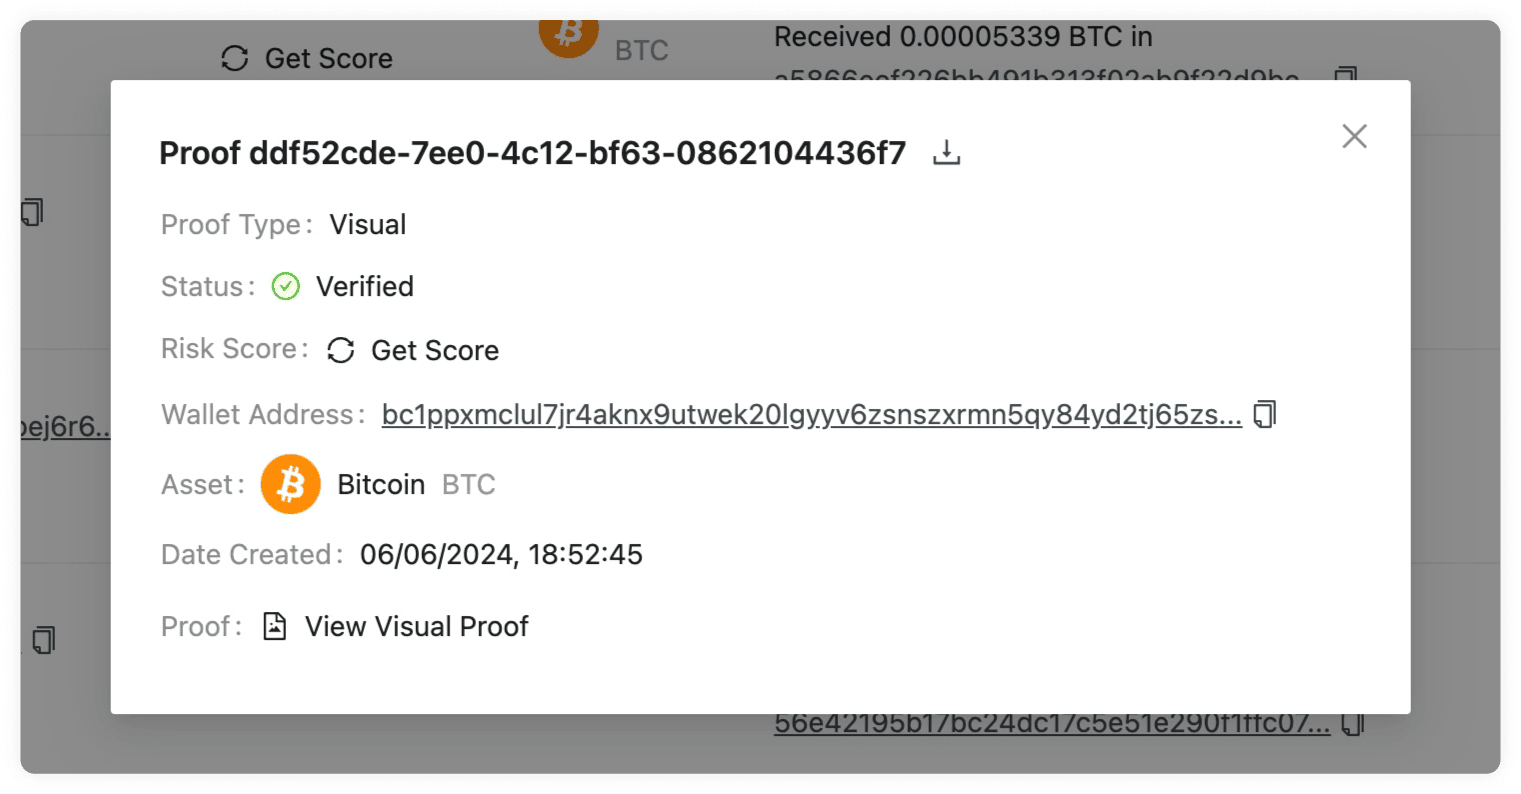
Has the additional Proof field which shows the file uploaded. You can click on
this to download the file. To add a visual proof you can follow the instructions
on the Visual Proof page.
Wallet Address Search Bar
Enter a wallet address into the Wallet Address Search Bar to obtain the corresponding ownership proof. In the Satoshi Test proofs it will search for the Customer's Wallet Address and not the VASP Deposit Address.
The search result will be displayed in a proof details pop-up.
Signature Proof
Note: We recommend that you automate this manual process using Quickproof.
Signature Proof allows you to verify address ownership through a digital signature. This digital signature should be created on a self-hosted wallet. You can add the proof by clicking on the following button:

A pop-up will prompt and require you to add some information to verify ownership.
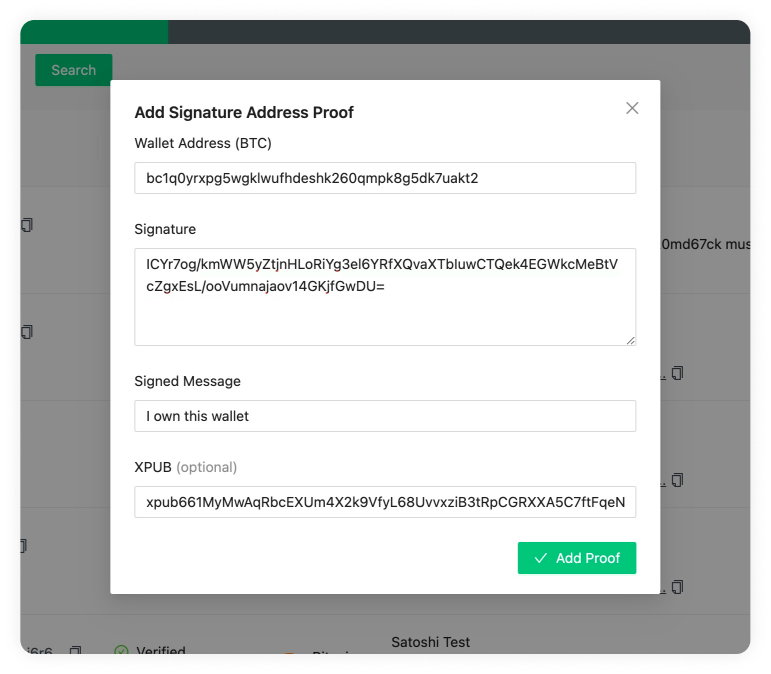
This data should be copied and pasted from the customer's self-hosted wallet and sent to you. If you add the data and the signature is valid, it means the customer could create the digital signature from their self-hosted wallet.
You can optionally add an xpub. An xpub is beneficial because it provides a secure, convenient, and scalable method for verifying all Bitcoin addresses belonging to the same wallet with a single proof.
Satoshi Test
Note: We recommend that you automate this manual process using the API.
This proof method involves the customer sending a minimal amount of a virtual asset to verify they own the self-hosted wallet account. To initiate a Satoshi Test, you can click the following button:
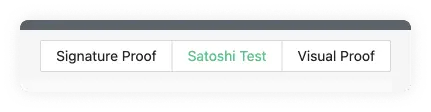
A pop-up will appear requesting the VASP Deposit Address, the Customer's Wallet Address and the Virtual Asset.
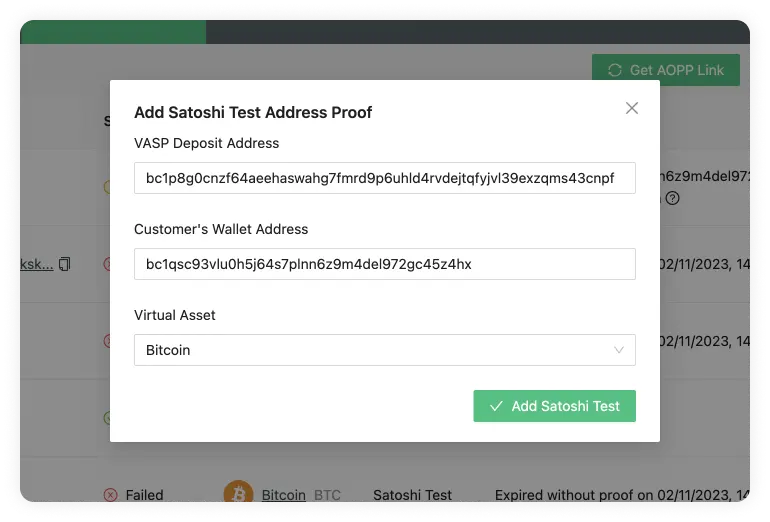
The first would be the address the customer holds at your VASP, and the second will be the address you want to verify ownership of. Lastly, the virtual asset used.
Once all the data has been added and you clicked on the Add Satoshi Test button, you will see the following pop-up:

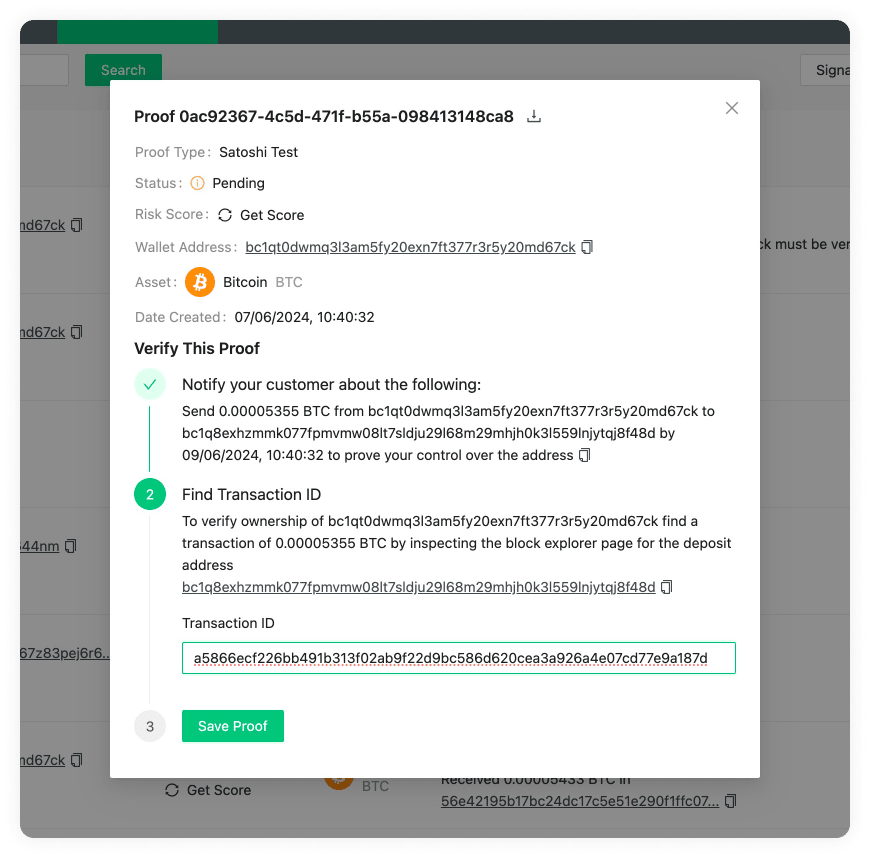
This is a three step pop-up with the instructions to verify, as well as the details of the entry. If you wish to change the amount that should be transferred, you can always modify this in the Configure Your VASP settings.
If you don't have the Transaction ID yet, you can click the X button in the
pop-ups upper right corner to close it and return to the proofs overview where
you will find the following row. Once the transaction has been confirmed on the
blockchain, you can verify the ownership of the address in the
Proofs Overview entry. You can now click on the verify
button represented by a tick (✔).

This will open a pop-up. In this pop-up you can see the instructions to follow.
Using a block explorer, one must find the transaction with the defined Satoshis.
Once found, the transaction ID needs to be introduced in the Transaction ID
input field.
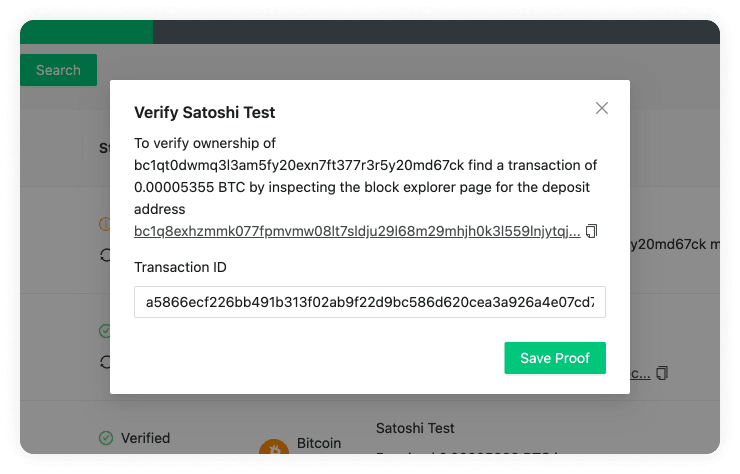
Alternatively, you can click on the entry row instead of the verify button and the initial three step pop-up will open.
Visual Proof
Note: We recommend that you automate this manual process using the API.
This verification ownership method allows you to upload an image or video of a screenshot to prove the ownership of a customer's self-hosted wallet. You can add a new visual proof by clicking the following button:

This will prompt a pop-up where you can upload a screenshot and add the address of the self-hosted wallet of your customer.
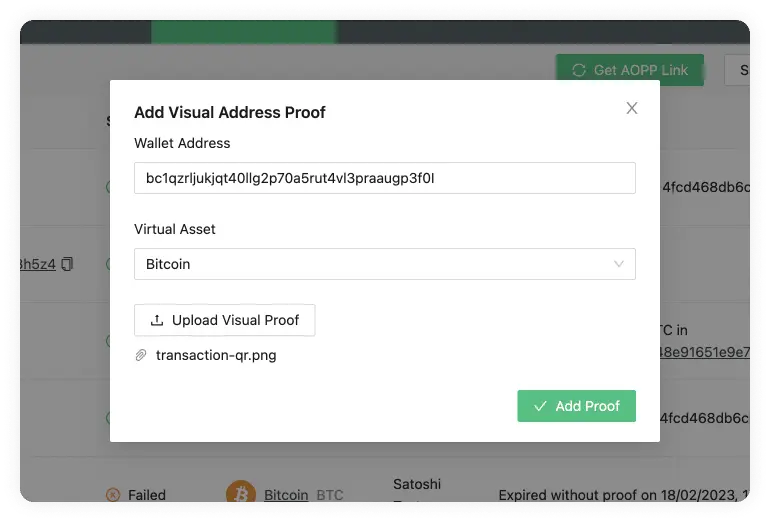
Export Proofs
The Export Proofs button allows you to export all the proofs as an .xlsx (Excel) file. This can then be imported to a spreadsheet software to further manipulate if needed, which comes in handy for filtering and ordering data in a specific way. It also allows you to search for a specific entry. The 21 Analytics team prioritised the export functionality since it allows compliance officers to use software they are familiar with and allows for an additional method of storage. Please contact our team if you have any extra functionality requirements.
Audit Log
The Audit Logs page is used for internal purposes. It gives you an overview of every action committed on the 21 Travel Rule software and who did it.
You can find the audit logs page to the right of the header.

The page consists of two distinct parts:
Audit Log Overview
This is the table where the audit log data is represented.
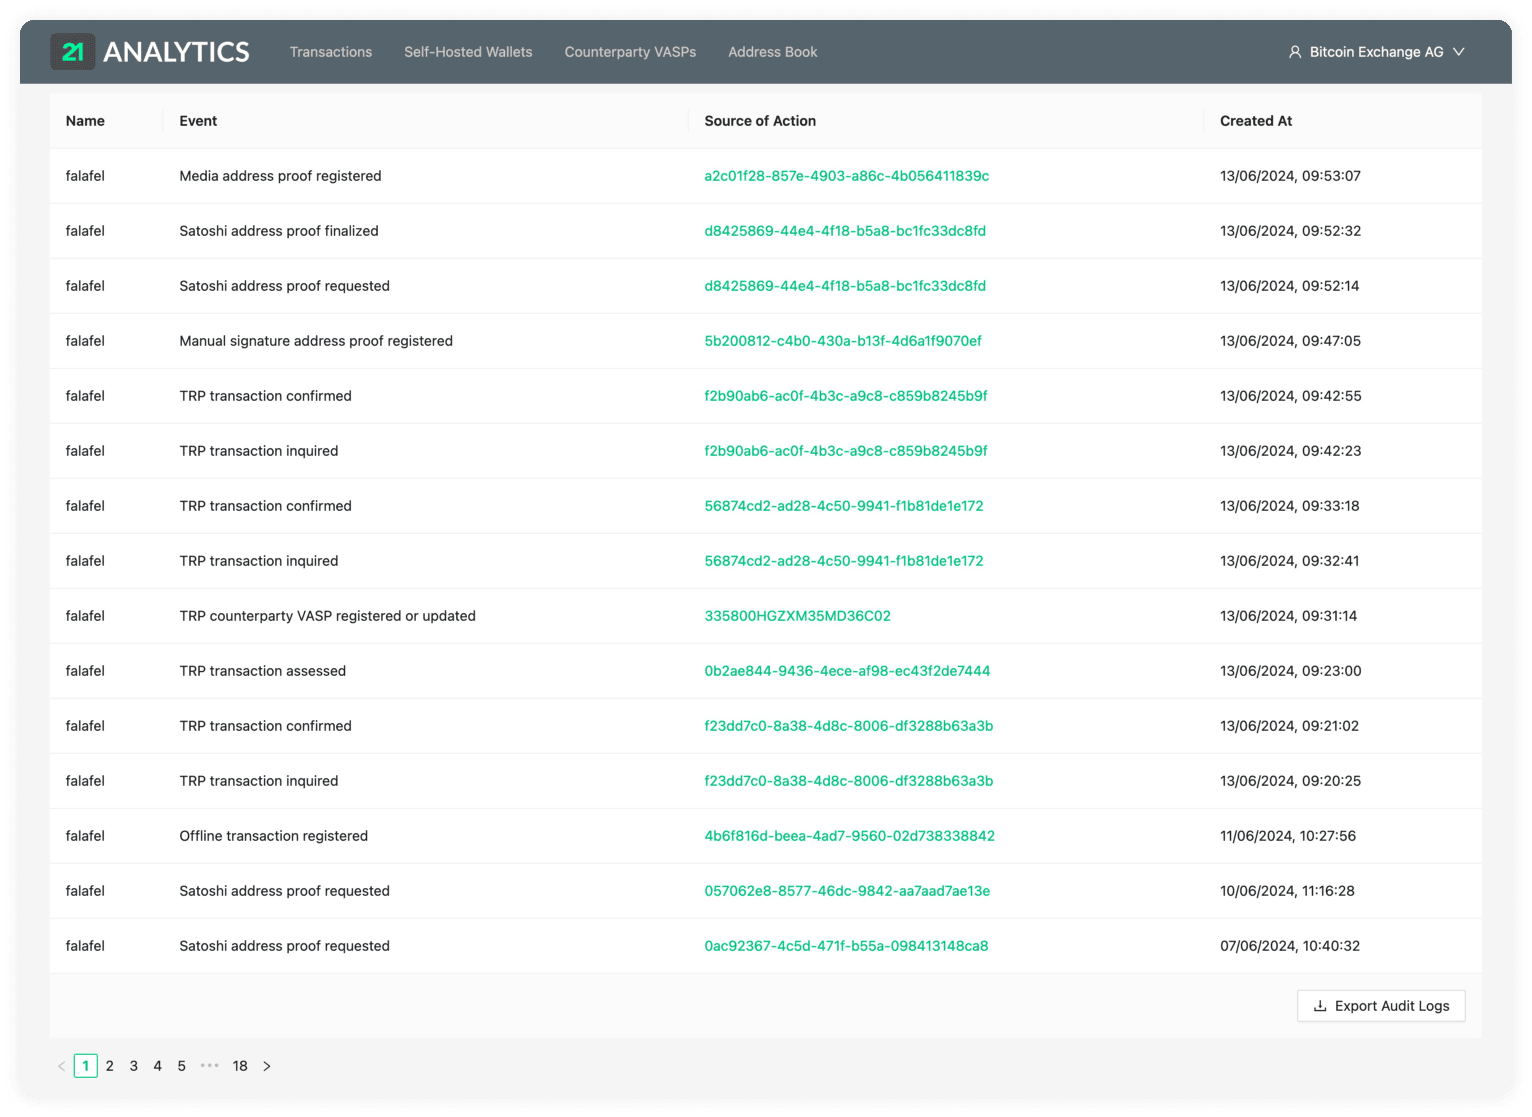
The table consists of:
Name
Event
Source of Action
Created At
Name
This is the name of the account that took a specific action/event on the 21 Travel Rule.
Event
These are the actions taken on 21 Travel Rule. These are some examples of events that can be found:
- User logged in
- User logged out
- Unsuccessful login attempt
- TRP transaction assessed
- TRP transaction canceled
- TRP transaction confirmed
- TRP transaction inquired
- Email transaction registered
- Offline transaction registered
- AOPP address proof requested
- Satoshi address proof requested
- Satoshi address proof finalized
- Media address proof registered
- Manual signature address proof registered
- TRP configuration updated
- Email configuration updated
- Address ownership settings updated
- Email counterparty VASP registered
- Email counterparty VASP distrusted
- Email address of an Email counterparty VASP updated
- TRP custodial user registered
- TRP counterparty VASP registered or updated
- Risk rating of a TRP transaction updated
Source of Action
These are represented with a unique ID. Most of the sources of action will be show in green which means they are a link to the specific event that took place. Events like logins and logouts don't have this functionality.
Created At
The date and time the event took place.
Export Audit Logs

The Export Audits button allows you to export all the proofs as an .xlsx (Excel) file. This can then be imported to a spreadsheet software to further manipulate if needed, which comes in handy for filtering and ordering data in a specific way. It also allows you to search for a specific entry. It allows compliance officers to use software they are familiar with and allows for an additional method of storage and processing. Please contact our team if you have any extra functionality requirements.
Quickproof
Introduction
Using Quickproof, VASPs can easily generate unique URLs that allow their customers to prove ownership over a self-hosted wallet. These proofs will be sent to, verified by and stored in 21 Travel Rule.
Workflow
- A VASP's customer is required to submit proof of ownership for an address.
- The VASP generates a unique proof ID which it associates with the customer.
- The VASP uses the proof ID to assemble a Quickproof URL following the detailed explanation below.
- The VASP loads the Quickproof URL in an
iframeor redirects the customer to the Quickproof URL. - The customer completes the ownership proof and (if necessary) is redirected back to the VASP's main page.
- The VASP receives a notification about the completed proof via the GraphQL subscription API.
- The VASP correlates the proof ID from the subscription notification with the proof ID it has generated in step 1 and proceeds accordingly.
Quickproof URL composition
Quickproof requires a URL with a specific format. An example of what it can look like is shown below.
https://quickproof.vasp.com/withdraw/wallet/someid
Below, the URL's components are discussed.
Domain
Given the URL above, quickproof.vasp.com represents the domain. It is set
during
deployment in the Caddyfile.
Transaction Type
Quickproof requires choosing between the withdraw and deposit transaction
type. This is done by selecting either the /withdraw/wallet/ or
/deposit/wallet/ path in the URL. The key difference is that the deposit
transaction type will require the customer to submit his
xpub key.
Proof ID
/someid is the last segment in the URL's path and represents the proof ID. The
proof ID enables a VASP to correlate received proofs with their customer. The
proof ID is a one-time use ID. Therefore, a new ID needs to be generated for
each proof of ownership. This ID will be included in the message to be signed by
the customer.
Optional Query Arguments
There are a few optional query arguments available.
https://quickproof.vasp.com/withdraw/wallet/someid?asset=eth&redirect=www.vasp.com
In the above example, both asset and redirect are used, but they can be used separately.
Asset
A VASP can add the asset query parameter /someid?asset=eth to specify the
asset required for the ownership proof. If the query parameter is omitted,
Quickproof will default to the Bitcoin (btc) asset type. The wallet options
presented to the customer are filtered by supported assets. Hence, the customer
is never presented with wallets that don't work for a particular asset.
Redirect
By using the redirect query argument /someid?redirect=www.vasp.com, a VASP can
redirect a customer back to its main site upon successful proof submission. A
valid URL must be entered, or the query argument will be ignored.
Wallet Address Picking Strategies
Different wallets will inhibit different strategies for picking an address for the ownership proof. These are detailed below.
BitBox
BitBox picks the next available address.
Ledger
Ledger picks the native segwit address at index 0. Native segwit needs to be configured in the settings of Ledger Live in order for the address to become visible.
Trezor
Trezor picks the native segwit address at index 0.